Search results for

Bread

How to make a homemade gingerbread house from scratch

Posted on December 3, 2020

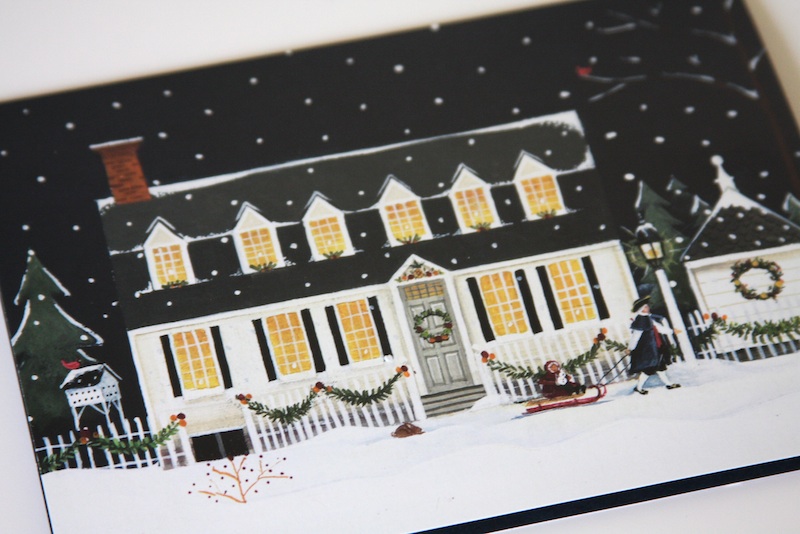
If you have ever made a gingerbread house from scratch, you know that it’s a labor of love. Between making the dough and the icing, cutting out each piece using a stencil, and then baking, decorating and glueing it all together, it takes a little bit of time to make, but it is so worth it in the end! It’s one of my favorite Christmas traditions and if you’ve never made a gingerbread house before, you should give it a try this Christmas! To me, there isn’t a more festive or Christmassy scent than gingerbread; that sweet and spiced aroma takes me right back to my grandparents’ kitchen table, baking gingerbread cookies, and impatiently waiting for the timer to ring so that I could see the little beauties I had created come out of the oven. As soon as they were done, they were quickly whisked away on a large wooden board to cool and then beautifully decorated. Don’t you wish you could bottle up that Christmas magic? There are a couple of tips and tricks that I’ve learned while making gingerbread houses over the last few years, and I would love to know any that you may have!

HOW TO MAKE A HOMEMADE GINGERBREAD HOUSE FROM SCRATCH

HOW TO MAKE GINGERBREAD COOKIE DOUGH
Since we never actually eat the gingerbread house, I don’t really care about the taste of it as much. I have used a store-bought gingerbread cookie mix in the past to speed things up and it worked just fine! This time, I used this recipe and it was great – I made it the night before, wrapped it in plastic wrap and chilled it in the fridge overnight, then let it come to room temperature before rolling it out.

HOW TO MAKE GINGERBREAD HOUSE STENCILS / TEMPLATES
I made my own stencils for this and all my gingerbread houses, but you can find plenty of templates online. Roll out your dough to about a 1/4″ to 1/8″ thickness (avoid using too much flour while rolling out the dough or brush it off the top of the cookies so your cookie can brown nicely while baking – if it comes out with flour residue after baking, simply brush it off with a soft pastry brush or paper towel). Cut out your shapes using a knife, and bake similar sized shapes together to ensure an even bake. Let cool on cooling racks COMPLETELY before icing.

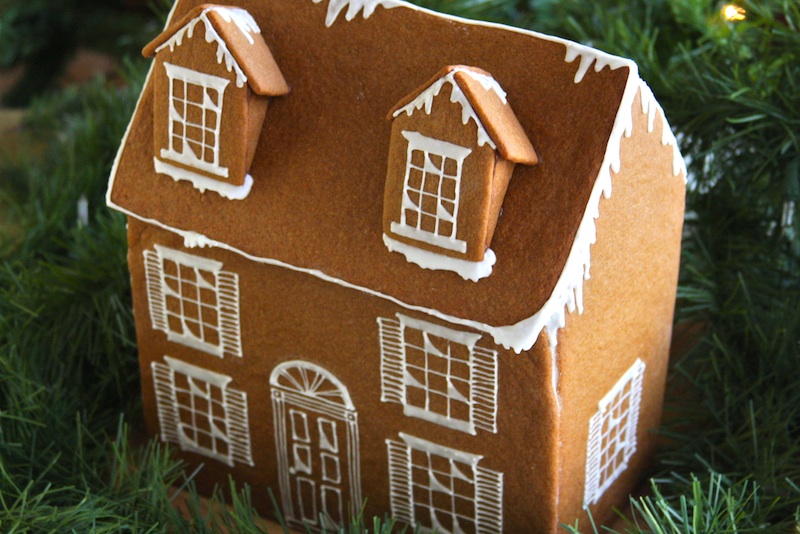
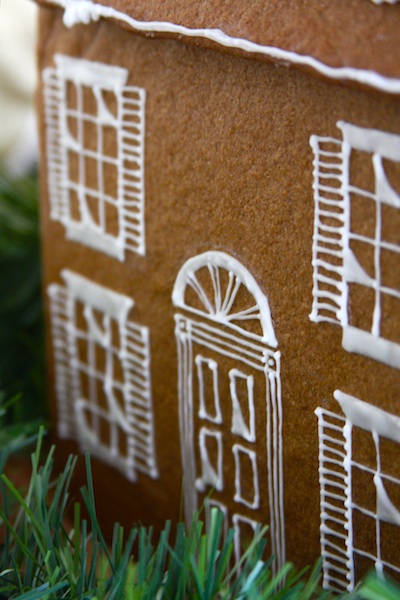
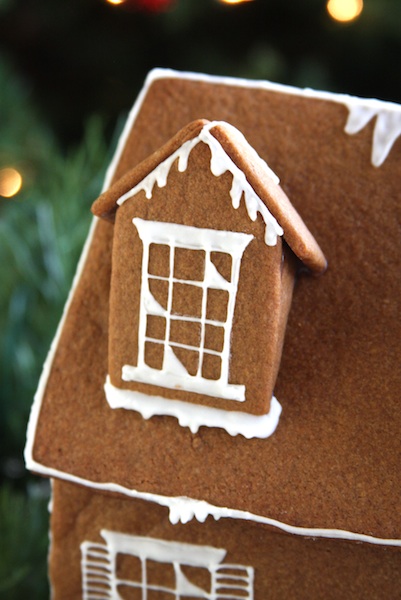
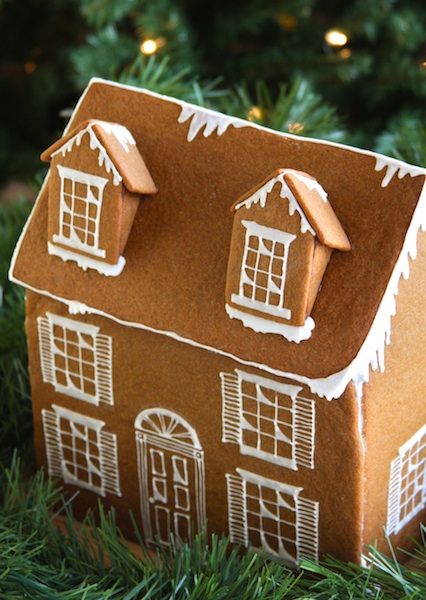
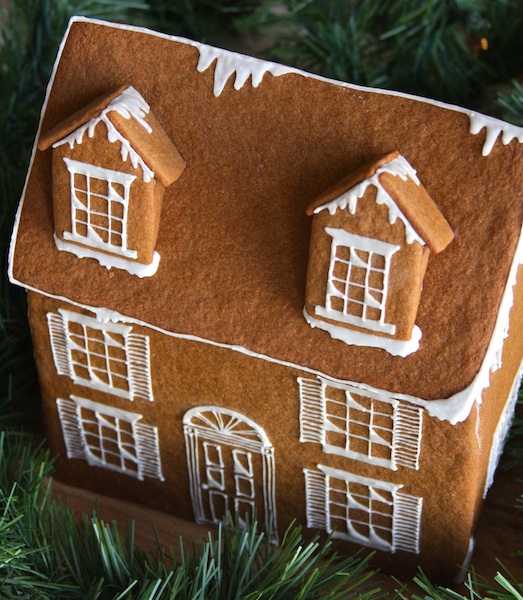
GINGERBREAD HOUSE ICING / HOW TO DECORATE YOUR HOUSE
I have tried so many different icing recipes in the past, and this one works really well. You may need to add a little more confectioners’ sugar to give you the consistency you’re looking for – you want the icing to be thick enough to hold it’s shape on the cookies, but not too thick where you can’t pipe it. My #1 tip is to decorate each side of your gingerbread house BEFORE you glue it together, it is so much easier! I always decorate each “wall”, let it dry completely before glueing the house together, and then use more icing to pipe on the “snow” and “icicles” hanging off the roof. I have also made my icing in advance in the past, and let it sit in the fridge overnight (in a ziplock bag or airtight container) and it was fine. The icing is actually easier to work with when it’s a little colder.

HOW TO GLUE YOUR GINGERBREAD HOUSE TOGETHER
This is the stressful part!!! There are a couple different ways that you can do this, but most importantly, make sure that the icing on your gingerbread has completely dried before you start putting your house together. This year, I used this caramel syrup for the first time, and it was the best kind of “glue” I’ve used. (*Note – I used the full amount of sugar but only about 1 TBS of water. I burned my first batch of the caramel syrup and fully felt like I was on The Great British Bake Off as I quickly made another batch! The caramel goes from silky smooth to BURNT very quickly, so watch it carefully!) You have to work VERY QUICKLY once you have your caramel, because it hardens so fast!
I have also used the icing itself as glue in the past and it worked fine, but it can be messy and it takes a while to dry. (I have also used a hot glue gun in the past to do this – obviously don’t do this if you’re going to eat the gingerbread! It worked ok, but the grease in the cookies can make it hard for the glue to stay on.)

For some of my gingerbread houses from the past, check out THIS (still my favorite to date!) and THIS post!

I hope you have a wonderful December… it may be a different holiday season this year, but I hope that you find little things that bring you joy and brighten up the end of this often miserable and difficult year! Thanks for stopping by today!

Pumpkin Bread

Posted on September 16, 2020

After a very long, hot summer, this week finally brought those crisp September mornings I’ve been waiting for, and today was the perfect day for the first pumpkin recipe of the season! This has been a strange year to say the least, and having spent the majority of spring and summer in quarantine, it’s hard to believe that fall is almost here. If you’re looking for a pumpkin recipe to try out this season, this Pumpkin Bread has been one of my go to’s for a couple years now, and I hope you love it as much as I do; it’s sweet with a hint of warming spices, and with a cup of hot apple cider, it screams fall!

PUMPKIN BREAD
*Makes 1 loaf*
(Recipe adapted from Taste of Home)

YOU WILL NEED:
1 2/3 cup all-purpose flour
1 1/2 cups granulated sugar
1 tsp baking soda
1/2 tsp baking powder
1/2 tsp salt
1 tsp ground cinnamon
1/2 cup canola oil
1/2 cup water
1 cup pumpkin puree
2 eggs
1/2 cup chopped walnuts
1/4 tsp ground nutmeg
1/4 tsp ground cloves
Optional: 1/2 cup raisins

DIRECTIONS
1. Preheat your oven to 350 deg F and prepare your loaf pan (either grease it or line it with parchment paper.

2. In a large bowl, whisk together the eggs, oil, water and granulated sugar. Add pumpkin puree. Next, sift in all the dry ingredients and fold together gently until a smooth batter forms. (If you’re adding raisins fold them into the batter as well.)

3. Pour the batter into your prepared baking pan, and evenly sprinkle the chopped walnuts on top (*Note: you can also simply fold them into the batter instead of just sprinkling them on the top). Bake for 60 – 75 minutes, or until an inserted toothpick/cake tester comes out clean. (If the loaf starts getting too dark on top, loosely cover it with foil.) Let cool before slicing.


HAPPY BAKING!

No-Knead Cranberry Walnut Bread

Posted on March 21, 2020
No-Knead Cranberry Walnut Bread

It has been a strange week to say the least. Here in the New York metro area (northern NJ) we went from work as usual last week to finding empty shelves in grocery stores and everything around us rapidly shutting down this week. The eery uncertainty that’s in the air is unsettling, and I hope you are well wherever in the world you find yourself. With all this extra time at home over the last few days (and likely in the next coming weeks…) I turned to a couple of simple ingredients in my pantry in search of comfort. And they delivered, as they always do. This cranberry walnut bread is simply a variation of the very popular New York Time No-Knead Bread recipe. If you’ve never tried that recipe, it is the easiest thing in the world to make, and chances are you already have all the ingredients on hand, which is a major plus right now!

NO-KNEAD CRANBERRY WALNUT BREAD
(Recipe adapted from The New York Times No-Knead Bread recipe)
Makes 1 loaf

INGREDIENTS

3 cups all-purpose flour (plus extra for dusting)
1/2 tsp dry yeast
2 tsp salt
1 5/8 cup lukewarm water
1/2 cup to 3/4 cup coarsely chopped walnuts (depending on preference)
1/4 cup to 1/2 cup dried cranberries (depending on preference)
Optional: orange zest, tablespoon of honey, other nuts such as pecans

DIRECTIONS

1. Combine all the ingredients other than water in a large bowl and stir to combine. Add water and stir everything together until a sticky dough forms. Cover with plastic wrap and let rise in a warm spot for 12 – 20 hours.

2. At the end of the rising time, you should be seeing lots of bubbles on the surface of the very wet dough. Take the dough out of the bowl and form it into a rough round loaf on a generously floured surface. Sprinkle with more flour, cover with a kitchen towel, and let rise for another 2 hours. (I let mine rise on a large wooden board.)

3. Preheat your oven to 450 deg F (232 deg C), placing your baking dish (either a Dutch oven with a lid or a casserole dish with a lid) inside the oven while it preheats. Once the oven hits the right temperature, carefully remove the baking dish and place the dough inside (sometimes I use parchment paper on the bottom, sometimes I don’t) and bake with the lid on for 30 minutes, then remove the lid and bake for another 15 – 30 minutes, until the top has a nice color and sounds hollow when you tap it. Let the bread rest and cool for at least 10 minutes before slicing. It is best fresh, but is still good for the next couple of days, especially toasted, with some butter and jam!

(New York Times No-Knead Bread recipe)

I hope you are safe and healthy wherever you are, thanks for stopping by today! Happy Baking!

Gingerbread House 2016

Posted on December 11, 2016

Hey Everyone! I hope you are all having a great December and holiday season so far; it’s hard to believe that Christmas is less than two weeks away now! So little time, still so much to do… I don’t know about you, but I feel like time just goes faster and faster every year! I wanted to share one of my favorite Christmas traditions with you today, which is my gingerbread house! I’ve made one almost every year for the past couple of years (I shared this one and this one on the blog) and so I wanted to stop by and show you this year’s! My gingerbread house seems to get progressively more complicated every year, which means the process seems to get progressively more stressful every year… because there is seriously nothing more frustrating than something you’ve worked on for hours collapsing into a big sticky mess! This house would never pass a home inspection (ha!) but fingers crossed it’ll make it till Christmas! I had this vision of a New England-cottage-looking house in my mind, and this is how it turned out! Let me tell you a little more about how I made it, and some of the tips and tricks I’ve learned along the way…

This image has an empty alt attribute; its file name is Gingerbread-House-684x1024.jpg

I always start out with a picture in my head of what I want my gingerbread house to look like… I’ve never really followed a picture or an example, but there are so many out there that you can use for guidance and inspiration! I drew a couple rough sketches of what I wanted to make, and then made templates out of card stock (*Tip: save those templates for next year! It’ll save you time if you want to make a similar looking house again). The process of making a gingerbread house can be pretty time consuming, so one of my favorite shortcuts is to use a store-bought gingerbread cookie mix. I almost always make everything from scratch, but for the sake of time, I always use a mix for this dough! (I used one package of gingerbread cookie dough mix for this house.) I roll out the dough pretty thin, then lay the templates on top and carefully cut around them, then transfer them onto a parchment paper lined baking sheet. Baking time will vary for the different pieces (longer for larger pieces, shorter for the smaller ones), so just watch your oven!

This image has an empty alt attribute; its file name is Homemade-Gingerbread-House-684x1024.jpg

Make sure all the pieces are completely cooled before you start, you could even bake everything off the night before. I’ve played around with different icing recipes, but this year I used this one, with just a slight alteration – I didn’t use quite as much sugar. This is another thing that you just need to play around with. Add the sugar in portions, adding just enough to make the icing thick enough so it’s not runny anymore, but not too thick where it won’t go through a piping bag. My biggest tip is definitely to decorate each face and piece of the gingerbread house BEFORE putting it together! It is so much easier to have the pieces laying on a flat surface than trying to do it once it’s all put together! I like to cut the tip of the piping bag as little as possible so I can get really thin lines, it just makes everything look cleaner.

This image has an empty alt attribute; its file name is Gingerbread-House-2-666x1024.jpg

Once you’ve decorated all the sides, the fun part begins… trying to put everything together! This is honestly the part when I tell myself I will never make one of these ever again, because trying to get all the parts to stick together can be a serious nightmare! This is why you need your icing to be pretty thick, so it can act as the glue and it doesn’t run all over the place. Build the four walls first – it’s a good idea to have heavy things like cans or bottles on hand to secure the walls until the icing dries. Next, add the roof and any other pieces on top. It’s probably a good idea to build the house on whatever surface you’ll be displaying it on, so you don’t risk it falling apart when you move it, but if you do move it, just make sure all the icing has set and dried completely. I carefully moved mine onto a white cake stand that I lined with some fresh greens for a clean & simple look. And that’s pretty much all there is to it! I hope you have fun making your gingerbread house if you make one, and enjoy all your Christmas traditions that make the holiday season so special! Thanks so much for stopping by today, have a wonderful week!

Strawberry Bread with Greek Yogurt

Posted on May 3, 2015

Hey Everyone! Happy May! How did this happen?! Sometimes it feels like the days and weeks just drag on, and other times, it feels like life is speeding ahead at a thousand miles an hour. It definitely feels like the latter is happening around here these days, and I can’t believe that the summer is almost here! I wanted to stop by and share this Strawberry Bread with Greek Yogurt recipe with you today, since it’s the perfect “almost summer” quick & easy recipe, and with strawberry season coming up soon, it’s a great seasonal quick bread to make! Greek yogurt is one of my favorite things to bake with, because it always keeps cakes and breads so moist. I always use it in banana bread, and it works great in other quick breads too! You could of course use other berries, like blueberries, raspberries or blackberries in this recipe instead, and even do a simple confectioners’ sugar glaze on top… that’s the great thing about quick breads, you can add whatever looks good in your fridge or pantry! Here’s how to make this strawberry bread…

Strawberry Bread with Greek Yogurt
STRAWBERRY BREAD WITH GREEK YOGURT
*Makes 1 loaf*
(Adapted from The Smitten Kitchen)

YOU WILL NEED
1 1/2 cups all-purpose flour
1 cup granulated sugar
2 tsp baking powder
1/2 tsp salt
3 eggs
1/2 tsp pure vanilla extract
1 cup plain Greek yogurt (I use fat free yogurt)
1/2 cup vegetable oil
1 – 1 1/2 cups fresh strawberries + 1 tbs all-purpose flour

Strawberry Bread with Greek Yogurt

DIRECTIONS

1. First, preheat your oven to 350 deg F, and grease (or line with parchment paper) a standard sized loaf tin. In your electric mixer bowl, whisk together the sugar, eggs, pure vanilla extract, vegetable oil and Greek yogurt. Once you have a smooth, creamy mixture, sift in the flour, baking powder and salt, and mix until you have a smooth batter.

2. Chop your fresh strawberries into small pieces (about the size of blueberries), then gently toss them with the tbs of all-purpose flour (this will prevent the strawberries from sinking to the bottom of the loaf as it bakes). Using a spatula, gently fold the strawberries into the batter (reserving a couple to sprinkle on top of the loaf), then pour it into your prepared loaf tin. Sprinkle the remaining strawberries on top, then bake the bread for 50 minutes to an hour, until an inserted toothpick comes out clean! (If the bread browns too much as it bakes, simply cover it with some foil to prevent burning.) Let cool before slicing.

Happy Baking, Everyone!
I will be linking to these awesome blogs!

Nutella Swirled Banana Bread

Posted on March 15, 2015

Hi Everyone! I hope you had a good weekend and are ready for the last couple of days of winter before spring officially begins in just five days! But before the week begins, I have a banana bread recipe to share with you. And it’s not just any banana bread recipe, it’s a Nutella Swirled Banana Bread recipe! Because Nutella makes everything better, including banana bread! To tell you the truth, I try not to buy Nutella too often because it inevitably ends with giant late night spoonfuls of it… but every once in a while, I give into the craving and buy a jar! I used my favorite banana bread recipe that uses Greek yogurt for this, added dollops of Nutella on top, and created the swirls using a knife. I love banana bread as it is, but adding the Nutella swirls to it just makes it that extra little bit more delicious!

 Nutella Swirled Banana Bread
NUTELLA SWIRLED BANANA BREAD
*Makes 1 loaf*

YOU WILL NEED
1 recipe banana bread (this is my favorite!)
A couple of spoonfuls of Nutella

Nutella Swirled Banana Bread

DIRECTIONS

1. Follow the directions for making banana bread like you normally would (this Chocolate Chip Banana Bread with Greek Yogurt is my absolute favorite recipe for banana bread! It always comes out super moist and stays fresh for days! I use it for this Nutella Swirled Banana Bread too, but I omit the chocolate chips – you can definitely keep them in the recipe for additional sweetness if you like – and I add chopped walnuts).

2. Preheat your oven to 350 deg F and grease your loaf tin (or line it with parchment paper). Pour your banana bread batter into your prepared loaf tin, then add a couple of spoonfuls of Nutella on top, distributing them over the whole loaf. Take a knife and gently create swirls in the batter. (Make sure the Nutella is at room temperature and is nice and spreadable!) Bake for about 50 minutes to an hour, until an inserted toothpick comes out clean. Let cool in the baking tin for a couple of minutes, then transfer to a cooling rack.

  Nutella Swirled Banana Bread

For more Nutella and/or banana recipes, check these out!

Chocolate Chip Banana Bread with Greek Yogurt  Chocolate Banana Bread
Left: Chocolate Chip Banana Bread with Greek Yogurt (recipe here) Right: Chocolate Banana Bread (recipe here)

Banana Nutella Crepes Baked Banana Walnut Oatmeal
Left: Banana Nutella Crepes (recipe here) Right: Baked Banana Walnut Oatmeal (recipe here)

  Grilled Nutella, Peanut Butter and Banana Sandwich
Grilled Nutella, Peanut Butter & Banana Sandwich (recipe here)

Happy Baking, Everyone! I hope you all have a great week!
I will be linking to these awesome blogs!

Vanocka – Traditional Czech Sweet Bread

Posted on February 23, 2015

Hello Everyone! I’m so excited to share one of my favorite family recipes with you today, for a Czech sweet bread called Vanocka. Sometimes, especially on the weekends, I really crave a sweet, indulgent breakfast, and this is one of my favorites. A vanocka is a rich, buttery braid filled with raisins and almonds, that’s beautifully golden brown and glossy on the outside (sometimes dusted with confectioners’ sugar), and super soft and rich on the inside; utter heaven in a bite. What’s even better is that you spread it thick with some butter and (preferably homemade) jam… what could be better with a big cup of tea on a lazy weekend morning or cold wintery afternoon! Traditionally, this bread is made for Christmas, but it’s baked and sold in stores all year round, so it’s not necessarily just a holiday treat. This recipe is one that I’ve adapted from my grandmother’s recipe, which we’ve been baking for years. I love the consistency of this dough; it’s so soft and it rises beautifully, making this bread wonderfully rich and fluffy. The perfect slice of home when I’m craving one!

Vanocka

YOU WILL NEED

4 to 4 1/2 cups all-purpose flour

3/4 cup granulated sugar

1/2 tsp salt

1 package instant dry yeast

1 stick (8 tbs) unsalted butter, softened

2 egg yolks

250 ml lukewarm milk (approx. 1 cup + 2 tbs)

Handful of raisins

Handful of sliced almonds

Egg wash: 1 egg & 1 tbs water

Optional: confectioners’ sugar for dusting

Vanocka

DIRECTIONS

1. In a small bowl add the dry yeast to the lukewarm water, cover and let sit for about 5 minutes, until the mixture is frothy on top. Then, pour it into the bowl of your electric mixer, and add in the flour, sugar, 2 egg yolks, softened butter and salt, and mix until a soft dough forms. (I usually add in the four cups of flour, and if the dough is still too wet and unworkable, I add in more flour by 1/4 cups, so you may need more than 4 1/2 cups of flour, or may not. The amount of flour I add in differs almost every time, so add in just enough to have a soft dough.) Towards the end, add in the raisins and almonds (reserve enough sliced almonds to sprinkle the top of your braid at the end), and form your dough into a ball. Place in a large, lightly greased bowl, cover and let rise in a warm spot until doubled in size (1 – 2 hours).

2. Once your dough has risen, take it out and divide it into 5 pieces (3 large, and two smaller. The three larger pieces will be for the large bottom braid, the two smaller pieces will be for the “twisted” braid that will go on top of the large braid.) Roll each of your 5 pieces of dough into a rope. The three larger pieces should be rolled into a rope about 22 inches long each, the smaller pieces should be rolled into a rope about 14 inches long each.

3. Line a large baking sheet with parchment paper. With the three longer ropes, make your braid directly on the parchment paper lined baking sheet (braid the ropes like you would your hair, and make sure you don’t braid it too tightly, the braid will expand as it rises again and bakes, so do it pretty loosely. Tuck in the ends underneath). Twist the two shorter braids together, then place them on top of your braid, tucking the ends under too. Cover with a kitchen towel, and let rise for another 30 minutes.

4. Preheat your oven to 350 deg F. Make your egg wash by whisking together an egg with a tbs of water, then brush your whole bread with it, and sprinkle it with your remaining sliced almonds. Bake for about 45 minutes to an hour, or until nicely golden brown and well baked through (and an inserted toothpick must come out clean). If the bread starts getting too brown as it bakes, cover it with foil so it doesn’t burn (I usually cover mine after about 20 minutes of baking). Let cool (and dust with confectioners’ sugar if you want some extra sweetness) before slicing, then serve with a generous spread of butter and your favorite jam!

(*Recipe notes: To make sure the raisins are plump, soak them in some boiling water for a couple minutes and drain them before adding them to the dough. You can use regular or golden raisins, or you could also add in candied fruit, as well as the sliced almonds or other chopped nuts. As for the bread’s shape, you could do the braiding differently – – for example do the bottom braid out of 4 ropes instead of three and the top part out of three ropes instead of a twist of two ropes, or even do three levels of braiding instead of two. I just do this because I find it the easiest. Some people insert skewers into the braided bread so the top layer doesn’t slip as it bakes, I don’t do this but you can do it if you’re worried about it slipping. By braiding the bottom braid pretty loosely and nestling the top one into it, it ensures that the bread holds its shape and there isn’t any slipping. You can simply form the dough into a round loaf and bake it off like that too, if you want to avoid all the braiding business and save some time. I adapted this recipe from my grandmother’s, and I converted all the metric measurements into cups. Also, make sure your ingredients are at room temperature since you’re baking with yeast, and this will help the yeast to work better and your dough to rise nicely. Traditionally, the vanocka is baked with fresh yeast, not packaged dry yeast, which may alter the texture/taste just slightly. The vanocka is definitely best eaten the same day, but you can store it for a couple days. I always toast mine in the toaster the next day, and it’s just as delicious as when it’s fresh!)

Vanocka

For more of my beloved family recipes, check these out:

Star Linzer Cookies  Linzer Cookie Hearts

Left: Linzer Cookie Stars (recipe) Right: Linzer Cookie Hearts (recipe)

Classic Apple Strudel  Traditional Czech Buchty

Left: Classic Apple Strudel (recipe) Right: Traditional Buchty – Sweet filled buns (recipe)

Happy Baking, Everyone!

I will be linking to these awesome blogs!

No-Knead Oatmeal Bread

Posted on February 3, 2015

Hi Everybody! If you’ve been reading my blog for a while, you will know how much I love to bake bread! I love baking all different kinds of breads, but the no-knead recipe is one of my all-time favorites. I’ve made a couple different flavor versions of it, and have another one to share with you today! This oatmeal bread has a great earthy flavor and is super hearty; it would be perfect alongside a big bowl of steaming hot soup on a cold wintery night!

No-Knead Oatmeal Bread

YOU WILL NEED

2 cups all-purpose flour

1 cup whole wheat flour

1/2 cup plus 2 tbs rolled oats

1/2 tsp dry yeast

2 tsp salt

1 5/8 cup water

DIRECTIONS

1. In a large bowl, mix together the all-purpose flour, whole wheat flour, yeast, salt, 1/2 cup oats (reserve the oats for topping the loaf before baking) and water. (I used 2 cups all-purpose flour and 1 cup whole wheat flour, but you could reduce the amount of whole wheat flour to 1/2 cup and increase the amount of all-purpose flour to 2 1/2 cups if you prefer it.) Cover the bowl and let the dough rise for 12 – 20 hours (I usually make the dough the night before, then bake the bread off the following day) in a warm spot.

2. Once the rising time is up, uncover the dough, and you should see lots of bubbles on the surface (the dough will be very wet and sticky, but don’t worry, that’s exactly what it should look like). Turn the dough out onto a generously floured surface, and quickly shape it into a round loaf. Sprinkle it with more flour, then cover it with a kitchen towel and let it rest for another hour or two, until it has doubled in size.

3. Preheat your oven to 450 deg F, and place a Dutch oven or covered casserole dish inside it as it heats up. Once the oven is preheated, carefully take the dish out, and quickly place your loaf in it (optional: you can sprinkle it with the remaining 2 tbs of oats at this point), then cover the dish and bake for 30 minutes. Then, take off the lid and bake for another 15 – 30 minutes, until the loaf is golden brown and sounds hollow when you tap your fingers on it. Let the bread rest and cool before slicing.

*Recipe Notes: If you prefer less of a “whole wheat” flavor, reduce the amount of whole wheat flour and substitute it with all-purpose flour as mentioned above. My recipe also uses more salt and dry yeast than the original recipe does, but you can check out the original here.

For other no-knead bread recipes, check these out:

IMG_0637  Pesto No-Knead Bread

Left: NY Times No-Knead Bread (recipe) Right: No-knead Pesto Bread (recipe)

Whole Wheat Bread  No-Knead Bread Bowls 1

Left: Whole Wheat No-knead Bread (recipe) Right: No-knead Bread Bowls (recipe)

And speaking of cold winter nights, this is what it looks like outside right now… it’s a bitter cold wintery day, so a big bowl of soup and some of this freshly baked bread is definitely needed!

Rose hips

Happy Baking, Everyone!

I will be linking to these awesome blogs!

Gingerbread House 2014

Posted on December 11, 2014

Hi Everyone! It’s another cold, gray day here, but it was so pretty earlier today as it started to snow and everything was covered in a delicate layer of sparkly white snow! I’m so excited to share this year’s Gingerbread House with you today. This is only the third gingerbread house I’ve ever made, but making one has become one of my favorite Christmas traditions. A friend of mine from church taught me how to make one a couple of Christmases ago, and I’ve made one every Christmas since! Making a gingerbread house is a really fun and slightly nerve-wracking process (especially if you are a perfectionist like I am, and if things start to fall apart as you try to attach the roof…..), it’s a lot harder to do than it looks! But the good thing is that all the cracks, holes and imperfections can be hidden with one magical ingredient…. icing! Nobody needs to know what’s hiding under the “snow” (wink, wink)! Here’s how I made my gingerbread house…
 .
 .
My gingerbread house was inspired by this Christmas card from Colonial Williamsburg, and all the beautiful homes there! We spent a weekend there with my husband’s grandparents last spring (you can read more about our trip HERE), and I fell in love with all the little cottages and colonial houses! I can just imagine how beautiful it must look at Christmastime! So when I started planning my gingerbread house, I decided to make it into a little colonial cottage (or at least that was the plan!)
 .
 .
What I did first, was draw a couple different gingerbread house designs to decide exactly what I wanted it to look like. Then, I worked out the measurements (let’s just say, VERY rough measurements! There is a reason why I am not an architect!) and made my templates out of cardstock. I made my dough the night before (since we never eat the gingerbread house and because I wanted to save some time, I used a store-bought gingerbread cookie mix – about 1 1/2 packets of cookie mix were enough for my gingerbread house) and once I had my templates, I rolled the dough out pretty thin, and cut out the shapes using the templates (TIP: use a pizza cutter to do this instead of a knife! So much easier!) I then baked the pieces on parchment paper lined baking sheets, at 350 deg F (the baking time varied for the smaller/larger pieces).
 .
I let all the baked pieces sit out overnight (you could of course just let them cool and then start icing them instead) and made my icing the next morning, when I was ready to decorate them! I used THIS recipe and it worked pretty well (I did add a little extra confectioners’ sugar to get the consistency I wanted. I wanted the icing to be thick enough where it wasn’t going to be runny, but to still be able to pipe it easily – you really just need to experiment with this). I like to decorate the pieces first, and then assemble the house, so I first did that. I actually drew on the windows and everything using a white pencil (my sewing/fabric pencil) so that it would make it easier for me to pipe on the icing (if you’re not planning on eating the gingerbread house, this technique makes it SO much easier). I piped all the decorations on the pieces except for all the “dripping snow” and roof outline. Next came the (not so) fun part…
 .
 .
… putting the house together! This is always a nerve-wracking moment, because I always worry that it’s all going to fall apart, and all my icing is going to be ruined! You can either assemble the house directly on the platter/plate or whatever else you are going to display it on (that way you don’t have to worry about it falling apart when you move it!), or on a wooden board like I did. To put the house together, do it piece by piece, building the base first, then adding on the roof (and the little attic windows). You might want to use some heavy cans or whatever other heavy object you can find to stand next to the house on all sides so they have some support while the icing is drying.
.
 .
Once everything is assembled and the icing has dried, pipe on all the snow! I just did some along the top and bottom of the roof on the front and the sides of the house, you can add as much or as little as you want. You could also sprinkle it with sparkling sugar sprinkles (is that what they’re called?!) or even confectioners’ sugar (this is the part where you cover up all the imperfections, all the cracks and fill in all the holes). Then, once everything has dried completely, you can decorate the plate/tray the house is on with some greenery or whatever other decorations you choose!
 .
.
Happy Baking, Everyone!

Gingerbread Christmas Ornaments

Posted on December 5, 2014

Hey Everybody! For the past couple of Christmases, I’ve always shared my traditional Czech gingerbread cookies with you, and today I’m here to share this year’s! Gingerbread cookies are one of my favorite Christmas traditions, but I don’t actually like to eat them… I make them purely for decorating purposes! I usually arrange them in a big shallow basket lined with greenery that I put on our dining table, but this year, I decided to make ornaments out of them, and decorate one of my little trees with them. To make the cookies into ornaments, you could either make holes at the top before baking (which I find never works well for me and they always seem to close up as the cookies expand when they bake) or you could very carefully make the holes using a needle once the cookies have completely cooled and you’ve decorated them (this is the way that I do it, it’s best to make the holes a day or two after baking and decorating so they’ve had time to sit out – I don’t store them in an airtight container since they are for decoration only). And I’ll let you in on a little secret… I used to make the cookies from scratch, but since we never eat them, I just use a store-bought cookie mix for them now. They smell just as delicious, and you save yourself a little bit of time! If you’re interested in saving yourself some more time and still want that person touch, my friend recommended Personalized Ornaments. They look so fantastic and still have that personal touch.
/
.
.
.
Lots of these gingerbread cookies are sold at the Christmas markets back at home in Prague. They are usually intricately decorated (my decorating skills have a looooong way to go!) and iced with different colors. I always miss the Christmas markets whenever we don’t go home for Christmas, because they are so fun to wander through; there are lots of stalls selling beautiful handmade Christmas ornaments and traditional gifts, lots of cookies and treats and holiday foods (which are the best part), all under the glow of a big Christmas tree! There are Christmas carols playing, people shopping and eating, and it always feels like a magical Christmas Wonderland! I can just smell it all now…. the spicy scent of all the cookies, the holiday drinks, the ham, sausages and slowly roasted pig… smells like Christmas!
.
.
.
.
And if you want to see some more gingerbread goodies, HERE are my cookies from a couple of years ago (left) and HERE are my (non-edible!) felt gingerbread man ornaments & gift tags (right)!
.
Happy Baking and Decorating, Everyone!
Back to top