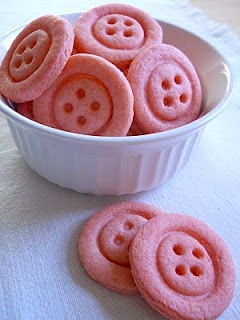
Happy first day of spring, everyone! I always get so excited when I see the first daffodils of the year, it’s my sign that spring really is right around the corner, and after this long winter, that’s pretty good news! What’s most refreshing about spring to me, is that after months of gray skies the world is full of color again! Bring some color onto your coffee table with these adorable Button Sugar Cookies!

BUTTON SUGAR COOKIES
(Recipe adapted from Martha Stewart)
INGREDIENTS
2 cups all purpose flour
1/2 tsp baking powder
Pinch of salt
4 oz (1 stick) unsalted butter, at room temperature
1 cup sugar
2 eggs
1 tsp pure vanilla extract
Food coloring of your choice

DIRECTIONS
In your mixer, combine flour, baking powder, and salt. In a different bowl, beat together butter and sugar for a couple of minutes, then begin adding in eggs and vanilla. Gradually mix this in with the flour mixture, and add your food coloring at this point too. If you are using liquid food coloring, add as many drops as you need until the dough gets your desired color. (If you are making different colored buttons, have separate bowls for each color.) Mix until dough is smooth and all color is incorporated.
Wrap your dough in plastic wrap and let it chill in the fridge for a couple minutes. Take your dough and roll it out into a disk like you would a sugar cookie dough. *GREAT TIP* for rolling out your dough – Don’t bother with flouring your surface, instead, lay down a large enough piece of plastic wrap on your rolling surface, put your dough on it and squash it down a little, and cut another piece of plastic wrap and lay that on top. Now begin rolling your dough out, in between the two layers of plastic wrap. It will be so much smoother, you won’ make a mess, and everything won’t be as sticky!
Using a round cookie cutter, cut out your circles. To add the inner ring into the button, you will need either a smaller cookie cutter, or any round object you may have in your kitchen, you could use the rim of a glass for example. Then, poke four holes (they will need to be pretty wide as they close up a little while baking), I actually used the bottom of a birthday candle for this because toothpick holes were just way too small! (You can make holes right through the cookie so you can thread it on some thin ribbon once the cookies are baked, if you like, or just press the holes into it like I did)
Preheat your oven to 350 deg F and place your cookies on baking sheets lined with parchment paper. Bake for 7 – 8 minutes (watch the cookies carefully, baking time may vary depending on your oven).
And that’s it! These cookies are adorable and will make great party favors or little gifts! Happy baking, everyone!


Really cute cookies.
those are adorable!!! love this idea.. thanks for sharing!
I will be featuring this today at bubblynaturecreations.com thanks again for sharing!
Thank you so much!! So happy you liked them!!!!
Those are so adorable!! I will definitely be giving these a try this week to take to our homeschool co-op on Friday! I love your idea about using plastic wrap to roll…great!!
Visiting you from Bubbly Nature Creations. Congratulations on being featured today!
Sarah
Those are so cute . . . they’d be perfect for at a baby shower!!!
Can these be any cuter! I agree with Aimee, these would be perfect for a baby shower. My mother loves to sew and I think these would make her smile! 🙂
Hello…
Ohhh..the button cookies are too cute! This recipe sounds really good! I’ll have to give it a try. Thank you so much for sharing it and for joining in with the Sunday Favorites repost party this week!
Happy spring wishes…
Chari @Happy To Design
These are so darling! I featured you over at Just Pleased as Punch . Check it out!
These are just too cute for words. I can think of so many uses for these. A great baby shower treat or a sewing themed party treat. I am bookmarking your recipe for a future Cookie Time Tuesday feature. Thanks for sharing
http://www.itsybitsypaperblog.com
Thank you so much everyone! Lindy, you can definitely feature the recipe, thanks!
Yummy… and they looks soo good too.
Oh. my. goodness. How sweet. I want to plan a baby shower right now 🙂 Going to have to save this… Thanks for sharing! ~ osc
Oh these are just….awesome! Perfect for a “cute as a button” baby shower. Thanks for sharing ~ please stop by and say hi sometime!
These are too cute and PERFECT for my new linky party, Foodie Friday. Please stop on over and link up!
Oh – and found you at Shabby Nest!
Thanks for letting me know about that, Bianca! I linked up to your party!
This is too cute!! Can’t wait to try it. Thanks for sharing.
~your new follower 🙂
So Stinkin’ cute!! Love how these are just as cute as decorated one!
(found you on the Walnut Avenue linky!)
I just found your blog and am your newest follower. I’m just going to say it: these are cute as a button. Great blog and a great recipe. I’ll be back to visit soon.
these are pretty adorable. I love the pink!
megan
craftycpa.blogspot.com
These are adorable & best of all they’re edible! Visiting from Bubbly Nature =)
-caroline
http://cwfrosting.blogspot.com
this is such a cute idea!!! totally fantastic. thank you for sharing!
These are adorable!
These ARE cute as a button! haha Love this idea, so trying it.
Hi Maria,
Would it be ok to include a link back on my blog? I have attempted these myself and they turned out amazing, had to convert to UK measures but would like to write a post and mention you!
Jade
Hi Jade! Sure you can! Glad they turned out well for you! 🙂