Clementine & Holly Christmas Centerpiece

Posted on December 23, 2014
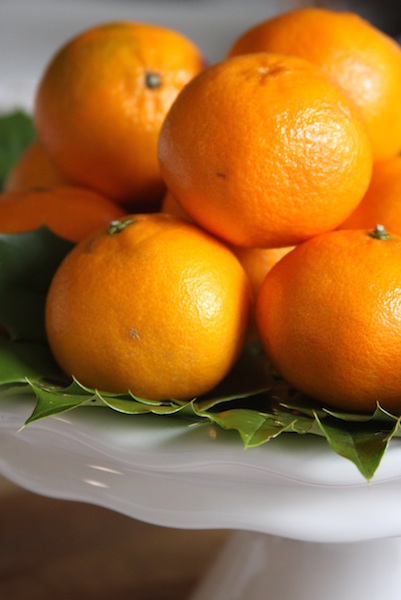
Hi Everyone! Are you still baking? Or wrapping presents? Or maybe still shopping? If you’re not quite done with your Christmas decorating yet and are looking for a super quick, easy and festive centerpiece for your Christmas table or buffet, I have an idea to share with you that couldn’t be simpler! All you need are some clementines, fresh holly, a cake stand and about 5 minutes of your time, and you’re done! Clementines always remind me of Christmas; I don’t know if they’re in season at this time of year or why they are around during the holidays, but they always remind me of my childhood Christmases when they would fill baskets in the kitchen, and then be on the Christmas dessert table along with other fruit, lots of cookies, walnuts and other festive goodies.
 .
 .
You could add other things to the centerpiece, like walnuts, cranberries, cinnamon sticks, or other citrus fruits, but I like the simplicity of just the clementines. You could also arrange them in a shallow basket with the holly instead of on a cake stand, but I like the height that the cake stand adds, and the extra festive touch it makes! Make sure you wash the fruit (even though you’ll be peeling it…) before eating, since it was sitting on the holly!
.
 .
Alright, well I better run, there are cookies to be finished, and a messy kitchen to be cleaned…! It’s a mess in there. A pretty delicious mess!
.
Merry Christmas, Everyone!

The Simple Joys of Christmas…

Posted on December 21, 2014
.
I don’t know about you, but I feel like this Christmas season has been flying by so much faster than usual. At the beginning of December, I decided to keep all the decorating pretty simple this year, and instead of taking out and using every single decoration we own (and there are several big boxes of them), I only unpacked the tree ornaments and a couple other things to decorate the house with. But I realized that every day I kept thinking, it just doesn’t feel like Christmas. So late last night, only four days before Christmas, I opened up all those big Christmas boxes and added lots of extra twinkle lights and other decorations around the house, and voila… it feels a lot more like Christmas! One of my friends recommended that I look into Neon Lights for Christmas this year. She said that some neon lights can be personalised with Christmas messages on, then they can be used as decorations on the walls. They do look nice and they would add some more bright colours to our living room. Maybe we’ll look into ordering those.
.
It’s funny what a little thing like a string of Christmas lights will do! There is something so peaceful about bright little twinkly lights glowing throughout the house in the darkness of a cold night. That quiet stillness is one of my favorite things about Christmas time. I recently visited a site like saltle.com/electrician-texas-service-areas/austin-tx-electrician/ to get an electrician to install more Christmas lights on the outside of our house. Looking out of the window now, I’m glad that I did because it just looks so magical out there. It might not be snowing, but the air itself is glowing with that special atmosphere that you only get at this time of year. When life seems to get so busy, the malls are crowded with people frantically trying to find that one last gift and everyone’s to-do list keeps getting longer and longer, I love those quiet moments by the twinkling tree that seem to make time stand still. It’s so easy to let the busyness of this time of year take over, so I hope you get a moment or two to just sit still. Whether it’s a quiet morning sitting by the tree, a big cup of hot chocolate at the end of a long day or watching your favorite Christmas movie, I hope you enjoy the simple little joys of the Christmas season this year.

Merry & Bright Gift Tags

Posted on December 15, 2014
Hi Everyone! I hope you all had a good weekend! The Christmas countdown is really on now, with less than two weeks to go! gift tags are so quick to make and are easily customizable. Here’s what you’ll need and how you can make them…
.
MERRY & BRIGHT GIFT TAGS
.
YOU WILL NEED
Black and gold glitter
Card stock
Fine tip glue pen
Ribbon
Pencil & Scissors
.
.
DIRECTIONS
To make these gift tags, first cut your gift tag shapes out of some thick card stock (I used white but you can use whatever color you like). Then, using your scissors, cut a slit in the top and look your ribbon through it. Draw your design on the gift tag with a pencil (I drew polka dots and wrote the words “Merry & Bright”, “Merry” and “Bright” on my gift tags), then go over it with your fine tip glue pen, immediately sprinkling the area with the glitter. Shake off the excess glitter and let the gift tags dry completely before attaching them to gifts!
.
.
.
Happy Crafting, Everyone!

Gingerbread House 2014

Posted on December 11, 2014
Hi Everyone! It’s another cold, gray day here, but it was so pretty earlier today as it started to snow and everything was covered in a delicate layer of sparkly white snow! I’m so excited to share this year’s Gingerbread House with you today. This is only the third gingerbread house I’ve ever made, but making one has become one of my favorite Christmas traditions. A friend of mine from church taught me how to make one a couple of Christmases ago, and I’ve made one every Christmas since! Making a gingerbread house is a really fun and slightly nerve-wracking process (especially if you are a perfectionist like I am, and if things start to fall apart as you try to attach the roof…..), it’s a lot harder to do than it looks! But the good thing is that all the cracks, holes and imperfections can be hidden with one magical ingredient…. icing! Nobody needs to know what’s hiding under the “snow” (wink, wink)! Here’s how I made my gingerbread house…
 .
 .
My gingerbread house was inspired by this Christmas card from Colonial Williamsburg, and all the beautiful homes there! We spent a weekend there with my husband’s grandparents last spring (you can read more about our trip HERE), and I fell in love with all the little cottages and colonial houses! I can just imagine how beautiful it must look at Christmastime! So when I started planning my gingerbread house, I decided to make it into a little colonial cottage (or at least that was the plan!)
 .
 .
What I did first, was draw a couple different gingerbread house designs to decide exactly what I wanted it to look like. Then, I worked out the measurements (let’s just say, VERY rough measurements! There is a reason why I am not an architect!) and made my templates out of cardstock. I made my dough the night before (since we never eat the gingerbread house and because I wanted to save some time, I used a store-bought gingerbread cookie mix – about 1 1/2 packets of cookie mix were enough for my gingerbread house) and once I had my templates, I rolled the dough out pretty thin, and cut out the shapes using the templates (TIP: use a pizza cutter to do this instead of a knife! So much easier!) I then baked the pieces on parchment paper lined baking sheets, at 350 deg F (the baking time varied for the smaller/larger pieces).
 .
I let all the baked pieces sit out overnight (you could of course just let them cool and then start icing them instead) and made my icing the next morning, when I was ready to decorate them! I used THIS recipe and it worked pretty well (I did add a little extra confectioners’ sugar to get the consistency I wanted. I wanted the icing to be thick enough where it wasn’t going to be runny, but to still be able to pipe it easily – you really just need to experiment with this). I like to decorate the pieces first, and then assemble the house, so I first did that. I actually drew on the windows and everything using a white pencil (my sewing/fabric pencil) so that it would make it easier for me to pipe on the icing (if you’re not planning on eating the gingerbread house, this technique makes it SO much easier). I piped all the decorations on the pieces except for all the “dripping snow” and roof outline. Next came the (not so) fun part…
 .
 .
… putting the house together! This is always a nerve-wracking moment, because I always worry that it’s all going to fall apart, and all my icing is going to be ruined! You can either assemble the house directly on the platter/plate or whatever else you are going to display it on (that way you don’t have to worry about it falling apart when you move it!), or on a wooden board like I did. To put the house together, do it piece by piece, building the base first, then adding on the roof (and the little attic windows). You might want to use some heavy cans or whatever other heavy object you can find to stand next to the house on all sides so they have some support while the icing is drying.
.
 .
Once everything is assembled and the icing has dried, pipe on all the snow! I just did some along the top and bottom of the roof on the front and the sides of the house, you can add as much or as little as you want. You could also sprinkle it with sparkling sugar sprinkles (is that what they’re called?!) or even confectioners’ sugar (this is the part where you cover up all the imperfections, all the cracks and fill in all the holes). Then, once everything has dried completely, you can decorate the plate/tray the house is on with some greenery or whatever other decorations you choose!
 .
.
Happy Baking, Everyone!

Lemon, Rosemary & Vanilla Simmer Pot

Posted on December 9, 2014
Hi Everyone! I hope that your December has been off to a great start so far; it’s hard to believe that Christmas is less than three weeks away now! I wish this time of year wouldn’t always fly by so quickly. If you want to cozy up your home during the holiday season, or just want to freshen it up any other time of the year, this Lemon, Rosemary & Vanilla Simmer Pot is a great way to do it! Apparently it’s Williams-Sonoma’s signature store scent (and it ALWAYS smells so good in there!) and even though it’s not necessarily a Christmas scent, the rosemary has a woodsy-pine sort of scent which is perfect for Christmas! This is such a simple, easy thing to do to make your home smell absolutely amazing. And if you’re looking for a last minute Christmas gift idea for someone, a little package of these ingredients and the directions for how to use them would make for a great little gift (or even a fun house-warming gift for someone who has just moved to a new home)! Here’s what you’ll need…
.
LEMON, ROSEMARY & VANILLA SIMMER POT
.
YOU WILL NEED
1 Lemon, sliced
2 Rosemary Sprigs
1 tsp Vanilla extract
Water
.
.
DIRECTIONS
To a small/medium sized cooking pot, add water (to about an inch or two below the rim of the pot), vanilla extract, sliced lemon and two sprigs of rosemary. Simmer on low until your house is filled with the most wonderful scent! Gift idea: Package together a box or gift bag of a couple lemons, a rosemary plant and a bottle of vanilla extract, along with the directions for how to put together this simmer pot!
.
Have a great week, Everyone!

Gingerbread Christmas Ornaments

Posted on December 5, 2014
Hey Everybody! For the past couple of Christmases, I’ve always shared my traditional Czech gingerbread cookies with you, and today I’m here to share this year’s! Gingerbread cookies are one of my favorite Christmas traditions, but I don’t actually like to eat them… I make them purely for decorating purposes! I usually arrange them in a big shallow basket lined with greenery that I put on our dining table, but this year, I decided to make ornaments out of them, and decorate one of my little trees with them. To make the cookies into ornaments, you could either make holes at the top before baking (which I find never works well for me and they always seem to close up as the cookies expand when they bake) or you could very carefully make the holes using a needle once the cookies have completely cooled and you’ve decorated them (this is the way that I do it, it’s best to make the holes a day or two after baking and decorating so they’ve had time to sit out – I don’t store them in an airtight container since they are for decoration only). And I’ll let you in on a little secret… I used to make the cookies from scratch, but since we never eat them, I just use a store-bought cookie mix for them now. They smell just as delicious, and you save yourself a little bit of time! If you’re interested in saving yourself some more time and still want that person touch, my friend recommended Personalized Ornaments. They look so fantastic and still have that personal touch.
/
.
.
.
Lots of these gingerbread cookies are sold at the Christmas markets back at home in Prague. They are usually intricately decorated (my decorating skills have a looooong way to go!) and iced with different colors. I always miss the Christmas markets whenever we don’t go home for Christmas, because they are so fun to wander through; there are lots of stalls selling beautiful handmade Christmas ornaments and traditional gifts, lots of cookies and treats and holiday foods (which are the best part), all under the glow of a big Christmas tree! There are Christmas carols playing, people shopping and eating, and it always feels like a magical Christmas Wonderland! I can just smell it all now…. the spicy scent of all the cookies, the holiday drinks, the ham, sausages and slowly roasted pig… smells like Christmas!
.
.
.
.
And if you want to see some more gingerbread goodies, HERE are my cookies from a couple of years ago (left) and HERE are my (non-edible!) felt gingerbread man ornaments & gift tags (right)!
.
Happy Baking and Decorating, Everyone!

Felt Gingerbread Man Ornaments & Gift Tags

Posted on December 4, 2014
Hey Everyone! I hope you’ve been having a wonderful December so far, and have enjoyed the beginnings of the Christmas season! For the first time ever, I am actually almost done with my Christmas shopping; there are still a couple little things I need to pick up, but all the major things are done and bought. I’m a terribly indecisive person which means my Christmas shopping usually takes me a really long time, so this is pretty much a Christmas miracle! Today I wanted to stop by and share a really easy little felt Christmas craft with you. I love felt because you can pretty much make anything out of it and it’s so easy to work with. You could use these little gingerbread men as gift tags like I did here, as Christmas ornaments or even make a garland out of them that would look so cute hanging on a kitchen window!
.
/
YOU WILL NEED
Felt
White thread & Needle
Small buttons
Thin ribbon
Hot glue gun
Pen/pencil & Scissors
Polyfill for stuffing
Gingerbread Man Cookie Cutter or Stencil
 .
 .
DIRECTIONS
For each gingerbread man, you will need a top and bottom piece out of felt. I used a gingerbread man shaped cookie cutter and traced around it on my piece of felt. Cut each piece out, then decorate the top piece only. You can decorate it however you like and add as many different embellishments as you want, I just stitched around the edges of the gingerbread man with white thread and added a little red bow and two buttons with hot glue. To put the gingerbread man together, I used outlined the head part of the bottom piece with hot glue (insert a ribbon loop at the top at this point so you can hang it up/attach it to gifts later!) and let it dry, then stuffed it with polyfill. Then I outlined the arms with hot glue and stuffed them, and so on, until the whole little gingerbread man was done. At the end, I went around and trimmed any excess glue and felt fuzz with my scissors.
 .

Happy Crafting, Everyone!

Linzer Cookie Stars

Posted on December 1, 2014
Hi Everyone! Happy December 1st! Now the countdown till Christmas is really on! Our tree is up, all the decorations are out, the traditional gingerbread ornaments have been baked and iced and the Christmas shopping has started! I’m so excited that the Christmas season is finally here; dark early mornings and late evenings are so much cozier by the twinkling tree! Last year, I shared my favorite Linzer Heart Cookie recipe with you, and last week I used the same recipe to make these star cookies (I will definitely be making these again for Christmas!) so I thought I would share them with you, and I also added lots of detailed notes and tips for baking Linzer cookies that I’ve learned just by making lots and lots of them, so I hope that’s helpful for you too!
 .
LINZER COOKIE STARS
 .
YOU WILL NEED
1 Recipe Linzer Cookies (find it HERE)
Confectioners’ sugar for dusting
Jam for filling cookies (I used a tart cherry jam for these)
.
 .
DIRECTIONS
You can find the full ingredients list and directions for how to make these cookies HERE, I just used a different shape cookie cutter here. A couple notes on the recipe… FILLING: a tart jam works well for these, as it cuts through the sweet, buttery flavor of the cookies. PREPARE AHEAD: Also, these are best baked at least a day ahead before eating, they get better and they soften as they sit (in an air tight container). I always make the dough the night before I make the cookies, it gives it time to rest in the fridge, and you have less work with the cookies the following day! ROLLING OUT: When you take the dough out of the fridge to roll it out, make sure you give it time to soften again, otherwise you will have a very hard time rolling it out (it will literally feel like a brick). Roll it out on a floured surface slowly, and if it looks like the edges are starting to tear off a little bit, just gather the sides and press them in gently, and continue rolling. BAKING: I like baking the bottom pieces on one tray, and the top pieces on a different tray, because the tops usually take a little less time to bake since they have a cutout in the center. So to prevent the tops from burning, bake them on a different baking sheet than the bottoms! DUSTING WITH SUGAR: Lots of people have asked me how I dust the cookies with confectioners’ sugar without getting the jam covered in sugar too. And here’s how: Once the baked cookies have cooled, lay all the top cookies with the cutouts in the center on a parchment paper lined baking sheet, and dust them with confectioners’ sugar. Spread an even layer of jam on the bottom cookies (leaving a little edge around the edges) then top them with the sugar dusted tops, picking them up and pressing them down by the sides, to avoid messing up the sugar on top!
.
Happy Baking, Everyone!

DIY Advent Calendar

Posted on November 29, 2014
Hi Everyone! I hope that those of you that celebrate Thanksgiving had a great one, and that you are all having a good weekend so far! We had a wonderful Thanksgiving in New Jersey, which started off with the first snowfall of the season on Wednesday afternoon. The snow didn’t stick, but it was so beautiful as it started falling, and it was the perfect way to kick off the festive season! Since December is almost here, I wanted to share a fun DIY Advent Calendar idea with you, that you could easily whip up before December 1st! Getting an Advent calendar was always one of my favorite things about Christmas and I remember one year my parents brought me the most spectacular one from Austria; it wasn’t filled with chocolates, but with little toys, and it was pretty much the most exciting thing I had ever seen! This DIY calendar is so easy to make, and would make for a great gift for someone. You could stuff the little bags with candy and chocolate, gift cards, little accessories or anything else you can think of! I went for a black and red theme to embellish the kraft paper bags I made and I placed them all in a big basket that I added a big red bow to, but you could completely customize yours and decorate the bags however you like!
 .
DIY ADVENT CALENDAR
 .
YOU WILL NEED
Kraft paper (or kraft paper bags)
Pencil, ruler & Scissors
Glue stick or hot glue gun
Ribbon
Hole punch
Colored cardstock
Tissue paper, faux greenery or paper crinkle to fill basket
Little gifts to fill your bags with!
 .
DIRECTIONS
First, find a big basket or decorative box that you can fill with your kraft paper bags. I added a big red bow to it (I attached it with hot glue) for a festive touch. Next, make your kraft paper bags (you can of course use ready made bags if you want to save time). To do this, you will need two kraft paper rectangles for each bag, one 4×5 inches big, and one 4×6 inches big. Place the smaller rectangle on top of the bigger rectangle, then attach them by glueing the two sides and bottom of the two. Fold over the flap on the top for your opening. Using a hole punch, make two holes at the top of the bag to loop your ribbon through, and make a small bow (after you’ve filled the bag with a gift!) Attach a number to the bag (I used a stencil to draw all the numbers on black and red cardstock) using a glue stick or hot glue. Place some tissue paper, paper crinkle or faux greenery inside the basket, then arrange the bags inside!
 .
.
 .
.
.
Happy Crafting, Everyone!

Toasted Marshmallow Hot Chocolate

Posted on November 26, 2014
Hey Everybody! Who said toasted marshmallows are only for the summer! They are just as good in a big cup of hot chocolate in the winter as they are oozing out of s’mores by a bonfire in the summer! And the best part is, you can let your oven do all the work and have toasted, golden marshmallows in about a minute! So easy and delicious! There used to be a coffee shop near our house that my husband and I used to go to all the time, that had the best hot chocolate. You could choose whether you wanted milk, white or dark chocolate as the base, then you could pick all different flavors to add in, like hazelnut, almond, vanilla or peppermint, and choose what toppings you wanted on top! It was a sad, sad day when they closed the coffee shop a couple of moths ago, and I still miss their creamy, rich and decadent hot chocolate! Luckily, it’s not too hard to make yourself a big cup, just like this one, at home!
 .
TOASTED MARSHMALLOW HOT CHOCOLATE
 .
YOU WILL NEED
Hot chocolate (my two favorite recipes are THIS Nutella Hot Chocolate
 and THIS decadent Hot Chocolate for Two!)
Mini marshmallows (you could use regular sized ones too)
 .
DIRECTIONS
Make your hot chocolate as usual and pour into your favorite mug! Then, prepare your toasted marshmallows. I set my oven to the broil setting, then put a couple mini marshmallows on a baking sheet (I line mine with parchment paper) and let them cook under the broiler for just about a minute or even less, watch them carefully because they toast VERY quickly! Then, simply place the marshmallows in your hot chocolate and enjoy!
 .
For other hot chocolate recipes, check these out!

Left: Nutella Hot Chocolate (recipe HERE) Middle: Hot Chocolate for Two (recipe HERE) Right: Hot Chocolate Cookies (recipe HERE)
Have a great day, Everyone!
Back to top