Gingerbread House 2013

Posted on December 7, 2013
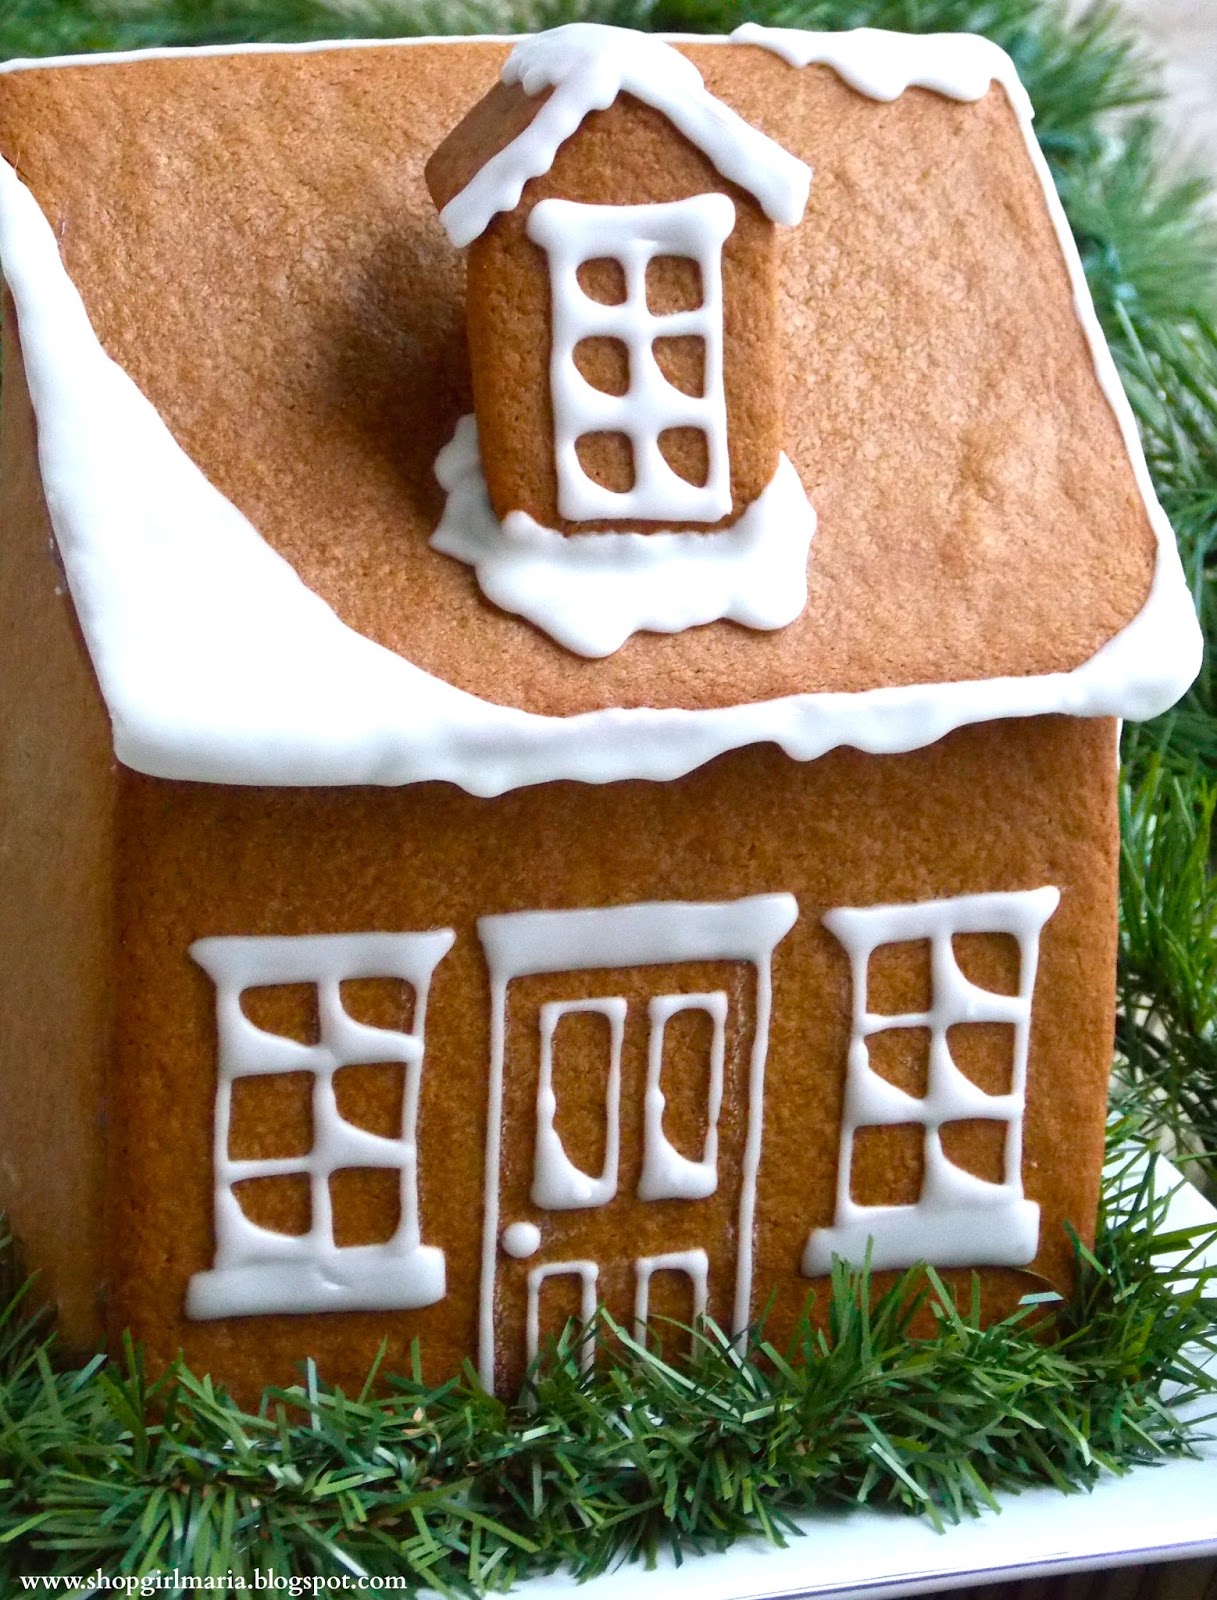
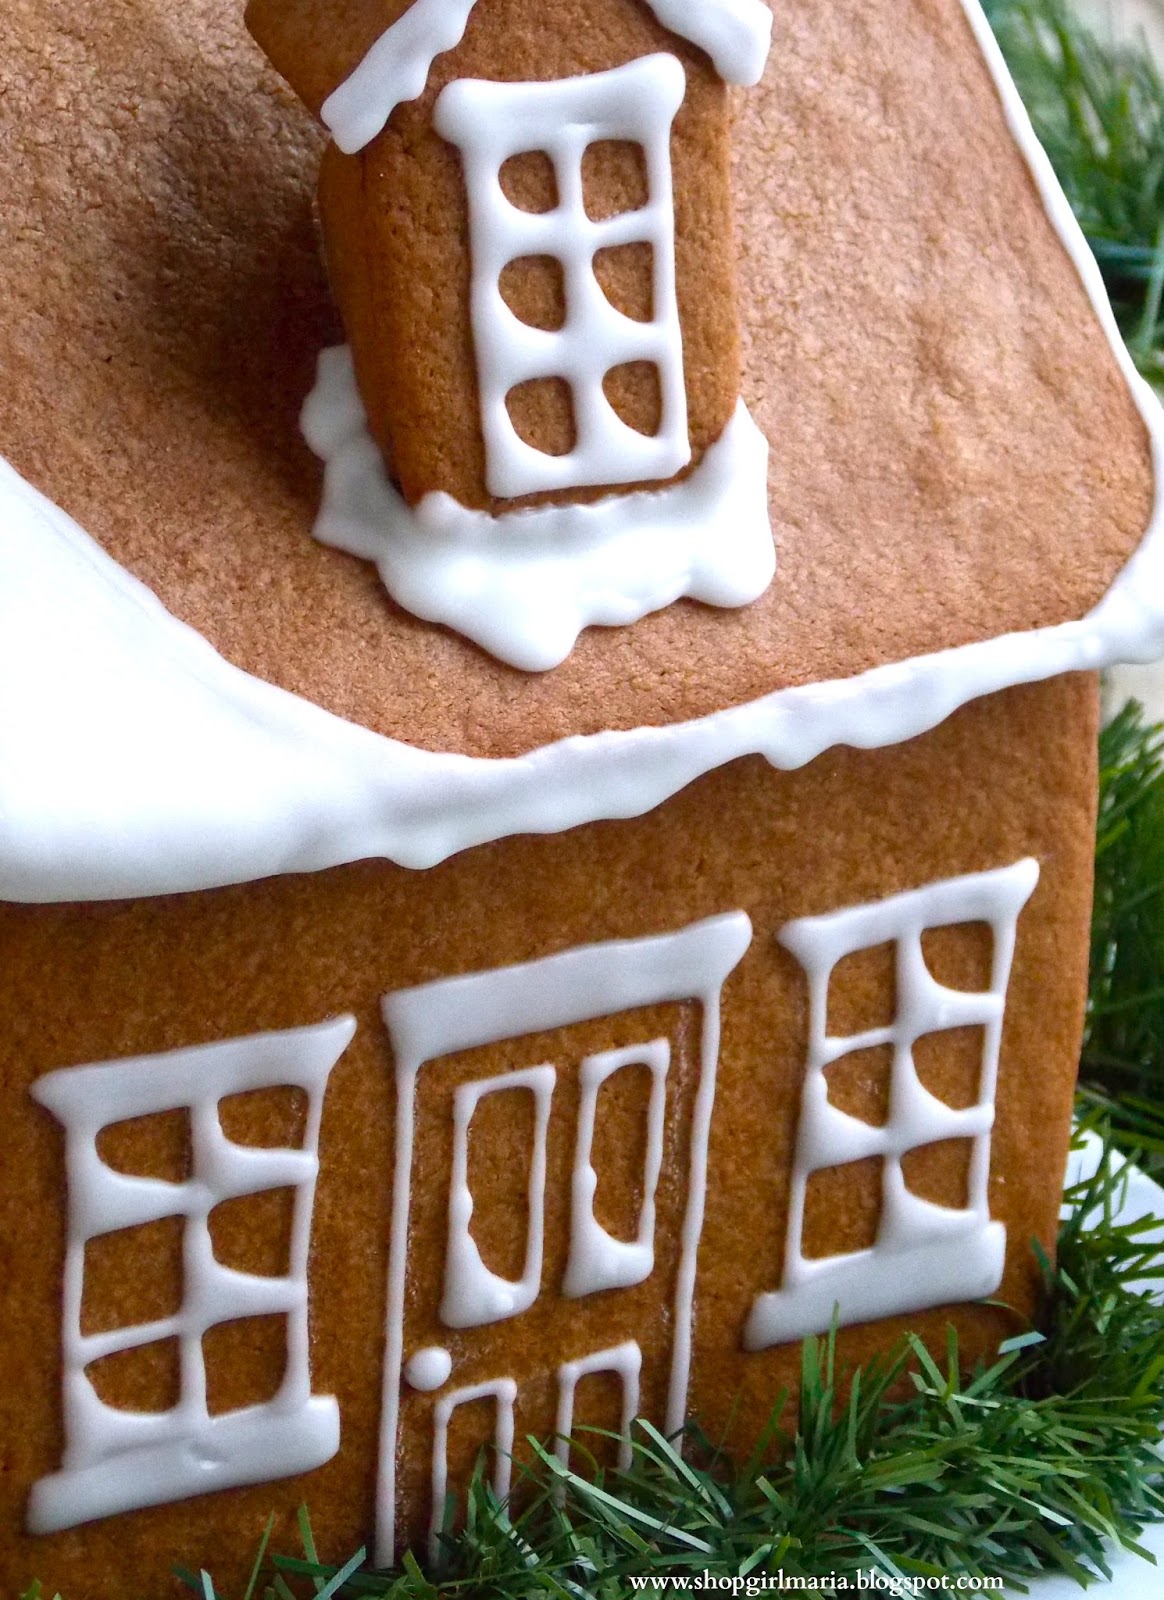
Hi Everybody! I hope you’re all having a good weekend so far! I can’t believe that Christmas is less than three weeks away now! The house is all decorated, the tree is up and there’s lots more cookie baking, shopping and gift wrapping to be done over the next couple of weeks! And with the weather forecast calling for snow, I’m hoping to wake up to a Christmassy winter wonderland tomorrow morning! I wanted to stop by and show you my gingerbread house today! Last year was the first time I ever made one, and it was a little bit of a disaster with too much frosting and candy, and a slightly unstable house structure! So this year I decided to go for a more simple look, and make a little gingerbread cottage covered in snow and surrounded by some greenery. Here’s how I made it…
.
 .
.
I first came up with what I wanted my gingerbread house to look like. Once I did that, I made my templates (you can also find some online if you don’t want to make your own) out of some card stock. I needed a total of eleven pieces for my gingerbread house (a front and back wall, two side walls, two pieces for the roof and five pieces for the attic window. I rolled out my gingerbread dough and laid all the templates on and cut the different pieces I needed. I then baked them and let them cool completely before decorating. You are going to want to make your icing pretty thick so that it’s sticky and holds the structure together well. I started out with decorating all the different pieces with my icing (if you’re not planning on eating the gingerbread house, you can use a white pencil to draw on the different pieces to make the decorating easier) and letting them dry completely. Then, once they had dried, I put the whole house together (either use the icing to do this, or use hot glue if you’re not going to be eating the house!) At the end, I added more icing on top of the roof and let some drip off the edge of the roof to make it look like the roof was covered in snow!) Once the house was completely dry, I transferred it to a white plate and added some greenery, and now it sits in my kitchen, making it smell deliciously Christmassy!
.
.
 .
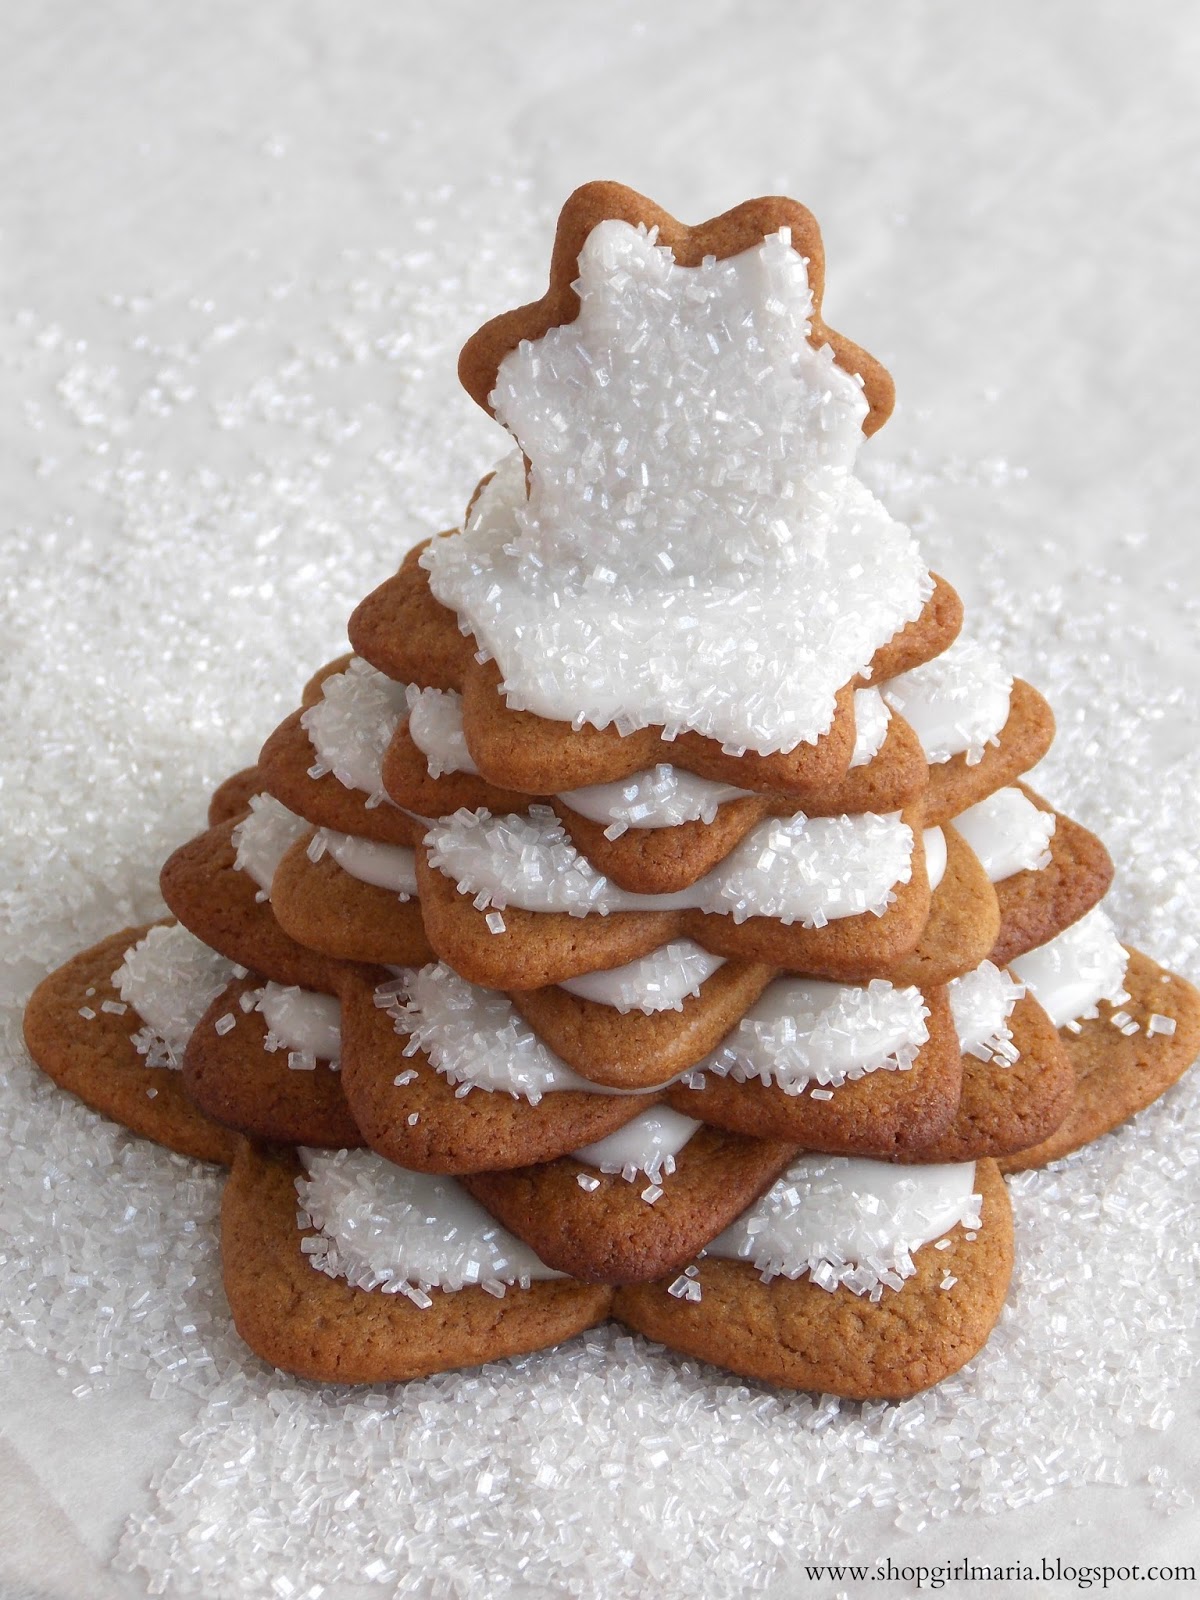
For another fun gingerbread Christmas idea, check out my Gingerbread Cookie Tree HERE!
Happy Baking, Everyone!

Gingerbread Cookie Tree

Posted on December 6, 2013
Hi Everyone! I hope you’ve all been having a great December so far! It’s a little strange to be sitting in my living room with all the windows wide open because it’s so warm outside, and it’s the beginning of December! But the crazy weather is supposed to catch up with the season this weekend and it’s supposed to (hopefully) snow! I wanted to show you all this fun Christmas baking idea today. A couple of days ago, I got a package from my mom who knows how much I love to bake, so she sent me lots of different cookie cutters and baking tools, one of them being a set of stacking gingerbread cookie cutters to make a gingerbread tree, that I couldn’t wait to use! These little trees make for really cute little decorations around your kitchen, they smell like Christmas and they are so fun to decorate!
 .
 ,
To make these, you will need a set of stacking star cookie cutters. Since I was making these for a party and baked over 300 pieces I used a store-bought gingerbread cookie mix to save time, but you can use your favorite gingerbread recipe to make these! For the icing, I made a classic royal icing and kept it pretty thick so that it would act as glue and hold the different pieces together, and then sprinkled it with some white sparking sugar to make it look like shimmery snow. I also inserted a toothpick behind the star on top just to make sure it wouldn’t fall. Make sure that you let the tree dry completely before moving it.
.
Happy Baking, Everyone!

DIY Kate Spade Inspired Jewelry Dish

Posted on December 3, 2013
Hi Everybody! I have a fun, girly DIY project to share with you today! I am a huge Kate Spade fan, I love how fun and whimsical, yet super chic and classy all her designs are, and this little project is inspired by her gold confetti line, which I love! I am sort of notorious for losing jewelry (I’m still looking for that jewelry with gemstones down the back of the sofa), I always have an extra pair of earrings and other accessories in my purse and my car (because who knows when you’ll have an emergency and need to switch out your jewelry, right?!) that end up getting lost, and I love the Kate Spade jewelry dishes, so I decided to make my own! You only need a couple of things to make one of these, and you have a cute little dish to hold your favorite pieces, or a fun little gift for someone (along with some jewelry, of course!) Here’s how you can make your own…
.
DIY KATE SPADE INSPIRED JEWELRY DISH

YOU WILL NEED
Small white dish
Gold Opaque Paint Marker (I used Elmer’s brand)
Pencil
And last but not least, jewelry to fill the dish!

.

.
DIRECTIONS

To make your jewelry dish, first pick out a plain white bowl or small plate. Using your gold paint marker, start drawing on your gold confetti, spacing them out randomly and letting some circles overlap. Make sure that you don’t accidentally smudge the painted circles. Once you have drawn on the confetti, go around the rim with the gold marker, making a thin, even gold line around the whole dish. Let all the gold paint dry completely before using the dish! (Note: Make sure that you use an opaque paint marker, a regular gold sharpie will look streaky.)

.

Happy Crafting, Everyone!

Simple Iced Gingerbread Man Cookies

Posted on December 1, 2013
Hi Everybody! Happy December and happy first Sunday of Advent! It is terribly cold here and it feels like winter has arrived, now all we need is some snow! I’m so excited to start decorating our home for Christmas; our tree is all set up and waiting to be decorated, the Christmas movies are out ready to be watched, and some Christmas treats have already been baked! Decorating the tree is one of my favorite things to do at Christmas time, and when my husband and I were first married I wanted to get the biggest, most beautiful (real) Christmas tree I could find for our first Christmas together. Being the (very) picky person that I am, we searched for hours in the cold to find the perfect tree and finally found The One, the biggest tree there, with the most perfectly spaced branches and the most wonderful piney Christmas smell. My Christmas mission was complete and it was all perfect, until the tree fell during the night because it was SO big, and half of my precious ornaments broke! Needless to say, we now have a fake tree, but it’s still just as beautiful, and a little safer! Baking Christmas cookies, especially gingerbread cookies, is another one of my favorite traditions, and I wanted to share my first ones of the year with you today! There will be lots more to come, so make sure to come back over the next couple of weeks!
.
SIMPLE ICED GINGERBREAD MAN COOKIES
 .
YOU WILL NEED
COOKIES
Use a homemade gingerbread cookie recipe or use a store bought mix.
ICING
1 cup confectioners’ sugar
2 – 3 tsp milk
2 – 3 tsp light corn syrup
Gel food coloring
 .
DIRECTIONS
First, make your cookies. Once they have cooled, make your icing. You may need to add more liquid to it, depending on your desired consistency of the icing. Once you have your icing, add your food coloring (I used the Wilton gel food colors, they work very well and you only need a little bit of them to get rich colored icing) to get a beige color (I don’t have an exact formula for this color, I usually just experiment and tweak the color until I get what I need). This will be your base color. Then, take out about a quarter of the icing, and use more food coloring to get it darker, this will be for the buttons. Next, using a plastic piping bag with your icing, outline your gingerbread man cookie with the beige icing, then “flood” the inside, and spread it around using a toothpick to help you smooth it out. Wait a couple of minutes for the icing to set, then use another piping bag with the darker icing to make the buttons. This recipe only makes a small amount of icing, so you may need to double it if you are making a big batch of cookies! (Note: You can also substitute more milk or use egg whites instead of the light corn syrup if you don’t want to use it, it just makes the icing more shiny.)
 .
For another Christmas cookie idea, check out my Snowy Tree Sugar Cookies HERE!
Happy Baking, Everyone!

Christmas Treat Bags

Posted on November 30, 2013
Hi Everyone! It’s hard to believe that Christmas is less than a month away now! I look forward to this time all year long, and I have some fun Christmas projects and recipes to share with you in the next couple of weeks, starting with these little Christmas Treat Bags! Since this month is filled with lots of holiday parties, gift buying, making and packaging, I thought they would be the perfect way to start off the Christmas season here on my blog!
.
CHRISTMAS TREAT BAGS
 .
YOU WILL NEED
1 cable knit sweater
Ribbon
Embellishments of your choice
Sewing machine or Hot glue gun
 .
 .
DIRECTIONS
To make these, start by cutting your sweater pieces. For each bag, cut two pieces (mine were 6×10 inches big each) and hem the top parts that will be the bag opening. Then, place the two sweater pieces together with the outside sides facing each other, and either sew the three sides that you didn’t hem together, or glue them together using some hot glue. Then, turn the bags inside out, fill them with candy or whatever else you want to stuff them with, add some ribbon and whatever embellishments you are using (attach them to the ribbon using hot glue) and you are done!
 .

Happy Crafting, Everyone!

Baked Pecan Praline French Toast

Posted on November 22, 2013
Hi Everybody! Happy Weekend! With the holidays coming up, I have a great recipe to share with you that’s a perfect breakfast or brunch dish to make when you have friends or family staying with you! This Baked Pecan Praline French Toast is so rich, decadent, and absolutely delicious, and what’s even better is that all you have to do is put all the ingredients together in a pan and let the oven do all the work for you, instead of having to stand at your stove making French toast for everyone! All the maple syrup, vanilla, brown sugar, cinnamon and pecans give this French toast casserole the most wonderful flavor. It’s sweet and fluffy on the inside, and golden brown and crunchy on the outside, and smells heavenly as it bakes, filling your home with the warm and cozy aroma of the holidays!
.
 BAKED PECAN PRALINE FRENCH TOAST
(Recipe adapted from Food Network & All Recipes)
*Serves 6 – 8*
 .
YOU WILL NEED
FRENCH TOAST
1 challah loaf (or loaf of French bread)
6 eggs
1 cup milk (I used fat-free)
1/2 cup half-and-half
1 tsp pure vanilla extract
1/2 tsp ground cinnamon
1 tbs brown sugar
 .
TOPPING
3/4 cup pecans
3/4 cup brown sugar
1/2 cup maple syrup
1 tbs unsalted butter
 .
DIRECTIONS
 .
1. First, prepare your baking dish (9×13 inch baking pan, greased) and preheat your oven to 350 deg F. In a small bowl, whisk together the eggs, milk, half-and-half (the original recipe called for a full 1 1/2 cups of half-and-half, but I reduced the amount and used fat-free milk for the rest to lighten it up a little!), vanilla extract, ground cinnamon and 1 tbs of brown sugar together. Set aside.

.

2. Next, cut the challah (you could also use French bread, I just think the challah adds some extra flavor and richness) into 1 inch slices. Pour some of the egg mixture into your baking dish, then arrange the challah slices in it. Pour the rest of the egg mixture on top and let it soak into the bread.

.

3. Coarsely chop the pecans and in a small saucepan, whisk together the butter, maple syrup and 3/4 cup of brown sugar. Stirring constantly so it doesn’t burn, bring the sauce to a boil, then turn the heat down and cook for about a minute. Stir in the pecans and pour the mixture over the prepared French toast in the pan. (*Note: if you want to cut back on the sugar, you can use only about half of the syrup). Bake for 30 – 35 minutes or until the French toast is puffed up and golden brown, and the liquid has been absorbed. Once it’s done, let it sit for about 5 minutes, serve warm with fresh fruit (and dusted with confectioners’ sugar, extra maple syrup and whipped cream if you’re feeling extra hungry!)

/

Happy Baking, Everyone!

Glittered Monogram Gift Tags

Posted on November 20, 2013
Hi Everyone! I hope you are all having a good week so far! Since the holiday season is beginning and buying and wrapping gifts is a big part of it, I wanted to share this fun gift tag idea with you today! I have always loved wrapping gifts, in fact, it’s always been one of my favorite things about Christmas! All the festive wrapping paper, ribbon, gift tags… all my favorite things! And a beautifully packaged gift always makes whatever is inside even better! These little Glittered Monogram Gift tags are super easy to make and will make any gift look sparkly and elegant, and just a little extra special!
.
GLITTERED MONOGRAM GIFT TAGS
.
YOU WILL NEED
White card stock
Glitter
Ribbon
Fine tip glue pen
Pencil, scissors, tape
.
 .
DIRECTIONS
To make these, first cut the gift card shapes out of your card stock, then, using a pencil, lightly draw on your monogram (either draw it on freehand or trace it on) and the outline shape on them. Then, using a fine tip glue pen (you can find this at any craft store, I one from the Martha Stewart craft line), fill in the monogram and trace over the outline shape and sprinkle the glitter over the top. Shake off all the excess glitter (you can use a fine brush or q-tip to get some of it off) and let it dry completely. Once dried, cut a little slit along the top of the gift tag to thread your ribbon through, and secure it in the back with some tape.
 .
Happy Crafting, Everyone!

Hearty Minestrone Soup

Posted on November 16, 2013
Hi Everyone! I hope you’re all having a good weekend so far! I started my Christmas shopping today, thinking I was getting an early start, only to find out that everybody else was thinking the same thing! I couldn’t believe how packed all the stores and parking lots were! It’s hard to believe that the holiday season is beginning already! I love everything about this time of year; all the festivities, the decorating, the shopping, the chilly weather and all the cooking and baking, of course! And today, I have a super easy, delicious and comforting recipe to share with you! I am a HUGE soup lover, and could literally eat soup every single day. I love cooking soups too, not only because they are so comforting and satisfying on a cold day, but because you can make a large pot and feed lots of people, or freeze some to have on hand on a busy day. All you need is some fresh bread or rolls, or some salad to go with it, and you have a complete dinner! This Minestrone soup is one of my favorites, it doesn’t need to simmer on the stove for hours and hours, in fact it comes together pretty quickly, and it’s so delicious! It’s filled with lots of different vegetables, beans and pasta, which you could change up according to your taste or whatever is in season, and you could add some cooked shredded chicken or even sprinkle some crispy bacon or pancetta on top to finish it off! The perfect dinner for a cold night in!
.
HEARTY MINESTRONE SOUP
(Adapted from BHG)
*Serves 6 – 8*
 .
YOU WILL NEED
1 large onion, diced
2 cloves of garlic, minced
3 ribs of celery, diced
3 small carrots, diced
1 medium sized zucchini, diced
1/2 cup green beans (fresh or frozen)
2 tbs olive oil
1 15oz can Cannellini beans, drained and rinsed
1 28oz can diced tomatoes
1 1/2 large cans (45oz) crushed tomatoes
6 cups low-sodium chicken broth
1/2 cup pasta
1 tsp dried oregano
Salt & Pepper
Sugar
Grated Parmesan Cheese
 .
DIRECTIONS
1. First, dice your onion and cook it in olive oil in a large pot over medium heat. Once the onion is translucent, add the minced garlic and cook for a minute or so. Add in the chopped carrots and celery, and cook for a couple of minutes, until they’ve softened a little bit. Then, add in the diced zucchini (and green beans, if you are using fresh green beans. If you are using frozen ones, add them in once you add in the pasta later on) and season everything with salt, pepper and dried oregano. Cook for another couple of minutes, stirring the vegetables occasionally.

.

2. Next, add in the chicken broth (use vegetable broth if you want a vegetarian soup), diced tomatoes and crushed tomatoes, and bring everything to a boil. Reduce the heat and let the soup simmer for 10 – 15 minutes. Then, add in the pasta (I used Campanelle, but you can use any small pasta, and if you don’t want your soup very thick, only add about 1/4 cup of pasta), beans (drained and rinsed) and the frozen green beans if you are using those instead of the fresh green beans. Cook for an additional 10 minutes, or until all the vegetables have softened and the pasta is cooked. (If the soup seems too thick to you, just add more chicken broth and adjust the seasoning.) Serve with grated parmesan cheese and fresh bread.

Happy Cooking, Everyone!

Being Thankful…

Posted on November 13, 2013
“It’s not happy people who are thankful. It’s thankful people who are happy.”
I love this statement, and as Thanksgiving is just around the corner, I was thinking about all the things that I am thankful for this year, and about what being thankful is really all about. There is so much truth in this quote, because so much changes and shifts in your life when you consciously adopt a thankful heart and mindset. Why consciously? Because while on some great days, it’s easy to be happy and feel thankful for the wonderful things that have happened to you, there are many other days when honestly, feeling thankful is the last thing on your mind. And so thankfulness has to be a conscious choice. To decide to live a lifestyle of thankfulness and to make it a daily discipline. The result? Like the quote says, happiness. Why?
 .
Thankfulness changes your perspective and helps you see things in a different light. Nothing makes a problem or a struggle worse than dwelling on it. It’s so easy to get wrapped up in it and completely lose all sense of reality and perspective, but when you consciously change your thought patterns and begin to remind yourself of all the good things and blessings that you have forgotten about, you may just be surprised. Thankfulness helps you shift your focus from the bad to the good. And ninety-nine times out of a hundred, the good outweighs the bad, in a big way. It’s easy to overlook the little, ordinary and everyday blessings that go by without us even noticing, when really, it’s those little things that make up our days and weeks, and the more we notice those little things, the better those days and weeks will be.
 .
All this isn’t to say that I am always thankful and always have the right attitude. There are many times when I find myself complaining, feeling frustrated and having a little pity party for myself, thinking that things couldn’t possibly be worse for me, which in fact, couldn’t be further from the truth. So this is what I need to strive for. Of course we all have times when we feel discouraged, unhappy and frustrated, but instead of dwelling on those things, choose to fill your mind with the good. With the things that you are thankful for every day, whether they are big or small.
 .
I hope that you all enjoy this upcoming holiday season, that spend it with those that you love most, and that you find many, many things to be thankful for, not just on the good days, but every day.

Snowy Tree Sugar Cookies

Posted on November 11, 2013
Good Morning, Everybody! So since we are supposed to get our first snow of the season sometime this week (it may even be today! And even if it’s just a dusting, it still counts!), I thought it would be appropriate to share these Snowy Tree Sugar Cookies with you today! I used my favorite sugar cookie and royal icing recipes to make these (you can find both of them in THIS post), and you could even sprinkle some shimmery sugar on top of the “snow” to make it look sparkly! Sugar cookies are one of my favorite cookies, and I always have some frozen dough in my freezer, which is a great time saver. And with all the Christmas baking being just a couple of weeks away, I hope these little cookies give you some inspiration!
.
 .
.
.
Happy Baking, Everyone!
Back to top