Teapot Flower Arrangement

Posted on March 11, 2013
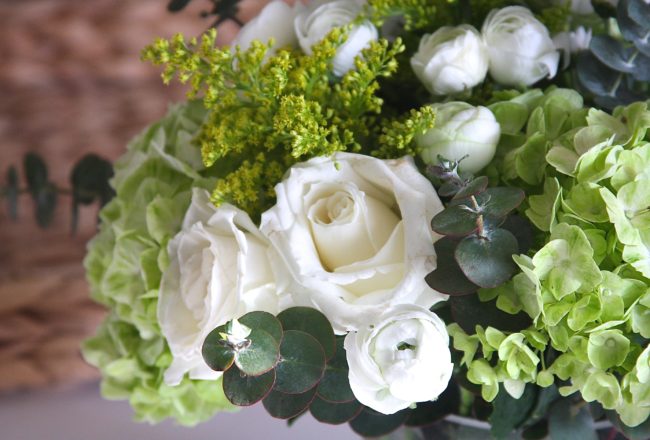
Hi, Everyone! I hope that March has started off well for you, and that you are enjoying some early spring weather already! We’ve had the most beautiful warm and sunny couple of days here in Maryland, and I’m hoping that this weather lasts now! And as signs of spring begin to pop up outside, I love bringing them inside our home too, especially with fresh cut flowers. I had a beautiful bouquet of flowers from my husband sitting on our dining room table, and as some of the flowers began to wilt a little bit, I took the ones that were still fresh and made a sweet little teapot arrangement out of them for my desk. The perfect way to bring spring into your home!
 .
Have a great week, Everyone!

Fabric Covered Hangers

Posted on March 1, 2013
Hi, Everyone! Happy first day of March! Since March is National Craft Month, I’m starting the month off with a sewing project here on Shopgirl! These Fabric Covered Hangers are very simple to make and are a great sewing project for anyone who is a beginner. Plus, they will look cute in your closet! What’s fun is that you can customize by using whatever fabric you like, adding embellishments like bows, buttons, ribbon or lace, buttons, sequins… or whatever else you may think of! I got this idea from the Design Sponge book, which is filled with fun projects like this. Here is how you can make your own…
,
.
To make one of these hangers, first get the hanger you will be using, and trace its outline onto a piece of paper. Cut it out, and trace it onto your fabric, adding a half inch border around the whole shape. Cut out two of these shapes and hem the bottom of each. Next, place the two pieces of fabric on top of each other with the right sides facing each other and use a couple of pins to secure the fabric in place. Then, sew around the edges, leaving an opening at the top to put the hanger through. Turn the fabric the right side out and place your hanger inside it (if it’s too crinkled just iron it). I made a little bow to add to the top and then attached it using hot glue, but you can add whatever embellishments you choose!
.
.
Another way you could customize these is by adding names or a “His” and “Hers” onto your hangers with some fabric paint. How fun would these be for a wedding, done in the wedding colors for the whole bridal party to hang their dresses on! This little project is also a great way to use up all those fabric scraps because you only need a little bit of fabric for each hanger cover.
.
Happy Crafting, Everyone!

Classic White Bread

Posted on February 27, 2013
Hi, Everybody! I don’t know if there is any food that I love more than just a warm slice of freshly baked bread. With butter of course, and lots of it! There is something so comforting and reassuring about homemade bread. It’s not an easy thing to make and I’ve definitely had my share of bread-making disasters, whether it was when my bread turned out heavy and dense like a brick, and therefore completely inedible, or when it was burned on top and still raw on the inside, and so inedible again. After lots and lots of recipes that I’ve tried, I recently finally found “The One”! This bread has a perfect crust and yet is wonderfully soft, light and fluffy on the inside. Here’s the recipe…
,
CLASSIC WHITE BREAD
(Recipe adapted from Martha Stewart)
*Makes 1 loaf*
 m
YOU WILL NEED
3 1/2 cups all-purpose flour
1 package instant dry yeast (1/4oz)
1 1/8 cup warm water
1 tbs plus 1 tsp honey
3 tbs unsalted butter, melted
2 tsp salt
 .
 .
DIRECTIONS
 ,
1. In a small bowl stir together 1/2 cup warm water, 1 tsp honey and package of instant dry yeast. Cover and let sit for about 5 minutes, until the mixture is frothy. Then, pour it into your electric mixer bowl.
 .
2. Add 2 tbs of melted butter, 1 tbs of honey and the rest of the warm water and mix well. In another bowl, sift together the flour and salt. Then, with your mixer running, begin adding the dry ingredients to the wet in portions. Mix until a dough begins to form. Then, using your dough hook attachment, knead the dough for about 10 minutes, until it’s soft and elastic. Then, form it into a ball and place it in a large greased bowl, cover it and let it rise in a warm place for about an hour, or until it has doubled in size.
 .
3. Once the dough has doubled in size, punch it down, take it out of the bowl and knead it by hand for just a couple of seconds. Form it into a rectangle (don’t stretch it out too much), then fold the long sides into the middle of the rectangle, and pinch down the seams (basically make a loaf shape out of the dough). Grease a standard loaf pan and place your dough in it. Cover again and let rise for about 10 – 20 minutes. Preheat your oven to 375 deg F.
 .
4. Once the oven is ready, brush your prepared loaf with the remaining tbs of melted butter, then place it in the oven. Bake for about 45 – 50 minutes, or until an inserted toothpick comes out clean, the loaf is golden brown and sounds hollow when you tap it. (*Note: I covered mine with foil after about 30 minutes of baking, just so it wouldn’t brown too much on top.) Cool for a couple of minutes before slicing and eating.
.
Happy Baking, Everyone!

Chicken Salad with Strawberries, Pecans and Cranberries

Posted on February 25, 2013
Hi, Everybody! Now that the winter months that were filled with eating indulgent comfort food are coming to an end, I feel like it’s time to start eating fresh food and lots of fruits and vegetables again. Every time spring comes around, I look forward to all the fresh local produce that I’ve been missing in the wintertime. I love salads and love coming up with new, creative ways to make them. I love filling them with lots of fresh ingredients and adding something sweet, something tangy and something crunchy. Here’s one of my favorites…
.
CHICKEN SALAD WITH STRAWBERRIES, PECANS AND CRANBERRIES
.,
YOU WILL NEED
Mixed greens salad
Baby spinach
Shredded chicken
Sliced strawberries
Pecans
Dried cranberries
*You can also add Feta or Goat cheese
 .
To make the salad, you will need some mixed greens and some baby spinach (this is a great source of lots of vitamins as well as iron and calcium, and I love it in salads!). Toss all the greens with the shredded chicken, sliced strawberries, dried cranberries and pecans. If you want to add some cheese to the salad, Feta or goat cheese would be the perfect choice! Serve the salad with a balsamic vinaigrette or a tangy salad dressing.
 .
Have a great rest of your week, Everyone!

Kitchen Tip: Frozen Cookie Dough Balls

Posted on February 24, 2013
Hi, Everyone! Maybe this baking tip isn’t new to you, but I only discovered this little trick recently and wanted to share it here with you! Do you ever crave a warm, homemade cookie but don’t want to bake a whole big batch (because if you are like me, you will want to eat them all)? Here’s what you can do – Frozen Cookie Dough Balls! Make your cookie dough, form it into balls like you would if you were going to bake the cookies, then place all the cookie dough balls on either a large tray or plate, and place them in the freezer for a couple of minutes, until they are frozen. Then just pop them in a large ziplock bag (I arrange mine on a plastic plate and place that inside the ziplock bag) and keep them frozen until you are ready to bake! This way, whenever you want a cookie or two, all you need to do is take a couple pieces out of the freezer, let them thaw for just a couple of minutes and then bake them and have freshly made cookies in just a couple of minutes!
.
Happy Baking, Everyone!

Scented Fabric Hearts

Posted on February 23, 2013
Hi, Everyone! I have a really fun and easy project to share with you today! Scented Fabric Hearts! It’s a great way to use up all those fabric scraps that you may have, and besides being fun to make and decorate, these little hearts will make your home smell wonderful! Place them in a closet or a drawer or any other place that needs freshening up a little! Here’s how you can make them…
 .

SCENTED FABRIC HEARTS

YOU WILL NEED
Fabric scraps
Card stock
Needle and thread or hot glue
Ribbon
Decorative embellishments (like the keys I used)
One store bought scented sachet
Polyfill
 /
.
DIRECTIONS
.
To make these scented hearts, you will first need to make a heart shaped stencil out of the card stock (you can make it whatever size you like, my fabric scraps were about 5×5 inch squares). Next, using the stencil, draw out the hearts on your fabric (you will need 2 hearts for each little scented heart). Cut the hearts out, then either sew them together or glue them together around the edges using hot glue, leaving an opening at the bottom, so you can stuff them. Stuff the hearts with polyfill. Then, you can either sprinkle some of the scented sachet into the heart, or you could make a little paper pouch for it and then insert that inside the heart. Once you’ve added the scent, glue or sew up the heart opening. Then, decorate the heart as you like by adding some ribbon, keys like I did, buttons, sequins, pearls or whatever else you may think of! You could also attach a ribbon loop at the top so you could hang these up somewhere.
.
 .
Happy Crafting, Everyone!

Homemade Cheez-Its

Posted on February 20, 2013
Hi, Everyone! So, the other night my husband and I were sitting on the couch watching a movie, and craving snacks (like we usually do), so he got up to see what goodies we had in the pantry. He came back and said, “We don’t have any man snacks!” which I guess was true since our pantry was still filled with tons of different kinds of chocolate left over from Valentine’s Day. So I thought… what’s his favorite “man snack”? And the answer is Cheez-Its, of course! So I decided to attempt to make a homemade version, and I can’t believe how good they turned out! They literally taste JUST like the store bought kind! And the ultimate stamp of approval? My husband said they were addicting. I think they passed the test!
.
HOMEMADE CHEEZ-ITS
(Recipe from BHG)
*Makes about 100 crackers*
 .
YOU WILL NEED:
8oz shredded cheddar cheese (I used sharp aged white cheddar)
1 cup all-purpose flour
4 tbs unsalted butter, softened
1 tsp salt
3 – 4 tbs ice water
 .
.
DIRECTIONS
.
1. First, mix together the shredded cheese,  half of the salt and the softened butter. (I used sharp aged white cheddar cheese, but you can use whatever kind of cheese you like. I shredded my own cheese just because I think it has better flavor and melts better, but you can use pre-shredded too to save some time!) Add in the flour and mix until the dough looks like little fluffy clumps. Then, with the mixer running begin adding the ice water and mix until a soft dough forms. (use as much ice water as you need for a dough to form).
 .
2. Divide the dough in two, form each into a disk and wrap in plastic wrap. Refrigerate the dough for about 30 minutes. Then, roll the dough out on a floured surface into about an 1/8 inch thickness and using a fluted pastry cutter, cut the dough into about 1 inch squares.
.

3. Preheat your oven to 375 deg F and line your baking sheets with parchment paper. Transfer your little cheez-its onto the parchment paper, make a hole in the center of each with a toothpick, then sprinkle them with the rest of the salt. Bake for about 7 – 10 minutes (baking time will depend on your oven, just watch them carefully so they don’t burn!), or until they have puffed up and the edges begin to brown. Let cool before eating. (They are best eaten right away, but you can store them in an airtight container).

.

 /
These homemade Cheez-Its are so quick and easy to make, and if you love the store bought version, these taste almost exactly the same! And from start to finish they only take about an hour to make! But I warn you, even though it may look like you have lots and lots of little Cheez-Its lined up on your baking sheet, they will be gone very quickly! Because they really are addicting!
Happy Baking, Everyone!

Baked Apple Cranberry Oatmeal

Posted on February 19, 2013
Hi, Everybody! It’s a cold, dark and rainy morning here in Maryland today… this is definitely my least favorite thing about winter. I’m ready for some sunshine and warmer weather, and so I’ve started counting down until the first day of spring… only 28 more days left! In the meantime, I’m trying to find new ways to cheer these dreary mornings up… and a good, warm breakfast always does the trick! I love this Baked Apple Cranberry Oatmeal, it’s sweet and creamy with a juicy tanginess from the tart apples and cranberries. And the cozy smell of cinnamon filling your kitchen as the oatmeal bakes is guaranteed to warm up even the coldest of mornings!
.
BAKED APPLE CRANBERRY OATMEAL
(Serves 6 – 8)
 .
YOU WILL NEED:
2 1/4 cups rolled oats
1 tsp baking powder
1/4 tsp salt
1/2 cup brown sugar
1 1/2 tsp pure vanilla extract
1 1/2 tsp ground cinnamon
1 large egg
2 cups fat free milk
2 apples (like Granny Smith apples), diced
1/2 cup dried (or frozen) cranberries
 ,
DIRECTIONS
1. Preheat your oven to 375 deg F, and prepare your baking dish (I used a 9inch round baking pan). Peel, core and dice your apples. In a large bowl, combine oats, brown sugar, baking powder, ground cinnamon and salt.
 .
2. In a smaller bowl, whisk together the milk, egg and vanilla extract. Pour the wet ingredients into the dry, then add the diced apples and the cranberries and mix well. Pour the mixture into your greased baking dish and bake for 20 – 30 minutes (or until the edges begin to brown and pull away from the pan and the center no longer jiggles. *You can adjust the flavors to your taste of course – add more/less sugar, cinnamon, vanilla extract.
 /
Happy Baking, Everyone! Have a great morning!

Dutch Baby Pancake with Apples and Cinnamon

Posted on February 17, 2013
Hi, Everyone! I hope you are all having a great weekend! This Dutch Baby Pancake is perfect for a lazy weekend breakfast or brunch! There are so many different ways to make pancakes and it seems like every culture has some sort of variation of this classic. Whether it’s baked, fried, cooked, sweet or savory, a crepe, a Dutch Baby or the regular pancake…. I love any form of it! This Dutch Baby pancake is baked in the oven and is deliciously light and airy, and tastes so good with a generous dusting of powdered sugar and topped with sweet and juicy cooked apples!
.
DUTCH BABY PANCAKE
WITH APPLES AND CINNAMON
(Adapted from Taste of Home)
*Serves 8*
 .
YOU WILL NEED:
Pancake:
3 eggs
1 cup milk
3/4 cup all-purpose flour
3 tbs unsalted butter, melted
1 tbs granulated sugar
1/2 tsp vanilla extract
 .
Apple Topping:
2 apples, peeled and thinly sliced
1 tsp granulated sugar
1 tsp lemon juice
1/4 tsp ground cinnamon
1/2 tbs unsalted butter
Confectioners’ sugar (for dusting at the end)
.

.

DIRECTIONS

1. In a small bowl, whisk together the eggs, milk, flour, sugar and vanilla extract. Set aside. Butter a 9-inch round pan (or a cast-iron skillet, I didn’t have a skillet so I just used a round pan) and preheat your oven to 400 deg F. Pour your batter into the prepared pan, and bake for 20 – 25 minutes, or until the pancake begins to puff up, the edges begin to curl away from the pan and the pancake is golden brown!

2. While your pancake is baking, prepare your apple topping. Peel and thinly slice your apples, and saute them in a small pan with the butter, sugar, lemon juice and cinnamon. Cook until the apples are soft.

3. Once the pancake is done, sprinkle it with the confectioners’ sugar and top with cooked apples and serve!

.

Happy Baking, Everyone!

Tied with a Bow – Stenciled Bow Brownies

Posted on February 15, 2013
Hi, Everyone! Happy Friday! I hope you all had a wonderful Valentine’s Day! I know that you may be stuffed with all those Valentine’s chocolates and luscious chocolate desserts, but I’m sharing a dessert idea with you today anyway! Because as far as I’m concerned, you can never have enough dessert! And these Stenciled Bow Brownies are a great one! I saw Martha Stewart do this a while ago, and I’ve been wanting to try it ever since. It’s a great way to make brownies look a little extra special, whether they are homemade or come from a box mix. Here’s how you can make your own…
.
,.
 To make these Stenciled Bow Brownies, first make your bow stencil. You can either make your own like I did, or you can use this one from Martha Stewart. Draw out (or print out) your stencil on a piece of card stock and cut it out carefully. Make sure that the size of your stencil works with the size of your baking pan that you will be baking your brownies in. Then, bake your brownies and let them cool completely. If you need to, trim the edges. Once the brownies have cooled completely, lay your stencil on top and sprinkle the whole thing with powdered sugar. Carefully lift the stencil off and viola! A beautiful bow!
,

Happy Baking, Everyone! Have a great weekend!
Back to top