A Little Tour of Prague

Posted on February 8, 2013
Hi, Everyone! It’s been fun being back at home in Prague, Czech Republic, for a little while visiting my family again, and I wanted to share some pictures with you today! Prague is a beautiful old city in the heart of Europe, filled with historical buildings and town squares, little cafes, and cobblestone streets.
Even though I’m currently visiting here for my leisure, there are people who make a profession out of traveling, like a travel blogger, for instance. The more attention their blog or social media handles like TikTok and Instagram get from their followers, the more likely they are to be noticed by reputed firms that can most likely pay them to advertise their services. In addition, these bloggers could also make use of the best TikTok growth services, or similar ones, in order to expand their audience base. What better way than to earn money while traveling and blogging? To be honest, Prague could definitely be an ideal location for them to follow their passion of leisurely travel and making money out of the same.
Coming back to my story, it’s been so cold here for the past couple of days, and it has snowed a little bit almost every day, making the city look so magical. Let’s take you to few places that might be of interest to you.
,
DSCN7517
Old Town Square, famous for its Astronomical Clock “Orloj”, Tyn Church and statue of Jan Hus. It’s also filled with lots of cafes, restaurants and little shops in all the historical buildings, and there is a big market in the center of the square every Christmas and Easter.
.
DSCN7519
The astronomical clock “Orloj” (which dates back to 1410) on Old Town Square. Every hour, lots of people gather in front of it to see the the little doors on it open, and see figures of the Apostles walk by.
.
DSCN7513
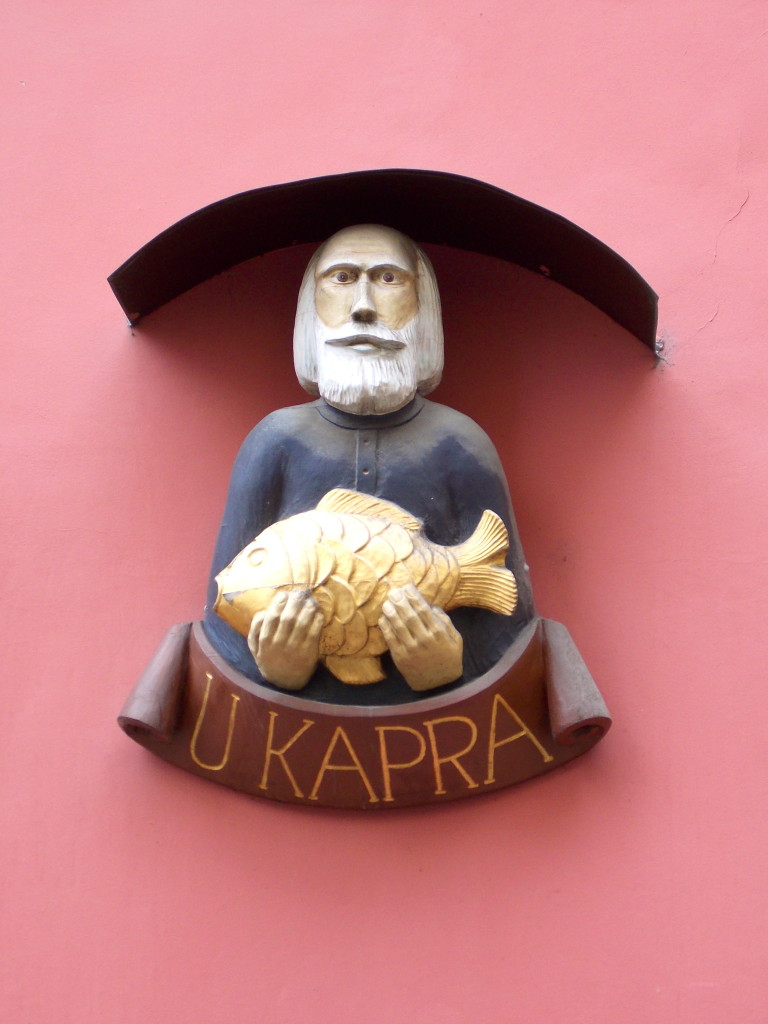
One of my favorite things about Prague is its beautiful architecture, and all the beautiful little details on each building. This sculpture decorates one of the 15th century buildings off of Old Town Square, which is called “U Kapra” (At Carp’s).
.
DSCN7514
.
DSCN7541
Stavovske Divadlo (Estates Theater). This 18th century theater is most famous for being the site of the premiere of Mozart’s Don Giovanni in 1787. Walking around the theater and going inside it, you can almost imagine what it was like back in Mozart’s day, with beautifully dressed ladies and gentlemen rushing into the theater in the evenings, going to see plays and operas that would become musical masterpieces.
.
DSCN7483
Prague Castle
.
DSCN7476
Walking by the river Vltava which runs through Prague.
.
DSCN7665
One of the traditional Czech appetizers, “Chlebicky” – open faced sandwiches, which are slices of a baguette topped with different meats, cheeses, spreads and vegetables.
,
DSCN7663
A classic Czech dessert, “Vetrnik” – it’s basically a large cream puff, that’s filled with a special cream and topped with caramel.
.
DSCN7667
At least some signs of spring…
.
DSCN7668
Beautiful tulips at a street stand.
.
I hope you enjoyed this little tour of this beautiful city in the heart of Europe, and if you are ever in the area, make sure you visit Prague and see some of the sights it has to offer! Prague is famous for many different things and there are so many things to do! You could even check out the best nightclubs in Prague if you enjoy drinking!
Have a great weekend, Everyone!

Blueberry Rolls with a Lemon Glaze

Posted on February 6, 2013
Hi, Everybody! Today I’m sharing another sweet roll recipe with you – Blueberry Rolls with a Lemon Glaze! I shared these Raspberry Swirl Rolls and these Cinnamon Raisin Buns with you, and these Blueberry Rolls are just as good! I love using blueberries in baking because they add so much freshness and juiciness, and they are so good in this recipe! These rolls are deliciously sweet, with a juicy tang from the blueberries and a fresh tartness from the lemon glaze. They take a little bit of time to make, since you need to allow time for them to rise, but they are well worth the effort! Happy Baking, Everyone!
.
BLUEBERRY ROLLS WITH
A LEMON GLAZE
(Adapted from Taste of Home)
*Makes about 12 rolls*
 .
YOU WILL NEED
Dough:
3 1/2 to 4 cups all-purpose flour (I used about 4 cups)
1 package active dry yeast (3/4oz)
1/2 cup plus 1/8 cup warm water
3/4 cup warm milk
1/2 cup (4oz) unsalted butter, softened
2 tbs granulated sugar
1 egg
1/2 tsp salt
 .
Filling:
3 tbs unsalted butter, melted
4 tbs granulated sugar
2 cups blueberries (fresh or frozen)
 .
Glaze:
3/4 cup confectioners’ sugar
2 tbs lemon juice
 .
.
DIRECTIONS
 .
1. Begin by dissolving your yeast in the warm water in your electric mixer bowl. Cover it with a kitchen towel and let it sit for about 5 minutes, until the mixture is frothy. Then, begin adding the milk, butter, egg, sugar and salt, and mix until you have a smooth mixture.
 .
2. Next, start adding the flour in portions (add as much flour as you need to make the dough hold together), you should have a soft, elastic dough. Knead with the dough hook attachment on your mixer for at least 5 minutes. Then, form the dough into a ball, place it in a large greased bowl, cover it and let it rise in a warm place for up to an hour and a half (until it has doubled in size).
 .
3. Once you take the dough out, punch it down and roll it out into a rectangle on a floured surface (roll it out to about 8×14 inches). Drizzle the rolled out dough with the 3 tbs of melted butter, then arrange the blueberries on it and sprinkle the sugar on top.
 .
4. Now begin rolling the dough up jelly-roll style, starting with the long side. Make sure you roll the dough tightly, and pinch the ends so the filling doesn’t fall out. Grease your baking dish (I used a 9 inch baking pan), and using a sharp knife, cut the roll into 12 equal slices, placing each into the baking dish. Cover with a kitchen towel and let rise for another 30 minutes. Preheat your oven to 350 deg F.
 .
5. Bake for 20 – 30 minutes, depending on your oven, until the edges are golden brown and the center has baked through. Let the buns cool for about 10 minutes, and prepare your glaze while they are cooling. Combine confectioners’ sugar and lemon juice in a small bowl (make sure there are no lumps in the glaze), then drizzle over the buns.
 ‘ 
 .
Happy Baking, Everyone!

A Trip to Hershey’s Chocolate World

Posted on February 2, 2013
Hi, Everyone! I wanted to share a couple of pictures from our day at Hershey’s Chocolate World a couple of days ago. If you are a chocolate or candy lover, and have never been there, you NEED to go! My husband’s grandparents live right by Hershey, Pennsylvania, so we’ve had lots of fun trips to Chocolate World and to Hershey Park over the years. Besides the park which is open when the weather is nice, you can visit Hershey’s Chocolate World, where you can take a fun ride through the factory where they show you how all the chocolate is made, then you can walk through their delicious gift shop where you can find EVERY kind of Hershey’s candy and chocolate, and finish up at one of their cafes and sweeten your day with some of their delicious goodies!
.
  DSCN7364
Drinking some Hershey’s hot cocoa with whipped cream and chocolate chips!
/
 DSCN7373
Welcome to Hershey’s Chocolate World!
.
DSCN7372
.
DSCN7367
My favorite man.
.
DSCN7362
Hershey’s hot cocoa with whipped cream and chocolate chips and a Reese’s Peanut Butter Cup Cupcake
.
DSCN7371
The bakeshop!
DSCN7374
Have a great weekend, Everyone!

Hand-stitched Valentine

Posted on February 1, 2013
Hi, Everyone! Happy February! With Valentine’s Day only two weeks away now, here is another easy project that I’m sharing with you! Hand-stitched Valentines! These are very easy to make, all you need is some fabric and a needle and some thread! I started by drawing out the tree and the “carving” onto my fabric with a pencil, and then simply stitched the picture with some red and brown thread. These would make for really cute Valentines; you could frame them, insert them into a card, or even stitch this pattern onto a pillow case. Here are some pictures of what I did…
 .
Happy Crafting, Everyone!

Creamy Broccoli Cheese Soup

Posted on January 27, 2013
Hi, Everyone! Another cold day calls for another soup recipe! This Creamy Broccoli Cheese Soup is one of my favorites, but this time I decided to lighten it up just a little bit by using skimmed milk and cutting some of the cream. This way it’s a little healthier, and still just as good! And with some warm bread and a handful of freshly grated cheese, it’s the perfect cozy dinner on a cold winter’s night!
 .
CREAMY BROCCOLI CHEESE SOUP
(Adapted from The Pioneer Woman)
*Serves 3 – 4*
.
YOU WILL NEED
2 tbs unsalted butter
2 tbs olive oil
3 tbs all-purpose flour
3 1/2 cups milk (I used fat-free)
1/2 cup half-and-half
2 heads of broccoli, cut into florets
1 medium onion, diced
1 1/2 cups chicken stock (or vegetable stock)
2 cups grated Cheddar cheese (plus more for serving)
Salt and pepper
 .
DIRECTIONS
1. First, heat the butter and olive oil in a large pot. Add in the onions and cook them on medium heat for about 5 minutes, or until they have softened and are translucent. Sprinkle in the flour and stir the onions with the flour for about a minute, just to cook the flour taste out. Then, pour in the milk and the half-and-half while stirring continuously.
 .
2. Add in the chicken stock (or vegetable stock), broccoli florets and salt and pepper and bring to a boil. Once the soup comes to a boil, reduce the heat to low and simmer covered for 30 minutes, or until the broccoli is soft.
 .
3. Stir in the cheese in two portions, allowing it to melt completely into the soup. Let the soup cool a little bit, and once it’s cool enough to pour into your blender, puree it completely. Once it has been pureed, return it into your pot and make sure that it’s well seasoned. If the soup is too thick, add more chicken stock to thin it out a little. Serve hot with good bread and some freshly grated cheese on top!
l

Happy Cooking, Everyone!

Country Applesauce Muffins

Posted on January 26, 2013
Hi, Everyone! Happy Weekend! I hope you all had a great week and are having a relaxing weekend now! My husband and I just got back from visiting his grandparents in Pennsylvania, where everything turned into a winter wonderland within a couple of hours yesterday! Everything looked so peaceful and beautiful as we drove down the windy country roads, and as the wind was blowing the snow around it looked like all the hills were getting powdered with a coating of shimmery white glitter. It was just beautiful! And on cold days like that, there is nothing better than a kitchen full of freshly baked goodies to warm you up! These Country Applesauce Muffins are the perfect comfort for a snowy day – they have that wonderful homey taste, and are so quick and easy to make!
 .
COUNTRY APPLESAUCE MUFFINS
(Recipe from Williams-Sonoma)
*Makes 12*
YOU WILL NEED:
2 cups all-purpose flour
2/3 cup granulated sugar
2 tsp baking powder
1/2 tsp baking soda
1/2 tsp kosher salt
1 1/2 tsp ground cinnamon
1 tsp ground allspice
1 cup chopped walnuts
1/3 cup oil
1 egg
1 heaping cup applesauce (I used natural unsweetened)
*Optional: 1/2 cup raisins
 .
 .
DIRECTIONS
 .
1. In a large bowl, sift together the flour, sugar, baking powder, baking soda, cinnamon, salt and allspice. Set aside.
 .
2. In your electric mixer bowl, mix together the oil, egg and applesauce (*I used natural unsweetened applesauce, but if you want some added sweetness just use the regular applesauce) until you get a smooth mixture. Begin adding your dry ingredients in portions, and mix until all ingredients are incorporated. Then, add in the chopped walnuts (and raisins, if you are adding them).
 ,
3. Preheat your oven to 350 deg F and line a standard muffin pan with muffin cups. Drop about 1/4 cup of the batter into each muffin cup. Bake for 20 – 30 minutes, or until a toothpick comes out clean when inserted into the center of the muffins. Let cool for a couple of minutes before eating. Serve warm.
 .
Happy Baking, Everyone!

Creamy Tomato Soup with Grilled Cheese Croutons

Posted on January 22, 2013
 Hi, Everybody! I don’t know about you, but this cold, windy weather makes me crave warm, satisfying soups almost every day! In fact, the other day I had some soup for lunch, and then made a whole new pot of soup for dinner! Besides it being cold, I haven’t been feeling too well, and eating a steaming hot bowl of soup always feels like an extra dose of medicine! If you are looking for a quick and comforting weeknight meal to cook for your friends or family, this Creamy Tomato Soup with Grilled Cheese Croutons is just perfect! It takes less than an hour to make, and it’s my absolute favorite tomato soup recipe (the Barefoot Contessa never disappoints!) It’s wonderfully creamy and rich (there may be some heavy cream involved…) and the grilled cheese croutons are just the perfect topping for a bowl of this soup!
l
CREAMY TOMATO SOUP 
WITH GRILLED CHEESE CROUTONS
(Recipe adapted from The Barefoot Contessa)
*Serves 4 – 6*
 .
YOU WILL NEED:
2 medium sized onions, diced
3 tbs olive oil
4 cups chicken stock
28oz can crushed tomatoes (like San Marzano)
Pinch of saffron (this adds wonderful flavor!)
1/2 cup heavy cream
1 tbs kosher salt
1/2 tsp freshly ground pepper
 .
 .
DIRECTIONS
 .
1. In your soup pot, saute your diced onions in the olive oil for about 10 minutes, or until they are soft and translucent. Once they are soft, add the chicken stock, crushed tomatoes, salt, pepper and saffron. Turn the heat up and bring the soup up to a boil, then turn the heat down and let the soup simmer for about 15 minutes.
 .
2. Next, stir in the heavy cream, and let the soup simmer for another 10 minutes. Meanwhile, prepare your grilled cheese croutons by making a regular grilled cheese sandwich, then letting it rest for up to 5 minutes (this is important otherwise the cheese will melt right out… trust me!) and then cutting it into bite sized pieces.
 .
3. Once your soup is done, let it cool a little bit, and once it’s cool enough to pour it into your blender, pour it in in portions, and puree it (you want it creamy but still slightly chunky). Serve the soup warm in bowls, topped with the grilled cheese croutons!

 .
Happy Cooking, Everyone!

Glazed Cinnamon Raisin Buns

Posted on January 20, 2013
Hi, Everyone! I hope you are all having a wonderful weekend and are staying warm and healthy! It always feels like January drags on forever and the weather becomes so dark and dreary without all the Christmas lights to brighten it up. But I love these words about wintertime, “Winter is the time for comfort, for good food and warmth, for the touch of a friendly hand and for a talk beside the fire: it is the time for home”, they sum it up perfectly! So today, I’m sharing some of that good food with you – Glazed Cinnamon Raisin Buns! Baking these in the warmth of your home on a cold day is definitely one of the best comforts of wintertime!

 .
GLAZED CINNAMON RAISIN BUNS
(Adapted from Taste of Home)
*Makes about 12 large buns*
YOU WILL NEED:
Dough:
3 1/2 to 4 cups all-purpose flour (I used about 4 cups)
1 package active dry yeast (3/4oz)
1/2 cup plus 1/8 cup warm water
3/4 cup warm milk
1/2 cup (4oz) unsalted butter, softened
2 tbs granulated sugar
1 egg
1/2 tsp saltFilling:
3 tbs unsalted butter, melted
1 cup packed brown sugar
3 tbs ground cinnamon
1/2 cup raisins

Glaze:
3/4 cup confectioners’ sugar
1/2 tbs unsalted butter, melted
1/4 tsp pure vanilla extract
2 tbs milk

.

DIRECTIONS
1. Begin by dissolving your yeast in the warm water in your electric mixer bowl. Cover it with a kitchen towel and let it sit for about 5 minutes, until the mixture is frothy. Then, begin adding the milk, butter, egg, sugar and salt, and mix until you have a smooth mixture.
 .
2. Next, start adding the flour in portions (add as much flour as you need to make the dough hold together), you should have a soft, elastic dough. Knead with the dough hook attachment on your mixer for at least 5 minutes. Then, form the dough into a ball, place it in a large greased bowl, cover it and let it rise in a warm place for up to an hour and a half (until it has doubled in size). While you wait, make your filling by combining the brown sugar with the cinnamon. Set aside.
 .
3. Once you take the dough out, punch it down and roll it out into a rectangle on a floured surface (roll it out to about 8×14 inches). Drizzle the rolled out dough with the 3 tbs of melted butter, then sprinkle with the brown sugar/cinnamon mixture. Sprinkle the raisins evenly on top of the brown sugar/cinnamon (make sure the raisins are plump – you can do this by soaking them in boiling water for a couple of minutes, or soaking them in some orange juice. Just drain them before using them!)
 .
4. Now begin rolling the dough up jelly-roll style, starting with the long side. Make sure you roll the dough tightly, and pinch the ends so the filling doesn’t fall out. Grease your baking dish (I used a 9 inch baking pan), and using a sharp knife, cut the roll into 12 equal slices, placing each into the baking dish. Cover with a kitchen towel and let rise for another 30 minutes. Preheat your oven to 350 deg F.
 .
5. Bake for 20 – 30 minutes, depending on your oven, until the edges are golden brown and the center has baked through. Let the buns cool for about 10 minutes, and prepare your glaze while they are cooling. Combine confectioners’ sugar, melted butter, vanilla extract and milk in a small bowl (make sure there are no lumps in the glaze), then drizzle over the buns! Serve warm!
 .

Happy Baking, Everyone!

Valentine’s Day Love Bird Cookies

Posted on January 17, 2013
Hi, Everybody! Welcome to another post in my Valentine’s Day Projects series! Today I’m sharing another cookie idea for Valentine’s Day – my Love Bird Cookies! To make these, I drew out a bird stencil and a branch stencil, and then cut the shapes out of some sugar cookie dough. I used Martha Stewart’s sugar cookie and icing recipes, which are both very easy to make! The fun part is decorating the cookies and packaging them up in a cute way for Valentine’s Day!
.

Happy Baking, Everyone!

Valentine’s Day Heart Puzzle Cookies

Posted on January 14, 2013
Hi, Everyone! With exactly a month left until Valentine’s Day, I’m sharing the first of my Valentine’s Day projects with you today! My Valentine’s Day Heart Puzzle Cookies! They are just simple sugar cookies decorated with colored royal icing, and you can make them in any color combinations, and write whatever words or names you like on them! I didn’t have a cookie cutter for these so I just drew out a stencil and cut the cookies out using a knife, but I know they sell cookie cutters for these, so if you have one go ahead and use it! I used Martha Stewart’s basic sugar cookie recipe, and also her royal icing recipe. To gift package these, just place them in a pretty box or clear bag with some colorful shredded paper and tie with some ribbon! Super easy and super cute for Valentine’s Day!
.
Happy Baking, Everyone!
Back to top