Raspberry Swirl Rolls

Posted on September 27, 2012
Hi, Everyone! I’m so excited that “baking season” (fall) is finally here! I love to bake and have a whole list of new recipes I want to try out this fall! I made the first recipe on my list this week, and wanted to share it with you today, because it was SO delicious! I made these Raspberry Swirl Rolls and they are honestly one of my favorite things I’ve ever made! Definitely a keeper recipe! These rolls are wonderfully sweet and soft and have a deliciously tart, tangy raspberry filling. They are a great alternative to the traditional cinnamon rolls, and make for a perfect fall dessert! I love raspberries, so I loved them in this recipe, but you could definitely substitute them with other berries, next time I will try a mixed berry filling which I think would work really well too! I hope you all love these as much as we did! Here’s the recipe…
,
RASPBERRY SWIRL ROLLS
(Adapted from this recipe)
*Makes 16 rolls*
,
YOU WILL NEED:
Dough:
1 cup milk
2/3 cup granulated sugar
2 packets active dry yeast (1 1/2 tbs)
1 stick (4oz) unsalted butter, softened
2 large eggs
1/4 tsp salt
4 1/4 to 4 1/2 cups all-purpose flour
 l
Filling:
10oz frozen raspberries (not thawed)
1/4 cup plus 2 tbs sugar
1 tsp cornstarch
 ;
Glaze:
3/4 cup confectioners’ sugar
3 tbs unsalted butter, melted
1 1/2 tbs heavy cream
 l
l
DIRECTIONS
l

1. First, heat up the milk until it is lukewarm. Pour it into your electric mixer bowl, and add the sugar and yeast to it. Mix a little bit, then cover the bowl with a dish towel and let sit for about 5 minutes, until the mixture is frothy. Next, with the mixer running, add in the softened butter, eggs and salt. Slowly begin adding in the flower until a soft dough forms (if the dough is too sticky, add a little more flour). Using the dough hook attachment, beat the dough on medium-high speed for about 10 minutes. Next, form the dough into a ball, place in a greased bowl, cover and let sit in a warm place for about 1 to 2 hours, until it doubles in size.

k

2. Prepare your baking pan by lining it with parchment paper and buttering/spraying it with cooking spray. Once the dough has risen, turn it out onto a floured surface and roll it into a 10×24 inch rectangle.

kl

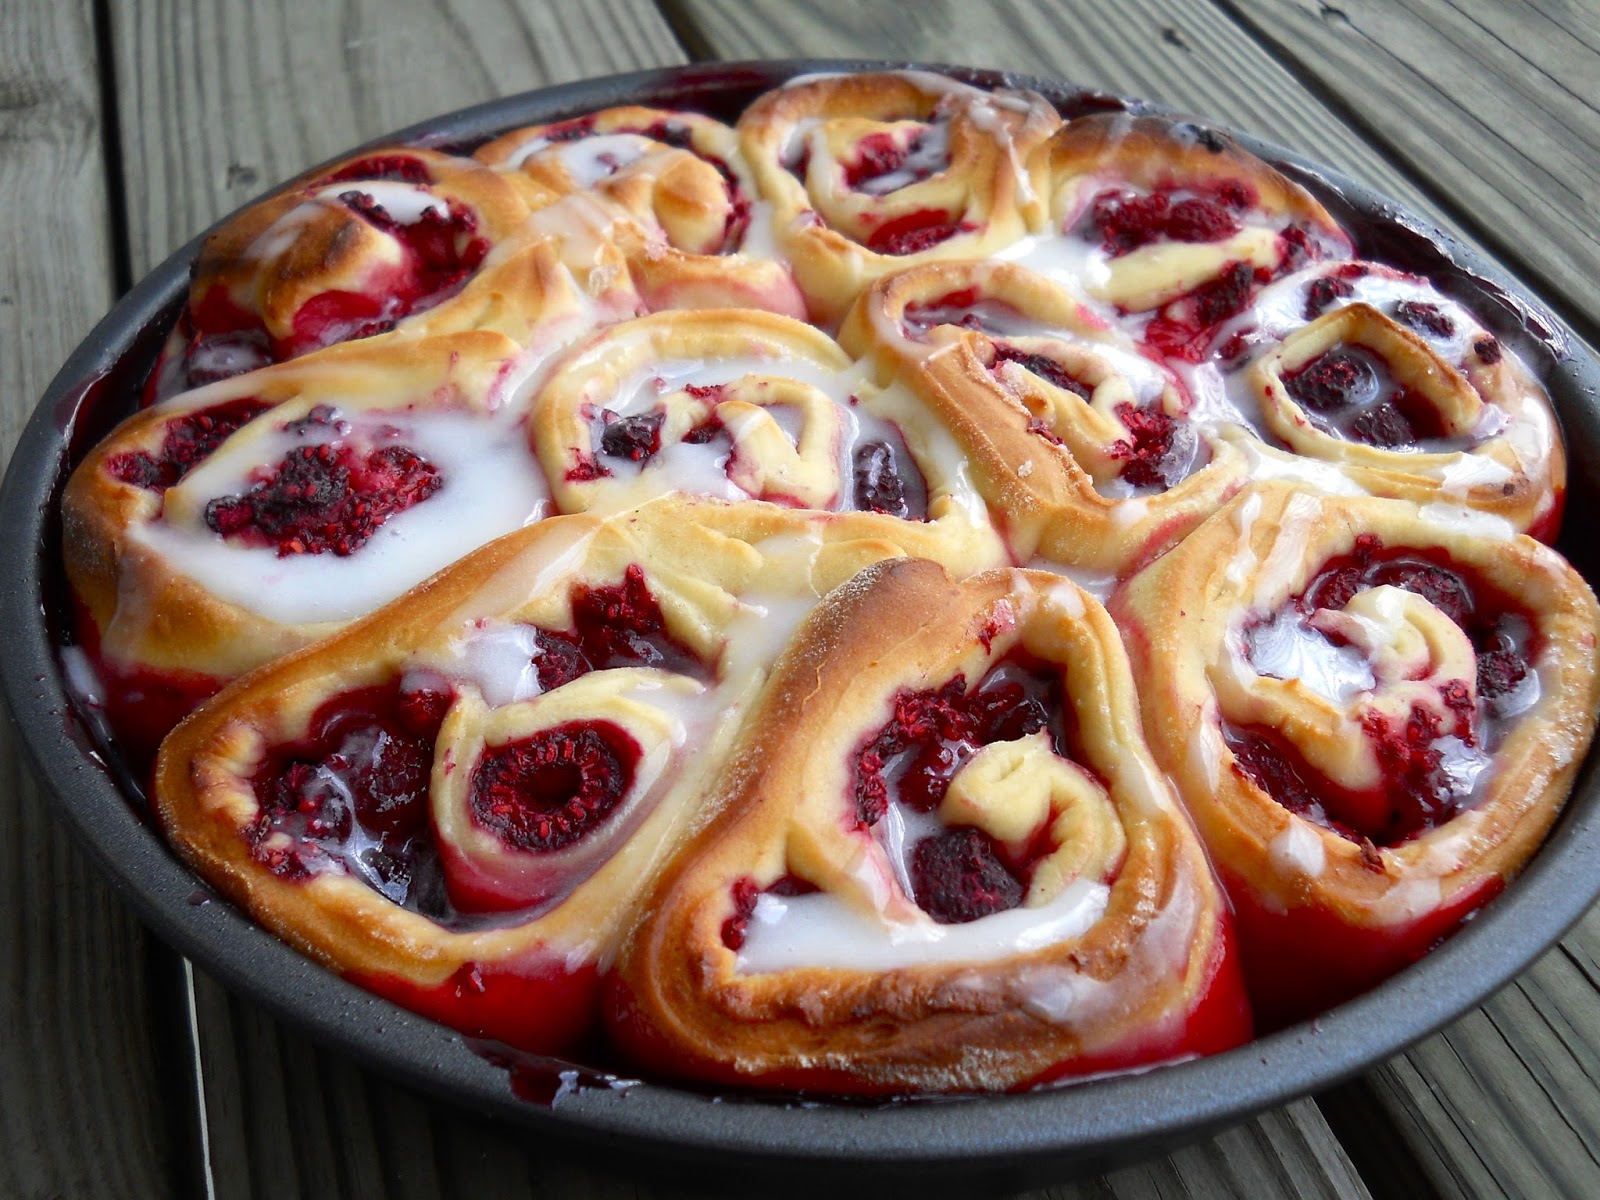
3. In a small bowl, mix together the frozen raspberries, sugar and cornstarch. Spread that over the dough and tightly roll it up. Using a sharp knife, cut the log into 16 equal sized slices (you will need to do this pretty fast, because the raspberries will start melting very quickly). Place the rolls into your prepared baking pans, cover them and let them rise in a warm place for another hour to two hours.

k

4. Preheat your oven to 425 deg F (if you think this is too hot for your oven, turn the temperature down to 400 deg F, or even lower if needed), and bake the rolls for about 25 minutes until they are beautifully golden brown and the juices are bubbling. Let cool. Next, prepare your glaze by whisking together the confectioners’ sugar, butter and heavy cream in a small bowl. Once the rolls have cooled a little, drizzle the glaze over the top. Serve warm!

k

Happy Baking, Everyone!!!
Have a great rest of the week!

A beautiful day in Annapolis

Posted on September 26, 2012
Hi, Everyone! I hope you are all enjoying the beginning of fall! We’ve had such beautiful weather here in Maryland these past few days, and it’s been so nice getting to explore our new area a little bit! We’ve been here in Maryland for almost two weeks now, and even though it’s been a super busy two weeks, we’ve found some time to visit different places and see different things! This is my favorite thing about moving to a new country, new state or new place – getting to see new things, explore new places, try new foods and see new traditions! One of our favorite places has been Annapolis, the state capital, which has a quaint little historic town center with a beautiful harbor and lots of cute little shops and restaurants. Here are some pictures of our day in Annapolis…
 l
l
If you’ve never been to Annapolis and are ever in the area, it’s definitely worth a visit! I’m looking forward to all the other new places we’ll get to explore during our time here! Hope you all have a great rest of your week!

Hot Chocolate Cookies

Posted on September 6, 2012
Hi, Everybody! I hope you are all having a great week and that September has started off well for you! So far, September has been very hot, humid and rainy for us here in New Jersey, and as much as I’m looking forward to the fall being here, I hope it’s not too rainy! There’s one thing that can make any rainy day better – a batch of warm, homemade cookies! Not just any cookies though, Hot Chocolate Cookies! I was so excited when I saw the recipe for these, and had to try them out immediately! They are our new favorite!!! They are deliciously sweet and chewy, and I love the hint of hot chocolate in every bite! They are the perfect treat for a rainy afternoon! Here’s the recipe…
 ,
HOT CHOCOLATE COOKIES
(Recipe adapted from The Tasty Kitchen)
YOU WILL NEED:
16 tbs (2 sticks/8oz) unsalted butter, softened
1 cup white sugar
2/3 cup light brown sugar
2 eggs
1 tsp vanilla extract
3 1/4 cups all-purpose flour
1 1/4 tsp baking soda
4 1oz packages hot chocolate mix (sweetened, I used Nestle)
1 tsp salt
1 1/2 cups white chocolate chips
1 1/2 cups semi-sweet chocolate chips
 m
n
DIRECTIONS

1. In your electric mixer bowl, cream together the butter, white sugar and brown sugar, until you get a nice, smooth, creamy mixture. Beat in the eggs and vanilla. In a different bowl, sift together flour, salt, baking soda and hot chocolate mix.

m

2. With the mixer running, begin adding the dry ingredients to the wet. Using a spoon, add in the chocolate chips (white and semi-sweet). Preheat your oven to 350 deg F and line your baking sheets with parchment paper.

m

3. Drop spoonfulls of cookie batter onto your baking sheets, about 2 inches apart. Bake for 9 – 11 minutes. Let cool for a couple of minutes before eating.

k

I promise you that if you love hot chocolate, you will LOVE these cookies!!! This was the first time I made them, and it’s definitely a recipe I’ll be keeping!!! I think I will make a Christmas version of these with some peppermint, or they would be great with walnuts too!
Happy Baking, Everyone!

Vintage Button Heart Pillow

Posted on August 27, 2012
Hi, Everyone! When I was back at home visiting my parents a couple of weeks ago, I found a big glass jar filled with vintage buttons that belonged to my grandmother and great-grandmother. There must have been hundreds and hundreds of buttons in the jar, of all different kinds and colors, each carrying a little piece of family history. My mom gave me the buttons to keep, but I didn’t just want to put them in another jar or another box, and so I came up with a way to use them and preserve the memories! I decided to sew them onto a pillow cover that I made out of some old white cotton fabric that had belonged to my grandmother. I love filling our home and surrounding myself with things that hold sweet, precious memories, and bring a smile to my heart every time I see them! Here’s the Vintage Button Heart Pillow I made using the old buttons.
k
 ,
The pillow was very simple to make, all I did was make a plain white cotton envelope pillow cover. I drew a heart on a piece of paper, cut it out to use as a stencil, placed it where I wanted it on the pillow cover and using a pencil, I lightly drew around the heart. Next, I picked out some of my favorite vintage buttons, and using some white thread, I started sewing them onto the pillow cover, filling up the heart.
 ,

Happy Crafting, Everyone!

Julia Child’s Kitchen at the Smithsonian Museum

Posted on August 25, 2012
Hi, Everyone! I hope that you are all having a great weekend and enjoying the last few days of the summer! I can’t wait for the fall to be here, I’m ready for the heat and the humidity to be over already! Although it does help that I have a great air conditioning unit in my home, installed by a HVAC expert like Morris Jenkins, it doesn’t stop me from overheating every time I step outside, particularly when I’m traveling. I wanted to share some pictures of a recent trip to Washington DC. As soon as I found out that Julia Child’s kitchen reopened at the Smithsonian Museum of American History in honor of what would have been her 100th birthday, I wanted to go and see it! I just read her book My Life in France a couple of weeks ago, and just love her whole story, and so I was so excited to get to see her kitchen! Here are some pictures from the exhibit, sorry they are not the greatest quality since they were taken with my phone. If you are a fan of Julia Child, it’s definitely a fun place to visit! You can find more information about it here!
,
.
By the entrance to the exhibition
,.
A view of the kitchen. Julia Child donated everything to the Smithsonian Museum in 2001.
m
.
Another view of the kitchen
,
The kitchen shows the hundreds of utensils that Julia owned, as well as lots of her appliances, dishes and pots and pans.
.
All of Julia’s copper cooking pots and pans!
.
Julia Child’s diploma from Le Cordon Bleu.
.
Unfortunately this was as close as you could get to the kitchen, it would have been so neat to be able to walk through it, but it was really interesting seeing it like this too! I have always loved modern kitchen designs but I am definitely drawn to this kitchen! No doubt people may take inspiration from this when it comes to their own remodel – I’m sure someone like this Carlsbad kitchen remodeling company would be able to create a kitchen that gives you the same warm and cozy feeling that this one certainly does.
However, no matter how chic the design looks, it will definitely would do with some upgrades to it! As in, I would opt for some nice renovations like maybe some beautiful granite or quartz countertops (you could find some amazing ones here), with classic yet sleek looking appliances! And yes, the oven! Definitely need an upgrade on that one!
.
However, if you’re ever in the area, are a fan of Julia’s and haven’t seen the kitchen, it’s a fun thing to do! They are also opening a new exhibition called Food: Transforming America’s Table, 1950 – 2000 at the Smithsonian American History Museum at the end of November! I hope you liked the little tour of Julia’s kitchen, and hope you get to check it out for yourself sometime! Have a great rest of your week, Everyone, and Bon Apetit!

Summery Peach Cobbler

Posted on July 20, 2012
Hi, Everyone! Happy Weekend! I hope you are all enjoying your summer so far! I’m sharing this delicious Summery Peach Cobbler recipe with you today! Fresh peaches are one of my favorite things about the summer, there is just nothing that can compare to that fresh peach smell! This peach cobbler is deliciously sweet and juicy and is the perfect summer treat paired with some vanilla ice-cream! Have a great weekend, everybody!
l
SUMMERY PEACH COBBLER
(Recipe adapted from All Recipes)
*Serves 6*
.
YOU WILL NEED
Peaches:
6 – 7 fresh peaches, peeled and sliced
1/4 cup white sugar
1/4 tsp ground cinnamon
1 tsp fresh lemon juice
2 tsp all-purpose flour
 ,
Topping:
1 cup all purpose flour
1/4 cup white sugar
1/4 cup light brown sugar
1 tsp baking powder
1/2 tsp salt
6 – 8 tbs unsalted butter, softened
1/4 cup boiling water
 ,
To sprinkle on top:
3 tbs white sugar
1 tsp ground cinnamon
 ,
l
DIRECTIONS

1. First prepare your peaches. Begin by peeling them (you can do this by cutting a cross into each peach, placing it in a pot of boiling water until the skin begins to peel off itself where you made the cross, and then place it into a bowl of ice water). Once you’ve peeled your peaches, cut them into thin slices.

l

2. Preheat your oven to 425 deg F and grease your baking dish. Place the sliced peaches in a large bowl, and add the sugar, ground cinnamon, lemon juice and flour. Mix well and transfer into your baking dish. Bake for 10 minutes, then take it out of the oven and spoon your topping on.

l

3. While the peaches are baking, prepare the topping. Combine flour, white sugar,  brown sugar, baking powder and salt, then add the butter and mix until the mixture resembles coarse meal. At the end, pour in the boiling water and whisk until you get a nice, smooth batter.

l

4. Take the baking dish with the peaches out of the oven, and spoon the topping over the peaches evenly. Sprinkle with the cinnamon sugar (I ended up using only about half of it), and bake for 20 minutes, until the top is golden brown. Serve warm with vanilla ice-cream!

 .
Happy Baking, Everyone!

Julia Child – My Life in France

Posted on July 14, 2012
Hi, Everyone! I hope you’re all having a great weekend! We had no plans for this weekend, and since life is usually pretty busy for us, I love it when I have nowhere to go and nothing to do! Yesterday we went to get some produce at a local farm; we got some delicious peaches (that smell heavenly!) and fresh sweet corn (the best sweet corn I have ever had in my life! It was as sweet as candy!) Here’s a glimpse of my lazy Saturday morning… English Breakfast Tea, fresh fruit and a Julia Child’s My Life in France. This is my idea of a lazy summer morning!
 .,
If you are a fan of Julia Child or enjoyed the movie Julie&Julia, and haven’t yet read this book, I would definitely recommend it! It’s an endearing account of Julia’s life and culinary adventures in Paris, and it is laugh-out-loud funny! From all the funny stories and familiar moments from Julie&Julia to insights into post-war Paris and Julia’s memories of Le Cordon Bleu and Parisian life, it’s a heart-warming story of her love for her husband, their life in France, and good food! It’s a perfect summer read!
., 
I love this part of the book where Julia describes how her teacher at Le Cordon Bleu made scrambled eggs- “His eggs were always perfect, and although he must have made this dish several thousand times,  he always took great pride and pleasure in this performance. Bugnard insisted that one pay attention, learn the correct technique, and that one enjoy one’s cooking – ‘Yes, Madame Scheeld, fun!’ he’d say. ‘Joy!’ It was a remarkable lesson. No dish, not even the humble scrambled egg was too much trouble for him. ‘You never forget a beautiful thing that you have made,’ he said. ‘Even after you eat it, it stays with you – always.”
Have a great rest of your weekend, Everyone!

Butterscotch Coconut Cookies

Posted on May 23, 2012
Hi, Everybody! I hope you’re all having a great week! I’m so excited to share this recipe with you today, because it’s my new favorite cookie recipe! These Butterscotch Coconut Cookies are AMAZING! I don’t think I’ve ever made a cookie this good. It’s sweet and chewy and the butterscotch and coconut are so good together! If you’re looking for a new cookie recipe and have never made these before, you NEED to try them! The recipe comes from the Williams Sonoma Baking Book, which is one of my favorite baking cookbooks! Here’s the recipe for you…
 ,
butterscotch 1
 BUTTERSCOTCH COCONUT COOKIES
The Williams Sonoma Baking Book
*Makes 4 dozen cookies*

YOU WILL NEED
1 1/3 cups all-purpose flour
1/2 tsp baking powder
1/2 tsp baking soda
1/2 tsp salt
1/2 cup sugar
1/2 cup packed light brown sugar
1/2 cup (1 stick) unsalted butter, softened
1 egg
1/2 tsp vanilla extract
1 1/2 cups sweetened shredded dried coconut
1 1/2 cups (9oz) butterscotch chips

k

 butterscotch 2

l

DIRECTIONS

k

1. Sift together flour, baking powder, baking soda and salt in a small bowl. Next, in your electric mixer bowl, cream together butter, sugar, brown sugar, vanilla extract and egg, until you get a smooth, creamy mixture.

;

2. Slowly with the mixer running, begin adding the flour mixture to the butter mixture until it is well mixed. Then, add the coconut and butterscotch chips, mix well, wrap in plastic wrap and refrigerate for 20 minutes.

;

3. Preheat your oven to 325 deg F and line your baking sheets with parchment paper. Shape the dough into 1-inch balls (leave space in between the cookies on the baking sheet as they will spread out).  Bake for 15 minutes, or until the edges are nice and golden brown.

.

butterscotch 3

Happy Baking, Everyone!

Recycled Gift Wrap Ideas – Part 2

Posted on May 17, 2012
Not too long ago, I shared some of my recycled gift wrap ideas with you, and I got so many sweet comments on the post! If you missed it, you can go back and read it here! Well, today I wanted to show you one more gift wrapping idea – a tissue paper flower wrapped gift! Here’s how I made it…
.
DSCN4937DSCN4889
DSCN4877
    DSCN4933.
First, I wrapped the gift in some crinkled white tissue paper, then, I tied it with four strands of twine, and tied those together in the center. Next, I made a flower out of a couple of layers of yellow tissue paper, and made the center of the flower by making some twine loops and sticking them in the middle using some hot glue. I cut out two leaves out of a brown paper bag and attached them to the bottom of the flower, and then glued the whole thing onto the gift using hot glue! So easy, so cute!
Happy Crafting, Everyone!

Beautiful Yellow Tulips – Tips for keeping cut flowers fresh

Posted on April 29, 2012

Hi, Everyone! One of my favorite things to have around the house are fresh cut flowers. I love how they instantly make a room look more bright and colorful. Tulips are definitely some of my favorite flowers, so I was very happy when I came home after work one day this week and saw that my husband had bought me a bouquet of yellow tulips! I’m always sad when the flowers wilt and I have to throw them out, but I’ve learned a couple of tricks that help them stay fresh and pretty for a little longer!

.

DSCN4863

.
TIPS FOR KEEPING CUT FLOWERS FRESH:
1. When you first get the flowers, cut each of the stems on an angle using a sharp knife or some scissors. This will expose more of the stem to the water so the flowers will be able to drink more of it and will stay fresh for longer. If you are putting the flowers in a vase, cut off any leaves that would be sitting in water.
2. Use lukewarm water for the flowers, and most importantly, change the water every day or every other day. This will prevent bacteria from building up in the water and killing the flowers faster. Every time you change the water wash the vase well too, and re-cut the stems.
3. Don’t place the flowers in direct sunlight, in a very warm spot or under hot lights. Keep them in a cool place, especially overnight.
4. Don’t buy flowers that have fully bloomed, but ones that haven’t fully opened up yet, this will let you enjoy them for longer!
l
 These are just a couple of things that I’ve learned and try to do to keep my flowers looking fresh for longer! Are there any other tips that you have for doing the same? Have a great week, Everyone!
Back to top