Valentine’s Day Love Tree

Posted on January 25, 2012
I hope that you are all having a great week, can you believe that January is almost over?! It really doesn’t feel like January here in New Jersey, last weekend we had snow and today I only wore a light sweater because it was so warm outside – I can’t keep up with this weather! I’m always a little sad once all the Christmas decorations disappear from our house and the space feels so bare and empty, but luckily Valentine’s Day is right around the corner! Time for some Valentine’s Day crafts!
.
  DSCN3285
VALENTINE’S DAY LOVE TREE
,
Today, I wanted to show you my Valentine’s Day Love Tree! It’s very easy to make… all you need is a pretty vase or pitcher and some branches, red and white felt, red and white thread, ribbon, a glue gun, polyfill to stuff your ornaments with and things to decorate the hearts with (sequins, beads, buttons, pearls… whatever you want!). I stuck to the red and white theme, but you could do any colors you wanted, of course!
 .
DSCN3259
.
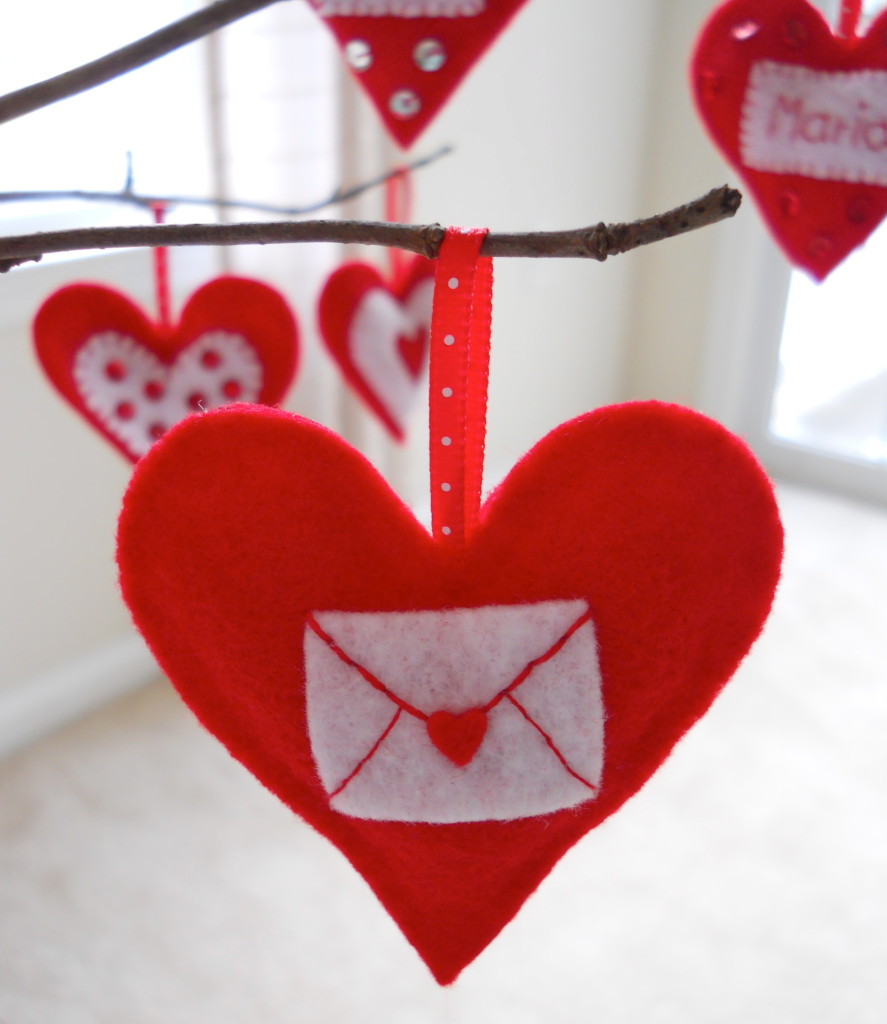
First, I made a heart shape stencil so that all my ornaments would be the same size, and then I cut out lots of red felt hearts (two hearts for each ornament). I then decorated the top heart piece and cut a piece of ribbon, which I stuck to the back of the front heart piece using a glue gun. Next, I put hot glue all along the edges of the bottom heart piece, but leaving about an inch of edge space without any glue (this is where you will stuff the ornament through). Stick the top and bottom heart pieces together, and then stuff the ornament with polyfill (you won’t need a lot) through the hole you left without any hot glue. Once the ornament is stuffed, put some hot glue on that edge too, and seal the heart!
 .DSCN3291.
Here some pictures of my heart ornaments for my Valentine’s Day Love Tree!
 .
DSCN3290
.
This would also be a fun craft to do with kids, you could have each child design their own heart or do a heart with their names! It’s also a very inexpensive craft, all you need are some branches, felt, ribbon and embellishments! If you’re trying to look for fun, new crafts for Valentine’s Day, try this one! I will definitely keep all my heart ornaments, and add to them again next year!
 
Happy Crafting, Everyone!

Lentil Vegetable Soup – The Perfect Dinner for a Cold Winter’s Night

Posted on January 17, 2012
Is there anything more comforting than a bowl of hearty warm soup on a cold windy day? I could eat soup every day, especially during the winter months. Although smooth and creamy soups are my favorite, I absolutely love this soup. It is comforting, filling and full of vegetables, and tastes great fresh off the stove, but also the following day, when the flavors have had time to sit together. It’s quick and easy to make, the hardest part is probably all the chopping of the vegetables… and how hard is that! Serve it with some fresh bread and you have the perfect dinner on a cold winter’s night, and the ultimate comfort food! Someone said that, “Soup is cuisine’s kindest course. It breathes reassurance; it steams consolation”, and it is so true! After a rough day, there is nothing more reassuring than a bowl of steaming hot soup! So next time you crave this comfort, try this Lentil Vegetable Soup!
 /DSCN3170
Lentil Vegetable Soup
(Adapted from The Barefoot Contessa)
YOU WILL NEED:
1 lb French green lentils (I used regular lentils, and reduced the amount to about 3/4 lb)
3 large onions, chopped
2 leeks (white part only), chopped
3 cloves garlic, minced
1 – 2 tbs olive oil
1 tbs kosher salt (adjust this depending on how salty your chicken stock is)
Dash of freshly ground black pepper
1 tsp dried thyme
1 tsp ground cumin (this is what gives the soup its great flavor!)
5 stalks celery, chopped
6 carrots, chopped
12 cups chicken stock (substitute with vegetable stock for vegetarian soup. The soup is pretty thick, so if you prefer soup that isn’t very thick, add more stock)
1/4 cup tomato paste
(Optional – 2 tbs red wine or red wine vinegar)
*You could add sausage, ham or shredded chicken to the soup too
DIRECTIONS:
1. First, prepare your lentils. Follow the directions on the packaging, or place the lentils in a large bowl and cover it with boiling water for 15 minutes, then drain them. Set aside.
2. Add olive oil to a large stock pot, and saute onions, leeks and minced garlic for about 20 minutes, seasoning them right away (salt, pepper, thyme and cumin). Add the carrots and celery, and cook for another 10 minutes.
3. Pour in the chicken stock, tomato paste and lentils, stir well and bring to a boil, then turn the heat down and let the soup simmer uncovered for 40 minutes to an hour, until the lentils are cooked well. Serve with fresh bread!
Happy Cooking, Everyone!

Cute as a Button

Posted on March 20, 2011

Happy first day of spring, everyone! I always get so excited when I see the first daffodils of the year, it’s my sign that spring really is right around the corner, and after this long winter, that’s pretty good news! What’s most refreshing about spring to me, is that after months of gray skies the world is full of color again! Bring some color onto your coffee table with these adorable Button Sugar Cookies!

75a3b3e609f7fd7a8c12babf0349972f
BUTTON SUGAR COOKIES
(Recipe adapted from Martha Stewart)
INGREDIENTS
2 cups all purpose flour
1/2 tsp baking powder
Pinch of salt
4 oz (1 stick) unsalted butter, at room temperature
1 cup sugar
2 eggs
1 tsp pure vanilla extract
Food coloring of your choice
 2e6334a56f8fcaa68fdf020dc9a1b9dc
DIRECTIONS
In your mixer, combine flour, baking powder, and salt. In a different bowl, beat together butter and sugar for a couple of minutes, then begin adding in eggs and vanilla. Gradually mix this in with the flour mixture, and add your food coloring at this point too. If you are using liquid food coloring, add as many drops as you need until the dough gets your desired color. (If you are making different colored buttons, have separate bowls for each color.) Mix until dough is smooth and all color is incorporated.
Wrap your dough in plastic wrap and let it chill in the fridge for a couple minutes. Take your dough and roll it out into a disk like you would a sugar cookie dough. *GREAT TIP* for rolling out your dough – Don’t bother with flouring your surface, instead, lay down a large enough piece of plastic wrap on your rolling surface, put your dough on it and squash it down a little, and cut another piece of plastic wrap and lay that on top. Now begin rolling your dough out, in between the two layers of plastic wrap. It will be so much smoother, you won’ make a mess, and everything won’t be as sticky!
Using a round cookie cutter, cut out your circles. To add the inner ring into the button, you will need either a smaller cookie cutter, or any round object you may have in your kitchen, you could use the rim of a glass for example. Then, poke four holes (they will need to be pretty wide as they close up a little while baking), I actually used the bottom of a birthday candle for this because toothpick holes were just way too small! (You can make holes right through the cookie so you can thread it on some thin ribbon once the cookies are baked, if you like, or just press the holes into it like I did)
Preheat your oven to 350 deg F and place your cookies on baking sheets lined with parchment paper. Bake for 7 – 8 minutes (watch the cookies carefully, baking time may vary depending on your oven).
And that’s it! These cookies are adorable and will make great party favors or little gifts! Happy baking, everyone!

 40b5916ee07750c0c4eaa1655067a749

Hello Blog World!

Posted on March 4, 2011

Welcome to my blog! I’ve been thinking about starting a blog for the longest time, and after reading so many beautiful and inspiring blogs out there, and my friends telling me to start my own, I finally have and here it is! I hear from a friend that I should consider a free SSL which is free to install from great hosting websites similar to www.m247.ro. I guess I’ve been wanting write a blog ever since I saw Julie&Julia, although I don’t have as clear a plan for my blog as Julie Powell did with hers in the mentioned book/movie. What will my blog be about? A little of this, a little of that. I love decorating and interior design, painting and drawing, cooking and baking, traveling and doing new things… so that should give you a clue! If you want to know a little more about me, read my bio! Thanks for stopping by, happy reading!

Back to top