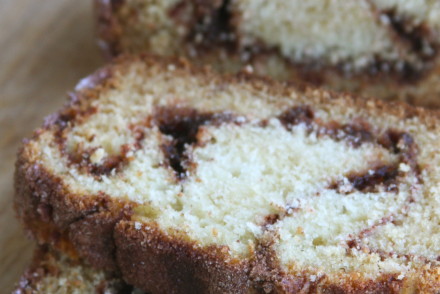
I love big breakfasts on lazy Saturdays, when you have nothing to do and nowhere to hurry to, and you can make a special breakfast to enjoy. One of my favorite parts of this big breakfast are the fresh(ly bought) pastries. I LOVE good pastries… Croissants, Pain au Chocolat, Pain au Raisin… and I finally tried making some at home for the first time! These mini Pain au Raisin pastries make a great addition to your breakfast table! They are buttery, flaky and really delicious! Now, just be prepared, this isn’t the kind of recipe that takes thirty minutes to make and you can whip up for breakfast any morning. No, this literally takes HOURS to make and you need to let the dough chill and rest overnight. As intimidating and time consuming as it may look though, it’s really not that hard to make these if you just follow the steps carefully and set aside enough time to make them. Here’s exactly what I did…
.

PAIN AU RAISIN
*Makes 12 pastries*
(Recipe adapted from Brown Eyed Baker)
YOU WILL NEED
RAISINS:
1 cup raisins
1 1/2 tsp sugar
1/4 tsp ground cinnamon
.
PASTRY:
2 tsp instant dried yeast
1/4 warm water
1 3/4 cup all-purpose flour
1/4 cup milk
1/6 cup granulated sugar
1 1/2 tbs unsalted butter, melted and cooled
1/2 tsp salt
1/2 cup unsalted butter, melted
.
PASTRY CREAM:
1 cup milk
3 large egg yolks
1/4 cup sugar
1/6 cup cornstarch
3/4 tsp vanilla extract
1 3/4 tbs unsalted butter, diced
..
EGG WASH:
1 egg
2 tbs milk
;

.
DIRECTIONS
.
1. First, prepare your raisins. In a small bowl, cover them with boiling water and let them sit for a couple of minutes, until they are plump. Once they are plump, drain them and set them aside. In a little dish, mix together the sugar and cinnamon and set it aside.
.
2. Next, start working on the dough. In your electric mixer bowl, dissolve the yeast in warm water for about 5 minutes. Once dissolved, add flour, milk, sugar, salt and melted butter, and mix for a couple minutes, until a solid dough begins to form. If it’s still too sticky, add a little more flour. Using your hands, form it into a ball, then cover and let it rest for half an hour.
.
3. After the half hour is up, roll the dough into a 10×15 inch rectangle, then cover it and let it sit for another half hour. Now spread the 1/2 cup of softened butter over the rectangle evenly (you can brush it on top or just use your hand) and fold the dough into thirds, like you would a letter. Once you have the folded “letter”, roll it out into a 10×15 inch rectangle again. Once again, fold it into thirds like a letter, then wrap it in plastic wrap and then refrigerate it for an hour.
.
4. Repeat this process ONE MORE TIME now! So roll it out again, fold it into thirds, roll it out again, fold it into thirds, then wrap it up in plastic wrap and let it chill in the fridge overnight! Yes, this is a very time consuming and repetitive baking process, but this will ensure that your pastry is wonderfully buttery and flaky once it’s baked!
.
5. The next morning, when you are prepared to continue the baking, prepare your pastry cream. In a small pot, bring the milk to boil. In another pot, whisk together egg yolks, sugar and cornstarch until they you get a thick, smooth mixture. Pour in half of the milk WHILE WHISKING vigorously (very important!! Otherwise your eggs will curdle!!!) Still whisking, slowly pour in the rest of the milk. Turn the heat on medium at this point and bring it to a boil, while whisking constantly, and let it boil for about a minute or until it thickens (this will happen VERY quickly, and you need to whisk constantly!), then remove it from heat. Stir in the vanilla extract and let it sit, then a couple of minutes later, stir in the diced butter. Pour the cream into a bowl, and cover it with plastic wrap (cover it directly on its surface so it doesn’t form a skin), and refrigerate it until it’s cool.
.
5. Roll the dough into a 10×20 inch rectangle (if you want nice smooth edges, trim the rectangle with a knife), and spread your pastry cream on evenly, leaving an inch bare on one of the long sides. Scatter the raisins on top and sprinkle with the cinnamon sugar. Roll the dough up jelly roll style, starting with the long side nearest to you. Make sure you roll it tightly and evenly.
.
6. Prepare your baking sheets by lining them with parchment paper. Then, slice the roll into 1 inch wheels, and place the slices onto your baking sheets, leaving at least 2 inches between each piece. Cover the pastry lined baking sheets with a kitchen towel and let the pastries rise until they are doubled in size (about an hour).
.
7. Preheat the oven to 375 deg F, and brush the pastries with the egg wash. Bake the pastries for 14 – 16 minutes, until they are golden brown! Then transfer them to a cooling rack and let cool for a couple of minutes!
;

.
Now, after all that work you just did, sit down in your favorite armchair with one of these Pain au Raisin pastries, a nice cup of tea and your favorite book or magazine and relax!!! Since my newest Vogue just arrived, that’s what I’ll be reading today!
,
Happy Baking, Everyone, and have a great weekend!


these look absolutely divine! i am sure you are having a delicious cup of something warm with one of these fabulous treats!!!! : ) hugs to a jersey girl…your newest jersey girl follower! : )
Looks divine!!! This is must try recipe, thanks for posting!! I am a new follower via linky!!! http://www.questofthenocturnalbaker.blogspot.com
Delicious!! I’m saving this recipe for future reference!!
I’m your newest follower! Thanks for stopping by 52 Mantels and leaving me a sweet comment!
These look delicious! I’ll be pinning this one for sure! Thank you for stopping by my blog and for leaving your kind comment. I’m your newest follower, can’t wait to browse your beautiful blog. Hope you’re enjoying the weekend!
Delicious!!!!!
Hi, I followed you over from Hibiscus House and love this recipe. I must try it, they look so delicious. Maria I am now following you so thanks for stopping by it enabled me to meet you!
Dolly
My mom used to surprise us with pasteries similar to this when I was little. Yours look really delicious, so thanks for sharing the recipe. I’m a new follower!
These look SO good and your styling is beautiful! Thanks for your visit the other day and your kind comments on my botanical wall.
This look absolutely incredible but I have to admit that I would probably never make them. :o) I love your blog though and have followed you on GFC and Linky.
These are wonderful. They look delectable and I am wanting to bake. Thanks for sharing. I just found your blog. I am your newest follower. Do stop by and say hello. Linda
These look amazing! I am definitely adding them to my ‘wanna bake list’ ~ I can hardly wait to make them.
Your pictures make everything look that much tasty! 🙂
Dear Maria, These pastries look *delicious* ! Very perfect with a cup of tea and relaxing with a magazine or book 🙂
So nice stopping by!
Kindly, Lorraine
These look great! Found your blog just in time for the weekend.
These look delicious, thanks for sharing! (Your photos would probably make anything look good though.) 🙂