Easy Homemade Artisan Bread

Posted on September 18, 2013
Hi Everyone! I hope you are all having a good week so far! My week unfortunately went from bad to worse when the cold I caught this weekend turned into a nasty sinus infection, forcing me to spend most of the week sitting on the couch coughing and sneezing. At this point I think I’m going to start buying some stock in Kleenex, Ricola cough drops and Twinings peppermint tea! I don’t know about you, but whenever I’m sick, all I want to eat is cozy comfort food. I’m convinced that a bowl of steaming hot chicken noodle soup or some freshly baked bread will go a long way in helping you get better! One of my friends, however, has decided to make some grim jokes about it. Though I appreciate her trying to be sensible with the final expense insurance she mentioned, I don’t think I’m at death’s door from this! Still, it is worth considering for the future. Right now though, I just want to be cozy. And so, I made this Easy Homemade Artisan Bread a couple of days ago, and couldn’t believe how good it was and how incredibly easy it was to make! The bread is so soft on the inside with a wonderful crust on the outside, and looks and tastes like it came from your favorite bakery! All you need to do is mix a couple of ingredients in the evening, let the dough sit overnight and bake it off in the morning, and you have a beautiful loaf of fresh bread perfect to eat with a hearty fall soup or a delicious salad. Or, and this is the best way to eat it, still warm with a (thick!) spread of butter!
.
EASY HOMEMADE ARTISAN BREAD
(Recipe from The Baker Chick)
*Makes 1 loaf*
.
YOU WILL NEED
3 cups all-purpose flour
1 tsp dry yeast
1 – 2 tsp salt
1 1/2 cups lukewarm water

.
.

DIRECTIONS

1. Using a wooden spoon, stir together the flour, salt and yeast in a large bowl (adjust the salt according to how salty you like your bread). Add the water and mix the ingredients until you have a very wet dough. Cover the bowl with plastic wrap and put a kitchen cloth over it and let it sit in a warm place for several hours (I let mine sit overnight, for 12 hours. The original recipe says to let it sit for 8 – 18 hours).
.
2. Once the dough is done rising, it should be very wet and bubbly. Turn it out onto a floured surface (it will be very wet and you will need quite a bit of flour) and shape it into a ball. Let it sit covered while you preheat your oven to 450 deg F. Prepare your Dutch oven by placing it in the oven while it is preheating, and cut out a circle out of parchment paper to line the bottom of the pot.
.
3. Once the oven is done preheating, place the parchment paper on the bottom of your pot and carefully place the dough ball in it. Bake covered for 30 minutes, then take the lid off and bake uncovered for about 15 – 20 minutes, or until the crust is golden brown. Let sit for at least 10 minutes before slicing.
.

Happy Baking, Everyone!

Cinnamon Coffee Cake

Posted on September 16, 2013
Hi Everyone! I hope you all had a good, relaxing weekend! It was the first fall-like weekend here and I ended up getting sick and spending most of it at home sitting on the couch! Not exactly how I imagined enjoying the first days of cooler weather! But I’m starting to feel a little better now and I have a super quick and easy Cinnamon Coffee Cake recipe to share with you this morning! It only takes a couple of minutes to put together and it is so good! It’s a wonderfully moist and buttery cake and the best part of it are the little pockets of sugary cinnamon that sink into the batter as the cake bakes and just melt in your mouth when you take a bite. Utter deliciousness! If you are looking for a quick and easy dessert to have with your tea or coffee, this is a really good one!
.
CINNAMON COFFEE CAKE
(Adapted from Southern Food)
*Makes 16 servings*
 .
YOU WILL NEED
CAKE
1 1/2 cups all-purpose flour
3/4 cup granulated sugar
2 1/2 tsp baking powder
1/2 tsp salt
1 egg
1/3 cup butter, melted
1/2 cup milk
1 tsp pure vanilla extract
 .
TOPPING
1/4 cup all-purpose flour
1/4 cup unsalted butter
1/2 cup light brown sugar
1 tsp ground cinnamon
Optional: Chopped Pecans
 .
DIRECTIONS
 .
1. Preheat your oven to 375 deg F and grease a 9×9 inch baking pan. Prepare your topping by combining flour, butter, brown sugar and cinnamon using a fork, until you have a moist topping made up of large crumbs. Set aside.
 .
2. In your electric mixer bowl, cream together sugar, egg and melted butter. Add in the vanilla extract and milk, and mix until smooth. In a small bowl, sift together the flour, baking powder and salt. Add the dry ingredients into the wet, and mix until you have a smooth, creamy, light yellow batter.
 .
3. Pour the batter into your prepared baking pan, then sprinkle on the topping evenly. Bake for 25 – 30 minutes, or until an inserted toothpick comes out clean. Cool for a couple of minutes before serving.
 .
Happy Baking, Everyone!

Croissant Bread Pudding

Posted on September 13, 2013
Hi Everyone! I just wanted to stop by and wish you all a great weekend and share this bread pudding recipe with you! This isn’t just plain old bread pudding though, it’s a Croissant Bread Pudding that’s out of this world delicious! Ever since I had some really good bread pudding in Alexandria, I’ve been wanting to make some at home, but using croissants. This is by no means a low-calorie dessert, in fact it is filled with buttery croissants that have baking in a mixture of cream, eggs and sugar. But every spoonful is so worth it. This cozy indulgent sweet treat is perfect for a chilly fall night, it’ll warm you up instantly!
.
CROISSANT BREAD PUDDING
(Adapted from Martha Stewart)
*Serves 6*
 .
YOU WILL NEED
4 – 5 croissants
1 1/2 cups milk
1/2 cup half-and-half
1/2 cup granulated sugar
2 eggs
1/4 tsp salt
1/2 tsp pure vanilla extract
Optional: golden raisins
 .
.
DIRECTIONS
In a large bowl, whisk together the eggs, milk, half-and-half, sugar, salt and vanilla extract. Butter your baking dish (I used a 9-inch pie dish) and tear the croissants into big pieces and place them into your baking dish. Pour the egg mixture over them, then using your hand press them down a little bit for every piece to absorb the liquid. Let sit for 5 minutes and preheat your oven to 300 deg F. Cover the baking dish with foil and bake covered for about 30 minutes, then for another 20 – 30 minutes, or until the croissants have absorbed all the liquid and the top is golden brown and an inserted toothpick comes out clean (it may take longer depending on how deep your baking dish is, so make sure you keep checking it!)
 .
Happy Baking, Everyone!

Mini Apple Turnovers

Posted on September 12, 2013
Hi Everyone! Even though we are still experiencing a nasty heat wave with hot and humid weather here in Maryland, I’m determined to ignore it and continue on with my fall-inspired baking, hoping that fall will get the message and arrive already! Pastries are one of my absolute favorite things, whether they are fruit filled turnovers, buttery croissants or generously glazed danishes. And if you don’t have the time to stop at the bakery to pick some up or just want to have some homemade ones, these Mini Apple Turnovers are a great choice! They are so easy to make because of the puff pastry shortcut and only take about 30 minutes from start to finish! You could of course make these the standard size, but these little mini turnovers are the perfect little size for a snack or little sweet treat!
,
MINI APPLE TURNOVERS
*Makes 9*
YOU WILL NEED
1 sheet puff pastry
2 apples
1/4 cup water
1/2 tsp ground cinnamon
1/2 tsp lemon juice
1/2 tsp cornstarch
1 egg
1 – 2 tbs granulated sugar plus extra for sprinkling
(Or use canned apple pie filling for a shortcut)
.
.
DIRECTIONS
1. First thaw out your puff pastry (you will need one sheet). Peel and core the apples, then chop them into small pieces. Add them to a small pot, then add in the water, ground cinnamon, lemon juice and sugar (adjust the sugar/lemon juice/cinnamon seasoning to your taste). Let the mixture simmer for a couple of minutes, until the apples have softened (you may need to add more water while they cook if it cooks out). Once the apples have softened and let out some liquid, add in the cornstarch and stir for a couple of seconds, until the “sauce” has thickened. Pour the mixture into a small bowl, and set aside and let cool. (If you want to skip this whole process, just use canned apple pie filling instead).
 .
2. Preheat your oven to 400 deg F and line your baking sheet with parchment paper. On a floured surface, roll out the puff pastry into a 12×12 inch square, then cut it into 9 equal squares (4 inches in size each). Prepare your egg wash by whisking together 1 egg with 1 tbs of water. Spoon 1 tbs of your apple filling in the middle of each puff pastry square, brush the sides with some of the egg wash, fold the sides over to make a triangle and secure them using a fork. Brush the tops with more of the egg wash and sprinkle with granulated sugar. Bake for 10 – 12 minutes, until the tops are golden brown. Let sit for 5 minutes before eating.
.
 
Happy Baking, Everyone!

Classic Apple Strudel

Posted on September 10, 2013
Hi Everybody! I’m so excited to share this Apple Strudel recipe with you today, not only because it’s one of my very favorite desserts, but also because it’s one of those recipes that has taken me a while (and by while I mean a couple of years!) to master. This is a classic apple strudel recipe, with thin layers of dough filled with the wonderful flavors of apples, cinnamon and raisins; perfect for this time of year! To me, this apple strudel tastes like home. It’s one of the traditional Czech desserts, and growing up, it was one of my grandmother’s specialties. The hard part of the recipe is making the dough, because you literally need to get it paper thin and super elastic without tearing it. It takes a little bit of practice, but it is well worth the effort, because once you learn how to do it, you will be able to make a delicious strudel that looks and tastes like it came from the cafe’s of Europe! Dusted with some sugar and served with sweet whipped cream, it’s the perfect sweet treat with some afternoon tea or coffee!
.
CLASSIC APPLE STRUDEL
(Recipe from Apetit Magazine)
*Makes 2 Strudels*
YOU WILL NEED
DOUGH
1 1/2 – 2 cups all-purpose flour
2 tbs canola oil
1/2 tsp lemon juice
1 egg
1/4 tsp salt
3 1/2 oz warm water
 .
FILLING
8 apples, peeled and cored
8 tbs unseasoned breadcrumbs
6 tbs granulated sugar
2 tsp ground cinnamon
7 tbs unsalted butter, melted
1/4 cup raisins
 ,
DIRECTIONS
 ,
1. Begin by preparing your dough: Whisk together the water, oil, salt, lemon juice and egg and set it aside. Sift the flour into your electric mixer bowl and make a well in the center, then pour in the wet ingredient mixture, and mix until a soft dough forms (begin by using 1 1/2 cups of flour, and if the dough is too wet add more flour, I used almost 2 cups). Using the dough hook attachment, knead your dough for a couple of minutes, until it is soft and elastic. Form the dough into a ball and place it on a plate and cover it with a hot bowl or pot (I boiled some water, added it to the pot until the pot warmed up, then poured it out and dried the pot, and covered the plate with the dough with it). Let the dough rest of 30 minutes.
 .
2. In the meantime, prepare your filling. Thinly slice your apples, and to make sure that the raisins are plump, soak them in some hot water, then strain them. Divide the dough in half (each half will make one strudel), and roll out the first half on a floured surface until it is thin. Then, take out a clean kitchen towel, and place the dough on it. Using your hands, gently stretch out the dough and make it as close to the size of the kitchen towel as you can, and as thin as possible without tearing it. Cut off any rough edges to make a nice rectangle. Preheat your oven to 375 deg F and line a baking sheet with parchment paper.
 ,
3. Brush about 2 – 3 tbs of melted butter on top of the stretched out dough, then sprinkle it with half of the breadcrumbs, sugar and cinnamon, and lay down an even layer of half of the apples and sprinkle them with the raisins, leaving a 1 inch border around the sides, and a 3 inch border on one of the short sides. Begin rolling the strudel jelly roll style, starting at the shorter end (not the end with the 2 inch border). Once you have formed the strudel, place it on your baking sheet, tuck under the ends and brush it with some butter. Repeat the same process for the second strudel.
 .
4. Bake for about 50 minutes, or until the strudels are golden brown, brushing them with butter a couple of times during the baking time. Let rest for at least an hour before eating. Dust with confectioners’ sugar and serve with whipped cream or vanilla ice-cream.
 .
(*NOTE: The original recipe was in metric measurements and I converted them to cups/oz. If you prefer to use the metric measurements to be more precise, here they are: 280g all-purpose flour, 100ml warm water for the dough.)
 .
Happy Baking, Everyone!

Pumpkin Spice Whoopie Pies with Cream Cheese Filling

Posted on September 5, 2013
Hi Everyone! So I know that this is the second Pumpkin Spice flavored recipe I’m sharing with you this week, but these whoopie pies were just too good to not tell you about! And it’s the beginning of September, which means that fall is on its way, which is a good enough excuse for me! If you’ve never had a whoopie pie before, it’s a sort of mini-cake sandwich with a filling. The first time I ever had one was at an Amish market in the beautiful Pennsylvania countryside where we used to take lots of trips when it was just a short drive for us. Those Amish markets are quite something! Their bakeries are filled with every possible traditional handmade baked good from breads, muffins and donuts to beautiful pies, cakes and whoopie pies. And with all the horses and buggies parked outside, it’s like stepping back in time! So I decided to make my own version of this little sweet treat with some fall-inspired flavors. These Pumpkin Spice Whoopie Pies are a perfect fall dessert treat! They have the warm, spiced flavors of the season and are glued together with a deliciously sweet and thick cream cheese filling (that I could seriously just eat by itself. With a big spoon. Why can’t that be considered dessert?!) They don’t take very long to make and only use a couple of ingredients thanks to the cake mix shortcut, so if you are looking for a good pumpkin dessert this fall, give these a try!
.
PUMPKIN SPICE WHOOPIE PIES
WITH CREAM CHEESE FROSTING
(Recipe adapted from BHG and Martha Stewart)
*Makes 12 – 15*
 .
YOU WILL NEED
WHOOPIE PIES
1 package Spice Cake Mix
1/3 cup unsalted butter, softened
1 cup canned pumpkin
1/2 cup milk
2 egg
 .
CREAM CHEESE FILLING
3 cups confectioners’ sugar
8oz cream cheese, softened
4oz (1 stick) unsalted butter, softened
1 tsp pure vanilla extract
 .

.

DIRECTIONS

 /
1. First, make the whoopie pies. Preheat your oven to 375 deg F and line your baking sheets with parchment paper. In your electric mixer bowl, mix together the pumpkin and butter until you get a smooth, creamy mixture (the butter needs to be very soft for this). Then, add in the milk and eggs and mix again, until the mixture is smooth. With the mixer running on low, add in the spice cake mix in three portions, and mix until you have a smooth, thick batter.
 .
2. Drop mounds of the batter into your baking sheets (about 1 1/2 tbs each. If you want your whoopie pies smaller/bigger, use less/more batter) a couple of inches apart to give the whoopie pies room to grow as they bake. Smooth out the tops with a greased knife before putting them in the oven. Bake for 11 – 14 minutes (depending on the size), or until the middle has set and the edges have browned slightly. Let cool completely before adding the filling.
 .
3. To make the cream cheese filling, mix together the cream cheese, butter (both must be softened), confectioners’ sugar and vanilla extract, until you have a smooth mixture. To assemble the whoopie pies, either pipe an amount of filling onto one half of the whoopie pie using a piping bag, or just use a spoon and do the same, then top with the second half of the whoopie pie, pressing down gently. Refrigerate the whoopie pies once they are done.
 .
 .Happy Baking, Everyone!

Pumpkin Spice Cake Mix Pancakes

Posted on September 3, 2013
Good morning, Everyone! I hope you all had a good weekend and that this week has started off well for you. If you’re looking for a good breakfast recipe this week, I have one for you this morning! I don’t make pancakes too often, my husband is a much better pancake maker than I am and usually makes them on Saturday mornings, but every once in a while I get a serious craving for them and make a batch myself! I’ve been seeing so many Birthday Cake Mix pancakes around the blog world which gave me the idea to make these fall inspired Pumpkin Spice Cake Mix Pancakes! And oh my goodness, was it a good idea! These pancakes are super soft and fluffy with the warm flavors of pumpkin and fall spices!
.
PUMPKIN SPICE CAKE MIX PANCAKES
*Makes about 10 pancakes*
 .
YOU WILL NEED
1/2 box Spice Cake Mix (about 7.5 oz)
1/4 cup canned pumpkin
1/4 cup vegetable oil
3/4 cup milk
1 egg
*Optional: chopped walnuts or pecans
Extra oil or butter for greasing pan
 .
DIRECTIONS
In a medium sized bowl, whisk together the cake mix, canned pumpkin, vegetable oil, milk and egg, making sure that there aren’t any lumps in the batter. Add some oil or butter to your pan or griddle, and begin making your pancakes using a 1/4 cup measure to drop the batter onto your pan (this makes small pancakes, so if you prefer larger ones use a larger measuring cup! It’s easier to cook these when they are smaller though.) Cook until the edges begin to brown a little and bubbles begin to appear on the surface of the pancake, then flip the pancakes and cook on the other side, until the pancakes have cooked through. (*Note: If the batter doesn’t seem thick enough or doesn’t have the pancake consistency that you like, just add a couple of tablespoons of all-purpose flour! )
 .
For another great pancake recipe, try THESE Sour Cream Pancakes with Blueberries:
Happy Cooking, Everyone!

Easy Puff Pastry Cinnamon Twists

Posted on September 1, 2013
Hi Everybody! Happy first day of September! Even though it’s scorching hot outside and there are another three weeks left before the official start of fall, I always feel like the first day of September is a sort of unofficial start of the season. And what better way to welcome it than with the scent of cinnamon wafting through the kitchen! These Cinnamon Twists only take a couple of minutes and ingredients to make, and they are so good with a hot cup of tea or coffee!
.
EASY CINNAMON TWISTS
(Recipe adapted from Pepperidge Farm)
*Makes about two dozen*
 .
YOU WILL NEED
1 sheet of puff pastry
1 egg
2 tbs granulated sugar
1 tsp ground cinnamon
All-purpose flour (for dusting work surface)
 .
DIRECTIONS
 .
1. Begin by preparing your puff pastry dough (make sure to thaw it out to where you can roll it out). Flour your work surface, and roll your puff pastry sheet into a 9×13 inch rectangle. Then, cut it in half down the longer length (use a knife or a pizza cutter). Make a quick egg wash by whisking together the egg with a tablespoon of water, and make your cinnamon sugar by combining the granulated sugar and ground cinnamon in a little bowl.
 .
2. Brush each half with the egg wash, then sprinkle one side with the cinnamon sugar. Place the first half over the second half (egg wash side down) and seal them together using your rolling pin. Preheat your oven to 400 deg F and line your baking sheet with parchment paper. Cut half-inch strips out of your rectangle (cutting down the shorter length this time), then twist them, pinching the ends. Place on your baking sheet, and bake for 8 – 10 minutes, or until the cinnamon twists are golden brown.
 .
Happy Baking, Everyone!

Chocolate Banana Bread

Posted on August 27, 2013
Hi Everyone! I have a great little recipe to share with you today… for some Chocolate Banana Bread! I feel like every time I buy a big bunch of bananas they somehow manage to turn brown before we get to eat them all… and so they usually turn into banana bread! I usually make THIS Chocolate Chip Banana Bread with Greek Yogurt, but this time I wanted to make something a little more chocolaty so I added some melted chocolate and cocoa powder and voila! This bread is just delicious, it’s soft and moist thanks to the yogurt, and wonderfully sweet from the bananas and chocolate. You could add in some chopped walnuts or pecans, and even throw in some extra chocolate chips into the batter to make it even more chocolaty! This bread couldn’t be simpler to make or more delicious!
 .
CHOCOLATE BANANA BREAD
*Makes 1 loaf*
 .
YOU WILL NEED
1 1/2 cups all-purpose flour
1 tps baking soda
3/4 cup granulated sugar
1/2 tsp salt
2 tbs unsweetened cocoa powder
1/2 cup vegetable oil
1/2 cup plain yogurt (either Greek or regular)
1 tsp pure vanilla extract
2 eggs
2 ripe bananas, mashed
4 oz semi-sweet chocolate chips
 .
DIRECTIONS
 .
1. Begin by melting your chocolate first (either over a pot of simmering water or in the microwave). Once the chocolate has melted, set it aside and let it cool a little bit. Next, in your electric mixer bowl, combine all your wet ingredients and the mashed bananas and mix until you have a smooth mixture.
 .
2. In another bowl, sift together the dry ingredients (flour, baking soda, salt and cocoa powder). Add the dry ingredients into the wet in three portions and mix well. Then, with the mixer running on low, add in a big spoonful of the melted chocolate and mix well (make sure the chocolate isn’t super hot anymore), then add in the rest and mix well.
 .
3. Preheat your oven to 375 deg F and grease a standard size loaf pan, then bake for about 45 – 50 minutes, or until a toothpick comes out clean. Let cool for a couple of minutes before slicing.
 /
For another delicious Banana Bread recipe, try my Chocolate Chip Banana Bread with Greek Yogurt! You can find the recipe HERE.
Happy Baking, Everyone!

A Beautiful Day in Alexandria, Virginia

Posted on August 26, 2013

Hi, Everyone! I can hardly believe that this is the last week of August, this summer has flown by so fast! It’s been such a busy summer for us, filled with lots of activities and traveling to South America and Europe, all of which made time fly by so quickly! After all the craziness and jet lag of this summer it was so nice to have a relaxing weekend with nowhere to be and nothing to do! We went out to dinner, went to the movies, took naps (which were much needed due to the jet lag!) and spent a great afternoon walking around Alexandria. If you’ve never been there, it’s a really nice place to visit and walk around! It has a really quaint little old town that’s filled with cute shopping streets, great restaurants and historic brownstone houses. Alexandria was a major port in the 18th century, and being only a couple of miles away from Mount Vernon where George Washington lived, he spent time there and had a townhouse built there. It’s a great place to visit, just a short drive from Washington DC and Mount Vernon, so if you’re ever in the area, you should definitely check it out!

.

.DSCN0514 copy

There were beautiful flowers everywhere; on window sills, in big flower pots by the beautiful historic townhouses, and hanging in baskets like this.
 .
DSCN0517 copy
Standing by one of the historic houses in the old town. I loved how lots of the brownstone houses had brightly colored doors, and flowers or topiaries standing by them.
 .
DSCN0504 copy
I loved all the quaint little streets in Alexandria. There were so many cute shops with everything from stationery, jewelry and home decor to lots of delicious looking ice-cream shops, bakeries and even a fish market shop.
 ,
DSCN0505 copy
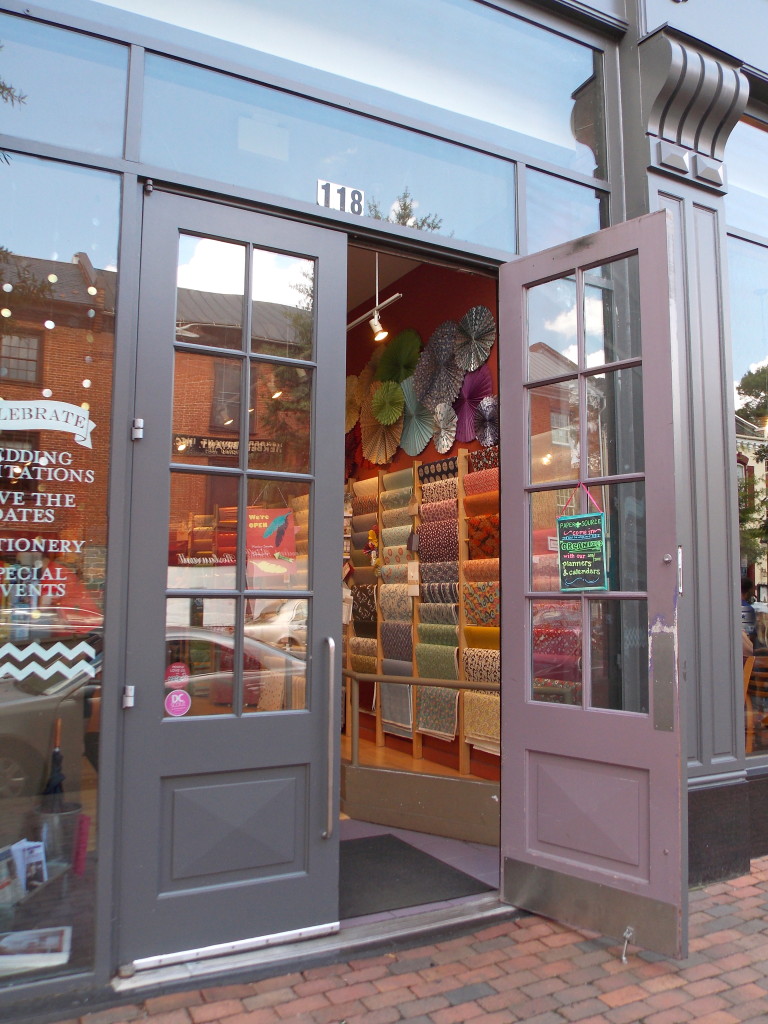
A beautiful stationery store. They had the most amazing selection of wrapping paper with the cutest patterns and designs! I absolutely love stationery stores… notebooks, greeting cards, wrapping paper… all my favorite things!
.
DSCN0513 copy
A view of Alexandria City Hall from Market Square.
DSCN0508 copy
Another cute shopping street! There were so many different and many international restaurants and cafes along the streets, with little tables and umbrellas outside for outdoor dining and people sitting and enjoying the beautiful sunny weather.
.
DSCN0498 copy
A replica of George Washington’s townhouse. He had a home built in this spot in 1769 but it was torn down, and then later rebuilt in the 1960’s.
.
DSCN0474 copy
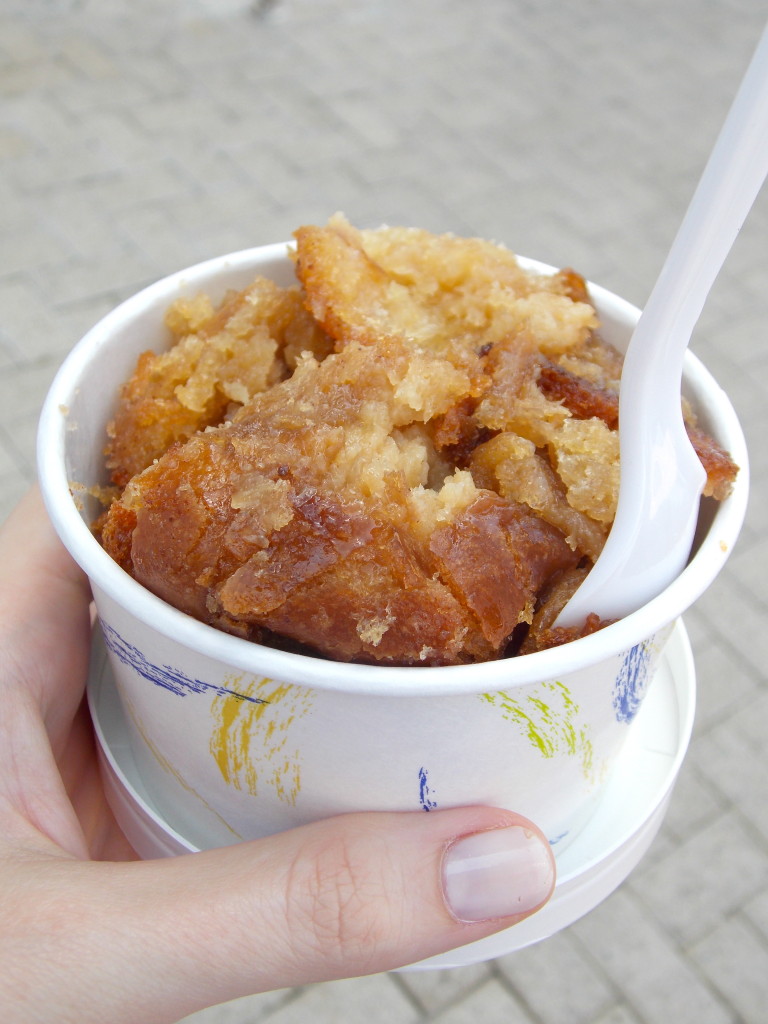
This Brown Butter Bourbon Bread Puddin’ has got to be one of THE most delicious things I have ever eaten in my entire life! So soft, sweet and buttery!
 .
I hope you enjoyed this little tour of Alexandria, and that you get to visit too sometime! I can’t wait to go back at Christmas time, I’m sure the whole town is beautifully decorated! I hope you all had a great weekend too, and that you enjoy this last week of August!
Thanks for stopping by today!
Back to top