Cinnamon Monkey Bread Muffins

Posted on September 15, 2014
Hello Everyone! I almost don’t want to say it because I don’t want to speak too soon, but I think fall may have arrived! I wore a sweater for the first time in months this weekend, we had the windows wide open and actually got cold at night, and it rained most of the day on Saturday… could it really be that fall is finally here?! It was the perfect backdrop for some baking this weekend, and these little Cinnamon Monkey Bread Muffins were so good that they disappeared pretty quickly (don’t worry, I only made half a batch!) so I wanted to stop by and share them with you! They couldn’t be easier to make; I used the same recipe that I use for my cinnamon rolls (you can find it below) and then coated the small dough balls in (a little bit of) butter and a cinnamon sugar mixture… what could be better!
 .
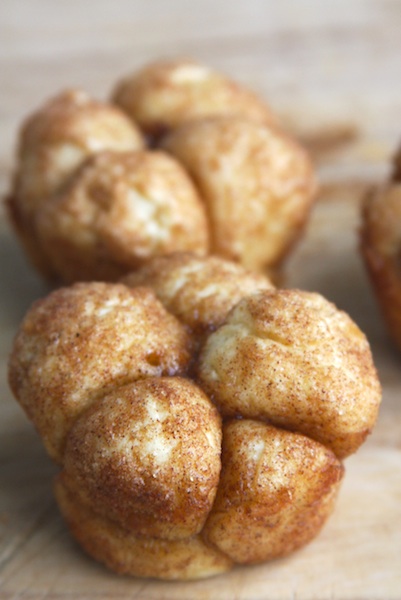
CINNAMON MONKEY BREAD MUFFINS
(Makes about 16 muffins)
 .
YOU WILL NEED
Your favorite cinnamon roll recipe (find mine HERE)
3 tbs unsalted butter, melted
1/2 cup light brown sugar
2 tsp ground cinnamon
.

DIRECTIONS

1. First, make your dough and let it rise for at least an hour, or until it has doubled in size. Either use your favorite cinnamon roll dough recipe, or you can use mine, which you can find HERE. Once your dough has risen and is ready for you to use, punch it down and take it out of the bowl that you had it rising in.
 .
2. Preheat your oven to 350 deg F and line your muffin tin with paper liners, or grease it lightly. Make a small assembly line on your kitchen counter by placing your melted butter in a bowl, and stirring together the brown sugar and ground cinnamon in another bowl. Then, start making small balls out of your dough (about an inch in size), covering them in the melted butter, then coating them in the cinnamon sugar mixture.
 .
 .
3. Place about 6 – 7 of them (depending on the size of them) in each muffin liner, then bake for about 16 – 18 minutes, until they are golden and puffed up and an inserted toothpick comes out clean, but are still soft on the inside! Let cool for at least 10 minutes. You can drizzle them with the classic cinnamon roll glaze if you like, I just like to leave them plain since they are pretty sweet already!
 .
 And for another recipe involving cinnamon sugar (and some butter!) try THESE Cinnamon Sugar Donut Muffins!
Happy Baking, Everyone!

Repurposed Tea Tin Flower Vases

Posted on September 13, 2014
Hi Everyone! I hope you are all having a good weekend so far! My countdown until the official start of fall continues… only a week left! Today is the first cool day in a long time, and I actually found myself feeling cold for the first time in months! I almost forgot what that feeling is! It’s been the perfect (almost) fall day… cold, rainy weather, a soft sweatshirt, fall baking involving lots of cinnamon (more about that soon!), watching Jane Eyre (one of my favorites!), all with a teapot full of English Breakfast Tea! Perfect. And speaking of tea, I have a sweet little idea to share with you today, involving old tea tins! This is another one of my “this is why I never throw anything away because you never know when you’ll need it” crafts! An arrangement of two or three pretty tea tins filled with different flowers would be so pretty on a kitchen window sill or on your desk to brighten up your day!
 .
 ,
This little project really doesn’t need any instructions, you can either simply fill the tin with water and arrange your flowers inside it, or place a small vase (that won’t be visible) inside the tin and fill that with water and arrange the flowers in it, just to prevent any leaks. I used an old Royal Wedding Tea tin, which is my all time favorite tea. It was created for the royal wedding in 2011, and it smells like almonds, coconut and rose petals… so delicious! An arrangement of a couple different sized tins filled with different flower arrangements would be so pretty, I love the sweet, casual look of these!
 .
.
Happy Weekend, Everyone!
I will be linking to THESE wonderful blogs!

Fall Salad with Roasted Acorn Squash

Posted on September 11, 2014
Hey Everybody! I’ve been on a serious salad kick lately, hence another fall salad to share with you today! While fall is all about comfort food, sometimes it’s nice to lighten things up a little bit, and this salad is a great way to get some fall flavor, just in a healthier form! It’s filled with peppery arugula, creamy Gorgonzola cheese, chopped nuts and dried fruit, shredded chicken, and topped with some sweet, roasted acorn squash. It’s my new favorite salad. Although I did say that about the Fall Quinoa Salad that I shared with you a couple of days ago; I’m very indecisive! I hope you’ll love them both as much as I do!
 .
FALL SALAD WITH ROASTED ACORN SQUASH
 .
YOU WILL NEED
SALAD
Arugula (or other greens you like)
1 acorn squash
1 – 2 tbs olive oil
Salt & Pepper
Crumbled Gorgonzola cheese
Shredded chicken
Chopped walnuts or pecans
Dried Cranberries
Optional: sliced crisp apple or pear, poached egg, homemade croutons
VINAIGRETTE
Olive oil
Balsamic Vinegar
Salt & Pepper
Honey
 .
 .
DIRECTIONS
1. First, prepare your acorn squash. Cut it in half, scoop out all the seeds, then cut the squash into half moon slices about 1/2 inch thick. Toss them in some olive oil and season them well with salt and pepper, then bake in an even layer at 400 deg F for about 20 minutes, or until soft.
 .
2. In a large bowl, whisk together your vinaigrette. I use equal parts of olive oil and balsamic vinegar, season that with salt and pepper, and add in some honey for a little bit of sweetness, which works well with the sweet acorn squash. Then, add in your greens. I like to use arugula because of its peppery bite, but baby spinach would work well too, or any other greens you may have on hand! Toss gently with the vinaigrette, then divide between your plates and top with shredded chicken, Gorgonzola cheese, dried cranberries, chopped nuts and the roasted acorn squash! Serve with some crusty white bread!
 .
For another great fall salad, try THIS Fall Quinoa Salad!
Happy Cooking, Everyone!
I will be linking to THESE wonderful blogs!

Roasted Butternut Squash Soup

Posted on September 8, 2014
Hello Everyone! I hope you all had a good weekend! I have another fall recipe to share with you today. For those nights when the weather gets chillier (and it’s actually starting to feel a little cooler in the evenings now!) this is the perfect cozy and satisfying dinner that’ll instantly warm you up! The soup is wonderfully creamy and smooth and has so much flavor thanks to the butternut squash being roasted. Besides it being really delicious, what I love about this soup is the bright orange color, because it just screams fall! Serve this with a big piece of fresh crusty white bread, and you have a great fall dinner ready in under an hour!
 .
ROASTED BUTTERNUT SQUASH SOUP
 .
YOU WILL NEED
Roasted butternut squash (mine was about 2.5 lbs)
2 tbs olive oil
1 small onion, diced
1 tbs unsalted butter
2 – 3 cups low sodium or homemade chicken stock
Salt & Pepper
Optional: 1 – 2 tbs half & half or heavy cream
 .
DIRECTIONS
1. First, roast the butternut squash. Peel it, slice it in half lengthwise, scoop out the seeds, then cut it into 1 inch cubes. In a large bowl, toss it with 2 tbs of olive oil and season it well with salt and pepper. Spread the butternut squash cubes evenly on a large baking sheet, and bake at 400 deg F for about 30 – 35 minutes, or until soft, then let cool. (You could of course just cook the butternut squash instead of baking it, but I love how much more flavorful it gets when you roast it!)
 .
2. In a small pan, saute the diced onion in the butter over low heat, until translucent, then set aside and let it cool. In a medium sized cooking pot, warm up the chicken stock. Place the cooled roasted butternut squash and sauteed onion in your blender, add about a cup or so of the chicken stock (make sure the chicken stock isn’t piping hot) and puree until smooth, or until it has your desired consistency and texture.
 .
3. Then, add the butternut squash mixture back into the pot with the rest of the chicken stock and let it cook for about 10 minutes (I used about 2 1/2 cups of chicken stock for the recipe, but it depends on how thick/thin you want your soup!) Make sure you taste it and adjust the seasoning to your taste! If you want to make the soup a little extra thick and silky, add in a little bit of half & half or heavy cream! Serve hot with some crusty bread!
 .
For another great butternut squash recipe, try THIS Fall Quinoa Salad (picture on left) with roasted butternut squash, fresh spinach, dried cranberries and chopped walnuts! And to serve alongside this butternut squash soup, try THIS NY Times No-Knead Bread (picture on right)!
 .
Happy Cooking, Everyone!
I will be linking to THESE wonderful blogs!

Fall is in the air…

Posted on September 7, 2014
Hi Everyone! It may not officially be fall yet, but it’s September and that’s good enough for me! As soon as August ends, fall begins to sneak its way into our kitchen and our home, and I thought I’d show you some glimpses of it today! This is my favorite season weather-wise, cooking-wise, baking-wise, fashion-wise and decorating-wise… so in other words, I love fall! I love the cozy flavors, warm colors, spiced scents and soft textures that it brings with it, and here are just a couple pictures of the beginnings of fall around here!
.
The first fall essential? Cozy blankets, and lots of them! I’m sort of a blanket hoarder, I feel like every time we travel to a new country, I bring back home a new blanket! The blanket on the top (in the picture on the left) is from our trip to Scotland this summer (which you can read about HERE). But that’s not the only thing we’re all wanting for the oncoming fall season. Another fall essential? Smellies of course! There’s nothing better than the smells of wood smoke and homemade chutney and crispy leaves and…. some lovely home scents for indoor enjoyment too. We need new aroma oils and scented candles, we need to stock up! However I have had a little peruse around the shops and found this Cinnamon Chai Wood Wick candle is my new favorite, it’s like fall in a jar!
.
I love having fresh cut flowers around the house, and I fell in love with this fall-themed petite flower bouquet as soon as I saw it! And on the right, more candles; because you can never have enough.
.
Textured picture frames and the coolest antler-like wooden candle sticks.
.
A stack of our favorite magazines on the coffee table. And a hot cup of tea – maybe my favorite thing of all!
.
Fall also means cozier, heartier dinners, which I am totally ok with! As well as full cookie jars. Which I am also ok with! (A current favorite? THESE Caramel Stuffed Chocolate Chip Cookies!)
.
Cozy pillows and blankets.
.
As summer’s last days are passing by, I’m looking forward to the next season and all that it will bring with it! The crisp air, the colorful leaves, the pie baking and hopefully many new happy memories! I hope you all have a great week and enjoy the coming new season!

Fall Quinoa Salad

Posted on September 5, 2014
Hey Everyone! So this is my new favorite salad. And I hope it will be your new favorite salad too! I love all the comfort food that fall brings with it, but sometimes it’s nice to lighten things up a little bit, and this salad is the best of both worlds… delicious fall flavor, just a little lighter and healthier! I love good salads that don’t leave me feeling hungry and that are filled with fresh ingredients and different flavors and textures. This one is filled with fresh spinach, tangy dried cranberries, crunchy nuts, deliciously sweet roasted butternut squash and hearty quinoa… the perfect fall salad!
.
FALL QUINOA SALAD
/
YOU WILL NEED
SALAD
Fresh spinach leaves
Cooked quinoa
Roasted butternut squash
Chopped walnuts or pecans
Dried Cranberries
Optional: Shredded chicken breast
Olive oil
Salt & Pepper
VINAIGRETTE
2 tbs olive oil
2 tbs balsamic vinegar
Honey
Salt & Pepper
.
 .
DIRECTIONS
 1. First, prepare your butternut squash (I used a pretty small one). Peel and halve it lengthwise, then scoop out all the seeds and cut it into about 1 inch pieces. In a large bowl, toss it with about a teaspoon or so of olive oil and season it well with salt and pepper. Then, spread it out in a single layer on a baking sheet, and bake at 400 deg F for about 30 – 35 minutes, or until it’s nice and soft.
 .
2. In the meantime, prepare the rest of your salad. Cook your quinoa according to the directions on the package (I use about 1/2 cup of cooked quinoa per salad portion), it should take about 15 minutes or so to cook, so you can get it done while the butternut squash is roasting. I like to use room temperature quinoa for the salad so I let it cool once it’s cooked. (If you are not a quinoa fan, you could definitely substitute couscous here!)
 .
3. To make your vinaigrette, whisk together equal parts of olive oil and balsamic vinegar, and season well with salt and pepper, then taste to make sure it suits your taste! I like to add a little bit of honey for a little extra sweetness and thickness, which works so well with the sweet roasted butternut squash!
 .
4. Now all you need to do is assemble your salad! So add the spinach leaves, quinoa, dried cranberries, chopped nuts and the warm roasted butternut squash and drizzle it all with your vinaigrette! And if you want to make your salad extra hearty, add in some shredded chicken.
For more quinoa recipes, check these out:
Left: Quinoa Breakfast Bowl (Recipe HERE), Middle: Cheesy Quinoa and Broccoli Patties (Recipe HERE), Right: Fresh Corn and Kale Quinoa Patties (Recipe HERE)
 .
Happy Cooking, Everyone!
I will be linking to THESE wonderful blogs!

A Trip to St. Michaels, Maryland

Posted on August 30, 2014
Hello Everyone! Happy Weekend! I cannot believe that this is the last weekend in August, this summer has flown by so quickly! I hope you all have a great weekend and manage to soak up all the remaining summer fun! I wanted to stop by today and share some pictures of a recent day trip we took to a quaint little historical town in Maryland, called St. Michaels. We have loved exploring this area since we moved to Maryland almost two years ago and this is one of the cutest places around! This 17th century town on the Chesapeake Bay is filled with lots of little shops, seafood restaurants, ice-cream parlors, bed & breakfasts and shops, and is definitely worth a visit if you’re ever in the area!
.
It was a beautiful sunny day so we decided to walk around the marina first. It was pretty busy with people sailing in and out, some stopping for lunch at a popular seafood restaurant, The Crab Claw!
.
The Crab Claw (you can check it out HERE!) sits right on the Chesapeake Bay, has seating both inside and outside and specializes in crabs! This is one of my favorite things about Maryland; all the amazing fresh seafood. If you are a seafood lover, you definitely want to come to Maryland at some point! We have friends nearby in Virginia who say that their seafood is the best (getting seafood has actually been named on of the top things to do in Chincoteague), so we might have to go visit and see what they have to offer… it’s going to take a LOT to beat our Maryland seafood though.
.
We’ve had lots of crab cakes and crab cake sandwiches since we’ve lived in Maryland, and these were really good! Super fresh and light, and so delicious!
.
What’s better than sitting outside on a beautiful day, eating delicious seafood, with your favorite person in the whole world?! The customer experience doesn’t get much better than that, and I should know after reading everything there is to know about customer experience here at https://www.qualtrics.com/experience-management/customer/customer-experience-measurement-metrics/!!!
.
.
I loved all the sweet little street signs all around the town. The main street in St. Michaels is called Talbot Street, and it’s lined with lots of nice shops specializing in all the things Maryland is known for, little antique shops, restaurants and cafes, ice-cream parlors, bed & breakfasts and inns, and old churches.
.
Here are some pictures of the main street, Talbot Street (named after Talbot County which is the county where St. Michaels is). All the buildings were decorated with beautiful plants and flowers, flags and images of crabs, of course!
More historical buildings on Talbot Street.
.
I loved this sign at a Bed & Breakfast called The Snuggery (which is actually the oldest residence in St. Michaels) on one of the side streets! It’s a little difficult to see in this picture, but it’s a man tipping his hat to a lady. It was so cute! I loved all the little details like this that many of the homes and buildings had, there was something to look at on every corner, and it made walking around the town so fun!
.
.
We stopped by an antique shop (picture on the left) that had so many old treasures (and we may have brought one back with us!) and also a Christmas shop (because I can’t ever pass by a Christmas shop without going in!) where I saw all these Downton Abbey Christmas ornaments! (Picture on the right) They had ornaments of Highclare Castle, the cars that were driven in the later episodes of Downton, and even an ornament that looked like the bells in the servants’ hall! A dream come true for any Downton fan!
.
.
I loved these two white rocking chairs at this Bed & Breakfast! I can just imagine sitting in one of them early in the morning, sipping my English Breakfast Tea out of my favorite teacup and watching the world wake up! Sounds perfect to me. I hope you enjoyed walking through this sweet little place with me, and if you’re ever in Maryland and are looking for a nice place to visit and eat some delicious crab cakes, make sure you visit St. Michaels! You can find more information about the town and the area HERE. I hope you all enjoy your weekend, and come back soon for some fall inspired recipes and projects! Thanks for stopping by today!

How to remove wax from jars

Posted on August 26, 2014
Hello Everyone! I have a super quick and easy craft tip for you today… for how to easily remove wax from a glass jar! I usually use some of those modern wax burners instead these days as they don’t make as much mess. However, if you love scented candles like I do and have lots of used up ones sitting in the back of one of your kitchen cabinets (like I do!) waiting to be repurposed for something one day, then this is for you! With three simple steps, you can easily remove the wax and re-use the jars for storage or making new candles! Here’s how to do it…
.
You can remove the wax in three easy steps! First, place the jar in the freezer for a couple hours or overnight, because this will make removing the wax much easier! Next, using a sharp knife, cut the wax into a couple big pieces, making sure you cut all the way down to the bottom of the jar. As soon as you make one or two cuts, the pieces will become loose, and the wax will start coming out itself! Take all the pieces of wax out, then wash the jar with a sponge and some soapy hot water just to make sure you got all the wax out!
.
Happy Crafting, Everyone!
I will be linking to THESE wonderful blogs!

The Perfect Crepes

Posted on August 24, 2014
Hi Everyone! When it comes to crepes, I have never had much success; they were either super thick and drenched in oil, or thin, ripped up and burned. My mom on the other hand, is a pro at making crepes! Her crepes always turn out perfectly and she always has two or three pans of them going at the same time, unlike me who struggles to keep one going! With a couple tips and a good recipe though, my crepe making skills have improved, and I have a great recipe to share with you today! I absolutely love crepes, both sweet and savory, and this recipe works for both. I love sweet crepes with Nutella and bananas or with some berry sauce and whipped cream, or savory ones with a creamy mushroom or spinach filling just to name a couple… and I’m getting pretty hungry just writing this!
.
THE PERFECT CREPES
.
YOU WILL NEED
2 cups and 2 tbs milk (A little over 16 fl oz)
3 eggs
2 cups all-purpose flour
1 – 2 tbs granulated sugar
Pinch of salt
Optional: 1 tsp pure vanilla extract
Oil for cooking crepes
 .
 .
DIRECTIONS
Whisk all the ingredients together in a large bowl. Make sure there are no lumps, and that the batter is nice and smooth! Then, let it sit and rest for about 20 minutes. Once the batter has had time to rest, add a little bit of oil to your pan and cook the crepes one by one (I use about a ladle-full of batter for each crepe), swirling the batter around the pan then letting it cook for a couple of minutes, until you start seeing bubbles on the surface and the edges begin peeling off a little bit. Then, very carefully flip the crepe over and cook on the other side for just a minute or two, until it has cooked through. Follow the same process for each crepe.
 .
Happy Baking, Everyone!
I will be linking to THESE wonderful blogs!
*I previously shared this recipe on Or So She Says, where I am a monthly contributor, make sure you go and check out the site, you’ll find lots of great recipes, projects & ideas!

Caramel Stuffed Chocolate Chip Cookies

Posted on August 19, 2014
Hi Everybody! After a busy summer filled with lots of travel, fun adventures and not much time spent at home, it feels like life is getting back to normal again… I’m not sure whether I’m happy about that or not, but I’m excited for this fall; for the cool weather, our annual trip to the pumpkin farm in Pennsylvania, walks through the colorful countryside, drinking apple cider and baking pumpkin rolls and apple pies! Speaking of baking, I only recently found out after a friend of mine mentioned that there are bakery courses if you want to run their own patisserie. That has been one of my dreams for a while, so this is something that I will need to take some time to look into. Imagine having your own bakery though and it being a success! One day. But before all of that, I have a cookie recipe to share with you today! I can never resist a good chocolate chip cookie, and add some gooey melted caramel in the middle of that cookie and you have cookie perfection! The last time I made these cookies was on one of those days when literally everything that could go wrong in the kitchen did. I made a batch of cookie dough and when I baked off the cookies they didn’t look right… I forgot to add in the baking soda! I was pretty annoyed, but decided to make a new batch, making sure I didn’t forget a single ingredient this time! The only problem…. when I went to get the baking soda out of my pantry, there was none left! I had pretty much had it with the cookie dough at that point. So one angry trip to the store and a fresh new box of baking soda later, the cookie jar was filled with these chewy caramel filled cookies and all was well with the world again (or at least in my kitchen it was)!
.
CARAMEL STUFFED CHOCOLATE CHIP COOKIES
YOU WILL NEED

Your favorite chocolate chip cookie recipe!
Chocolate covered soft caramel candies (like Rolos)
Or soft caramels cut in half for each cookie
Optional: coarse salt to sprinkle on top to make these salted caramel chocolate chip cookies!
.

.
DIRECTIONS

To make these, simply make your cookie dough as you would normally (leave the baking temperature & time the same as well), and let it chill in the fridge for about 20 – 30 minutes. Once the dough is chilled, preheat your oven (I bake mine at 375 deg F) and line your baking sheets with parchment paper. Place a chocolate covered caramel (or a soft caramel cut in half) in the middle of each cookie, make sure it’s completely sealed with cookie dough all around and form a ball shape. Place your cookies on your baking sheets, at least 2 inches apart, then bake according to your cookie recipe directions! Let the baked cookies sit on the baking sheets for at least 5 minutes after they come out of the oven so all the caramel doesn’t ooze out! They are best eaten slightly warm when the caramel is all melted!
.

.
I hope you love these cookies too!!! And for a quick trick to have fresh baked cookies anytime you want them? Check out THIS post about how to freeze cookie dough balls and have fresh cookies in 10 minutes whenever you want them!!!
.
Happy Baking, Everyone!
I will be linking to THESE wonderful blogs!
Back to top