Search results for

Bread

Banana Oatmeal Bread

Posted on March 14, 2014
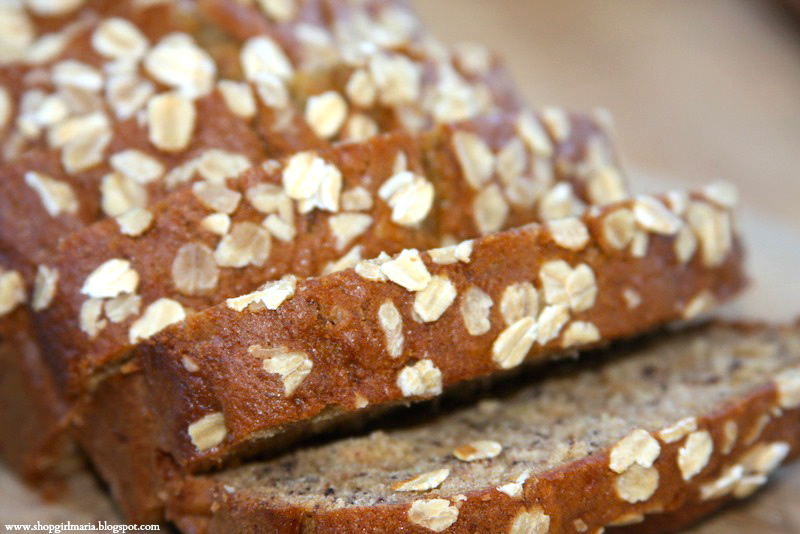
Good Morning, Everyone! I hope you’ve been having a good week, and if not… the weekend is almost here! But before it starts, I have a recipe to share with you! I LOVE banana bread, and have tried lots of different recipes, some of which I’ve shared with you here (like THIS Chocolate Chip Banana Bread with Greek Yogurt that’s still my favorite, or THIS Chocolate Banana Bread)! Here is another recipe to add to the banana bread recipe collection – Banana Oatmeal Bread! It’s super moist, not overly sweet, and makes for a great snack or breakfast!
 .
OATMEAL BANANA BREAD
*Makes 1 loaf*
.
YOU WILL NEED
1 1/2 cups all-purpose flour
1 tsp baking soda
1/4 cup plus 2 tbs rolled oats
3/4 cup granulated sugar
1/2 tsp salt
1/2 tsp ground cinnamon
1 tsp pure vanilla extract
1/2 cup vegetable oil
1/2 cup Greek yogurt (or regular plain yogurt)
2 eggs
2 very ripe bananas (about 1 cup), mashed
Optional: chocolate chips, chopped nuts
 .
 .
DIRECTIONS
1. First, preheat your oven to 350 deg F and line a loaf pan with parchment paper (or grease your loaf pan). In a large bowl, whisk together the oil, eggs, sugar and vanilla extract, until you have a smooth, yellow mixture. (Add more sugar if you prefer a sweeter taste, I usually try to use less sugar, and if the bananas are super ripe, they will naturally add a lot of sweetness!)
 .
2. Next, sift in the flour, baking soda, salt and ground cinnamon. Stir well until all the ingredients are well combined. In a small bowl, combine the mashed bananas and yogurt, then add in 1/4 cup of oats and mix the batter well.
 .
3. Pour the batter into your prepared loaf pan, and sprinkle with the remaining 2 tbs of rolled oats. Bake for about an hour, or until an inserted toothpick comes out clean, and let cool in the pan before slicing. (*Note: if the bread is getting too brown while it’s baking, cover it with some foil to prevent it from burning.)
.
For other banana bread recipes, try THIS Chocolate Chip Banana Bread with Greek Yogurt, or THIS Chocolate Banana Bread!
 
Happy Baking, Everyone!
I will be linking to THESE wonderful blogs!

The NY Times No-Knead Bread

Posted on February 2, 2014
Hi Everybody! I have been looking for the perfect bread recipe over the past couple of months, trying out different versions and baking techniques to find the best one. There have been several disasters along the way, as well as some successes (one of my favorites being THIS Easy Homemade Artisan Bread), with this bread being one of my favorites so far. I had heard a lot about THIS New York Times recipe and wanted to try it out, and here are the results! This recipe does take a little bit of patience to make, since the preparation, rising and baking time can add up to almost 24 hour, but it is actually extremely simple to make, and the dough does most of the work on its own! I loved the texture and consistency of this bread, and loved how beautifully golden brown the crust turned in the oven. Here’s how the bread is made and some of my notes on the recipe…
,
THE NY TIMES NO-KNEAD BREAD
(Recipe from The NY Times)
*Makes 1 loaf*
 .
YOU WILL NEED
3 cups all-purpose flour
1/4 tsp instant dry yeast
1 1/4 tsp salt
1 5/8 cup water
Cornmeal and extra flour for dusting
 ,
.
DIRECTIONS
 /
1. Combine the all-purpose flour, yeast and salt in a large bowl (*Note: I would increase the salt amount a little bit next time, so if you prefer a saltier bread, add a little more. Also, the small amount of yeast worked great and the bread rose well, but if you like a stronger yeast taste in your bread, I would add a little more). Add in all the water (I think I would reduce the amount to 1 1/2 cups next time), and stir with a wooden spoon until a super sticky dough begins to form. Then, cover the bowl with some plastic wrap (I also placed a cloth kitchen towel over the plastic wrap) and let it sit in a warm spot (I placed mine in the microwave – I didn’t turn the microwave on, obviously!) for 12 – 20 hours! (I let mine sit for about 12 hours, I prepared the dough mixture in the evening so it would be ready to work with the following morning).
 .
2. Check on the dough once the 12 hours or however many hours you are letting it sit are up, and you should be seeing lots of bubbles on its surface. Take the (very sticky at this point!) dough out of the bowl and place it on a floured surface and gently try to shape it a little bit, and sprinkle more flour over it. Then, place the piece of plastic wrap over it again and let it rest for 15 minutes.
 .
3. Next, form the dough into a ball (you can use more flour if you need to) and place it on a floured cloth kitchen towel (make sure it’s seam down), then sprinkle the bread with more flour and cover it with another towel, and let it sit and rise for about 2 hours, until it has doubled in size.
 .
4. Preheat your oven to 450 deg F, and place a Dutch oven or covered casserole dish inside it as it heats up (I used a covered casserole dish, make sure it’s at least a 3 quart dish). Once the oven is ready, remove the dish from the oven, and carefully place your dough ball inside it and cover it with the lid. Bake for about 30 minutes covered, then take the lid off and bake for another 15 – 30 minutes, until golden brown on top! Let the bread rest and cool before slicing. (*Note: the original recipe said you could use cornmeal for dusting, but I found that flour worked fine.)
.
Happy Baking, Everyone!

Homemade French Bread

Posted on January 3, 2014
Hi Everybody! I hope your new year has been off to a good start! After all the holiday cooking, baking and eating these past couple of weeks, I am so ready for some simple and clean food this month. I always feel like January is when winter gets really dark and cold, and by February it feels like it has lasted forever. The other night, I wanted to make a quick, light but still comforting soup, so I made THIS Potato Leek soup (which was delicious!) and I baked this French bread to go along with it. The original recipe is for baguettes, but these loaves definitely have more of a French bread texture, they don’t have a hard crust, but are so incredibly soft and fluffy on the inside (they were still very soft the following day too)! I turned one of the loaves into croutons (just cube the loaf, dry out the cubed bread in the oven on low heat for ten minutes, then finish them off on the stove in a buttered pan until they are golden brown) to serve with the soup, and they turned out great!
.
HOMEMADE FRENCH BREAD
(Recipe from The Cooking Channel)
*Makes 2 Loaves*
 .
YOU WILL NEED
1/2 cup warm water
2 tbs honey
2 packages instant dry yeast
3 1/2 – 4 cups all-purpose flour
2 tsp salt
Additional 1/2 cup – 1 cup warm water
Cornmeal for dusting
 .
DIRECTIONS
 .
1. In a small bowl, combine 1/2 cup of warm water, the honey and all the yeast and quickly stir to get the honey mixed in, then cover the bowl and let it stand for about 5 minutes, until the mixture is frothy.

.

2. Next, in your electric mixer bowl, combine about 3 1/2 cups of flour with all the salt. Pour in the yeast mixture and mix using the dough hook attachment on your mixer. Measure out 1 cup of warm water and begin pouring some in with the mixer running. Add enough water for a soft dough to form (I added just under 3/4 cup). If the dough is too sticky, just add in some more flour. Knead in your mixer for 6 minutes. Then, form the dough into a ball, place it in a greased bowl, cover it and let it rise in a warm place (I always let mine rise in the microwave, not with the microwave on, obviously!) for 30 minutes.

.

3. Once the 30 minutes have passed, take out the dough, punch it down, divide it in two and shape each half into one loaf. Do this by shaping the half into a rectangle, then folding all edges into the center and pinching down the seams. Repeat this several times, stretching the rectangle out a little every time, until the loaf is about 12 – 14 inches long and 2 inches wide. Place the loaves on a sheet pan that you have dusted with cornmeal. Make diagonal cuts on top of the loaves, then cover them with a dishtowel and let them rise for another half hour.

.

4. Preheat your oven to 450 deg F and prepare a baking dish with some water (you will need to add a couple of ice cubes to it once it’s time to bake the bread). Adjust the baking racks in your oven, place one in the middle, and one on the bottom (the one in the middle is for the bread, the one on the bottom is for the dish with water). Once the loaves have risen for the half hour, place them in the oven, add a couple of ice cubes to the water in the dish and place the dish on the bottom rack of the oven. Bake for about 15 minutes, until the bread is golden brown. (*Note: watch the bread very closely as it bakes, especially after 10 minutes of baking, and take it out whenever it starts getting golden brown and  sounds hollow when you knock on it. Baking time may also depend on your oven (my gas oven burns everything very quickly) and on your baking sheet – I’m going to try a pizza stone next time!) Let the bread cool and sit for about 20 minutes before slicing.

 .
Happy Baking, Everyone!

Sparkly Gingerbread Snowflake Cookies

Posted on December 9, 2013
Hi Everybody! Happy Monday! It’s another cold day here, and I have another gingerbread cookie idea to share with you! And since we got out first snow of the year yesterday, these Sparkly Gingerbread Snowflake Cookies are the perfect Christmas treat to show you today! Since it seems like every time it’s supposed to snow here in Maryland it never actually does, so I was super excited when it started snowing as I was driving to church yesterday morning! It was so pretty as the flurries were flying around, covering the trees and roofs in a thin layer of soft, sparkly snow! And what was even better – taking a nap by the Christmas tree as the snow continued to come down that afternoon! There is something so peaceful and serene about snow.
.
.
To make these cookies, you will need either a large snowflake or star cookie cutter. Using your favorite gingerbread cookie dough, cut out and bake off all your snowflakes, and let them cool completely. Once they have cooled, create the snowflake shape on your cookies using royal icing (you will need to work pretty quickly because it dries pretty fast!), then immediately sprinkling them with some sparkling sugar. Let all the sugar sit on the cookies for a couple of seconds, then shake all the excess sugar off, and let the cookies dry completely! You could use colored royal icing instead of white, and whatever colors of sparkling sugar or sprinkles you like, too!
.
Happy Baking, Everyone!

Gingerbread House 2013

Posted on December 7, 2013
Hi Everybody! I hope you’re all having a good weekend so far! I can’t believe that Christmas is less than three weeks away now! The house is all decorated, the tree is up and there’s lots more cookie baking, shopping and gift wrapping to be done over the next couple of weeks! And with the weather forecast calling for snow, I’m hoping to wake up to a Christmassy winter wonderland tomorrow morning! I wanted to stop by and show you my gingerbread house today! Last year was the first time I ever made one, and it was a little bit of a disaster with too much frosting and candy, and a slightly unstable house structure! So this year I decided to go for a more simple look, and make a little gingerbread cottage covered in snow and surrounded by some greenery. Here’s how I made it…
.
 .
.
I first came up with what I wanted my gingerbread house to look like. Once I did that, I made my templates (you can also find some online if you don’t want to make your own) out of some card stock. I needed a total of eleven pieces for my gingerbread house (a front and back wall, two side walls, two pieces for the roof and five pieces for the attic window. I rolled out my gingerbread dough and laid all the templates on and cut the different pieces I needed. I then baked them and let them cool completely before decorating. You are going to want to make your icing pretty thick so that it’s sticky and holds the structure together well. I started out with decorating all the different pieces with my icing (if you’re not planning on eating the gingerbread house, you can use a white pencil to draw on the different pieces to make the decorating easier) and letting them dry completely. Then, once they had dried, I put the whole house together (either use the icing to do this, or use hot glue if you’re not going to be eating the house!) At the end, I added more icing on top of the roof and let some drip off the edge of the roof to make it look like the roof was covered in snow!) Once the house was completely dry, I transferred it to a white plate and added some greenery, and now it sits in my kitchen, making it smell deliciously Christmassy!
.
.
 .
For another fun gingerbread Christmas idea, check out my Gingerbread Cookie Tree HERE!
Happy Baking, Everyone!

Gingerbread Cookie Tree

Posted on December 6, 2013
Hi Everyone! I hope you’ve all been having a great December so far! It’s a little strange to be sitting in my living room with all the windows wide open because it’s so warm outside, and it’s the beginning of December! But the crazy weather is supposed to catch up with the season this weekend and it’s supposed to (hopefully) snow! I wanted to show you all this fun Christmas baking idea today. A couple of days ago, I got a package from my mom who knows how much I love to bake, so she sent me lots of different cookie cutters and baking tools, one of them being a set of stacking gingerbread cookie cutters to make a gingerbread tree, that I couldn’t wait to use! These little trees make for really cute little decorations around your kitchen, they smell like Christmas and they are so fun to decorate!
 .
 ,
To make these, you will need a set of stacking star cookie cutters. Since I was making these for a party and baked over 300 pieces I used a store-bought gingerbread cookie mix to save time, but you can use your favorite gingerbread recipe to make these! For the icing, I made a classic royal icing and kept it pretty thick so that it would act as glue and hold the different pieces together, and then sprinkled it with some white sparking sugar to make it look like shimmery snow. I also inserted a toothpick behind the star on top just to make sure it wouldn’t fall. Make sure that you let the tree dry completely before moving it.
.
Happy Baking, Everyone!

Simple Iced Gingerbread Man Cookies

Posted on December 1, 2013
Hi Everybody! Happy December and happy first Sunday of Advent! It is terribly cold here and it feels like winter has arrived, now all we need is some snow! I’m so excited to start decorating our home for Christmas; our tree is all set up and waiting to be decorated, the Christmas movies are out ready to be watched, and some Christmas treats have already been baked! Decorating the tree is one of my favorite things to do at Christmas time, and when my husband and I were first married I wanted to get the biggest, most beautiful (real) Christmas tree I could find for our first Christmas together. Being the (very) picky person that I am, we searched for hours in the cold to find the perfect tree and finally found The One, the biggest tree there, with the most perfectly spaced branches and the most wonderful piney Christmas smell. My Christmas mission was complete and it was all perfect, until the tree fell during the night because it was SO big, and half of my precious ornaments broke! Needless to say, we now have a fake tree, but it’s still just as beautiful, and a little safer! Baking Christmas cookies, especially gingerbread cookies, is another one of my favorite traditions, and I wanted to share my first ones of the year with you today! There will be lots more to come, so make sure to come back over the next couple of weeks!
.
SIMPLE ICED GINGERBREAD MAN COOKIES
 .
YOU WILL NEED
COOKIES
Use a homemade gingerbread cookie recipe or use a store bought mix.
ICING
1 cup confectioners’ sugar
2 – 3 tsp milk
2 – 3 tsp light corn syrup
Gel food coloring
 .
DIRECTIONS
First, make your cookies. Once they have cooled, make your icing. You may need to add more liquid to it, depending on your desired consistency of the icing. Once you have your icing, add your food coloring (I used the Wilton gel food colors, they work very well and you only need a little bit of them to get rich colored icing) to get a beige color (I don’t have an exact formula for this color, I usually just experiment and tweak the color until I get what I need). This will be your base color. Then, take out about a quarter of the icing, and use more food coloring to get it darker, this will be for the buttons. Next, using a plastic piping bag with your icing, outline your gingerbread man cookie with the beige icing, then “flood” the inside, and spread it around using a toothpick to help you smooth it out. Wait a couple of minutes for the icing to set, then use another piping bag with the darker icing to make the buttons. This recipe only makes a small amount of icing, so you may need to double it if you are making a big batch of cookies! (Note: You can also substitute more milk or use egg whites instead of the light corn syrup if you don’t want to use it, it just makes the icing more shiny.)
 .
For another Christmas cookie idea, check out my Snowy Tree Sugar Cookies HERE!
Happy Baking, Everyone!

Easy Homemade Artisan Bread

Posted on September 18, 2013
Hi Everyone! I hope you are all having a good week so far! My week unfortunately went from bad to worse when the cold I caught this weekend turned into a nasty sinus infection, forcing me to spend most of the week sitting on the couch coughing and sneezing. At this point I think I’m going to start buying some stock in Kleenex, Ricola cough drops and Twinings peppermint tea! I don’t know about you, but whenever I’m sick, all I want to eat is cozy comfort food. I’m convinced that a bowl of steaming hot chicken noodle soup or some freshly baked bread will go a long way in helping you get better! One of my friends, however, has decided to make some grim jokes about it. Though I appreciate her trying to be sensible with the final expense insurance she mentioned, I don’t think I’m at death’s door from this! Still, it is worth considering for the future. Right now though, I just want to be cozy. And so, I made this Easy Homemade Artisan Bread a couple of days ago, and couldn’t believe how good it was and how incredibly easy it was to make! The bread is so soft on the inside with a wonderful crust on the outside, and looks and tastes like it came from your favorite bakery! All you need to do is mix a couple of ingredients in the evening, let the dough sit overnight and bake it off in the morning, and you have a beautiful loaf of fresh bread perfect to eat with a hearty fall soup or a delicious salad. Or, and this is the best way to eat it, still warm with a (thick!) spread of butter!
.
EASY HOMEMADE ARTISAN BREAD
(Recipe from The Baker Chick)
*Makes 1 loaf*
.
YOU WILL NEED
3 cups all-purpose flour
1 tsp dry yeast
1 – 2 tsp salt
1 1/2 cups lukewarm water

.
.

DIRECTIONS

1. Using a wooden spoon, stir together the flour, salt and yeast in a large bowl (adjust the salt according to how salty you like your bread). Add the water and mix the ingredients until you have a very wet dough. Cover the bowl with plastic wrap and put a kitchen cloth over it and let it sit in a warm place for several hours (I let mine sit overnight, for 12 hours. The original recipe says to let it sit for 8 – 18 hours).
.
2. Once the dough is done rising, it should be very wet and bubbly. Turn it out onto a floured surface (it will be very wet and you will need quite a bit of flour) and shape it into a ball. Let it sit covered while you preheat your oven to 450 deg F. Prepare your Dutch oven by placing it in the oven while it is preheating, and cut out a circle out of parchment paper to line the bottom of the pot.
.
3. Once the oven is done preheating, place the parchment paper on the bottom of your pot and carefully place the dough ball in it. Bake covered for 30 minutes, then take the lid off and bake uncovered for about 15 – 20 minutes, or until the crust is golden brown. Let sit for at least 10 minutes before slicing.
.

Happy Baking, Everyone!

Croissant Bread Pudding

Posted on September 13, 2013
Hi Everyone! I just wanted to stop by and wish you all a great weekend and share this bread pudding recipe with you! This isn’t just plain old bread pudding though, it’s a Croissant Bread Pudding that’s out of this world delicious! Ever since I had some really good bread pudding in Alexandria, I’ve been wanting to make some at home, but using croissants. This is by no means a low-calorie dessert, in fact it is filled with buttery croissants that have baking in a mixture of cream, eggs and sugar. But every spoonful is so worth it. This cozy indulgent sweet treat is perfect for a chilly fall night, it’ll warm you up instantly!
.
CROISSANT BREAD PUDDING
(Adapted from Martha Stewart)
*Serves 6*
 .
YOU WILL NEED
4 – 5 croissants
1 1/2 cups milk
1/2 cup half-and-half
1/2 cup granulated sugar
2 eggs
1/4 tsp salt
1/2 tsp pure vanilla extract
Optional: golden raisins
 .
.
DIRECTIONS
In a large bowl, whisk together the eggs, milk, half-and-half, sugar, salt and vanilla extract. Butter your baking dish (I used a 9-inch pie dish) and tear the croissants into big pieces and place them into your baking dish. Pour the egg mixture over them, then using your hand press them down a little bit for every piece to absorb the liquid. Let sit for 5 minutes and preheat your oven to 300 deg F. Cover the baking dish with foil and bake covered for about 30 minutes, then for another 20 – 30 minutes, or until the croissants have absorbed all the liquid and the top is golden brown and an inserted toothpick comes out clean (it may take longer depending on how deep your baking dish is, so make sure you keep checking it!)
 .
Happy Baking, Everyone!

Chocolate Banana Bread

Posted on August 27, 2013
Hi Everyone! I have a great little recipe to share with you today… for some Chocolate Banana Bread! I feel like every time I buy a big bunch of bananas they somehow manage to turn brown before we get to eat them all… and so they usually turn into banana bread! I usually make THIS Chocolate Chip Banana Bread with Greek Yogurt, but this time I wanted to make something a little more chocolaty so I added some melted chocolate and cocoa powder and voila! This bread is just delicious, it’s soft and moist thanks to the yogurt, and wonderfully sweet from the bananas and chocolate. You could add in some chopped walnuts or pecans, and even throw in some extra chocolate chips into the batter to make it even more chocolaty! This bread couldn’t be simpler to make or more delicious!
 .
CHOCOLATE BANANA BREAD
*Makes 1 loaf*
 .
YOU WILL NEED
1 1/2 cups all-purpose flour
1 tps baking soda
3/4 cup granulated sugar
1/2 tsp salt
2 tbs unsweetened cocoa powder
1/2 cup vegetable oil
1/2 cup plain yogurt (either Greek or regular)
1 tsp pure vanilla extract
2 eggs
2 ripe bananas, mashed
4 oz semi-sweet chocolate chips
 .
DIRECTIONS
 .
1. Begin by melting your chocolate first (either over a pot of simmering water or in the microwave). Once the chocolate has melted, set it aside and let it cool a little bit. Next, in your electric mixer bowl, combine all your wet ingredients and the mashed bananas and mix until you have a smooth mixture.
 .
2. In another bowl, sift together the dry ingredients (flour, baking soda, salt and cocoa powder). Add the dry ingredients into the wet in three portions and mix well. Then, with the mixer running on low, add in a big spoonful of the melted chocolate and mix well (make sure the chocolate isn’t super hot anymore), then add in the rest and mix well.
 .
3. Preheat your oven to 375 deg F and grease a standard size loaf pan, then bake for about 45 – 50 minutes, or until a toothpick comes out clean. Let cool for a couple of minutes before slicing.
 /
For another delicious Banana Bread recipe, try my Chocolate Chip Banana Bread with Greek Yogurt! You can find the recipe HERE.
Happy Baking, Everyone!
Back to top